Tag: Clock Tower

  • Crane Daze, Part 2: East Derry Lift

    Crane Daze, Part 2: East Derry Lift

    Arron Orients the Crew
    Arron Orients the Crew

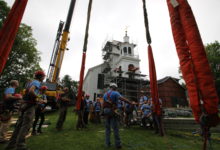
    If crane days were measured by weight, last Thursday’s crane day would be our biggest to date. East Derry’s belfry, bell and double lantern weighed 43,400 pounds, not including the rigging. The crane day might also be the biggest in terms of scope. Since 2013, we’ve lifted and moved the church onto a new foundation, rebuilt the undercarriage, replaced two tower posts, 60′ in length, and disassembled, reproduced and rebuilt the belfry and lanterns. This crane day was the culmination of more than five years of nearly continuous site-work following more than two years of fundraising, assessment and preparation. Brian, Dave, Tom and Dan have persevered through a lot of guano. Paul Lindemann and the rest of the building committee stuck with the project after the scope and cost ballooned past our earliest expectations. From the start, they’ve stayed rooted in the history of Nutfield, the colonial settlement that built the church. On Thursday, the entire crew was there, along with a few news crews, the building committee and good crowd of East Derry residents.

    Scott Tightens the Rigging Clamps
    Scott Tightens the Rigging Clamps

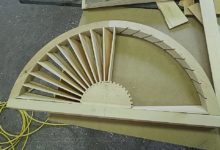
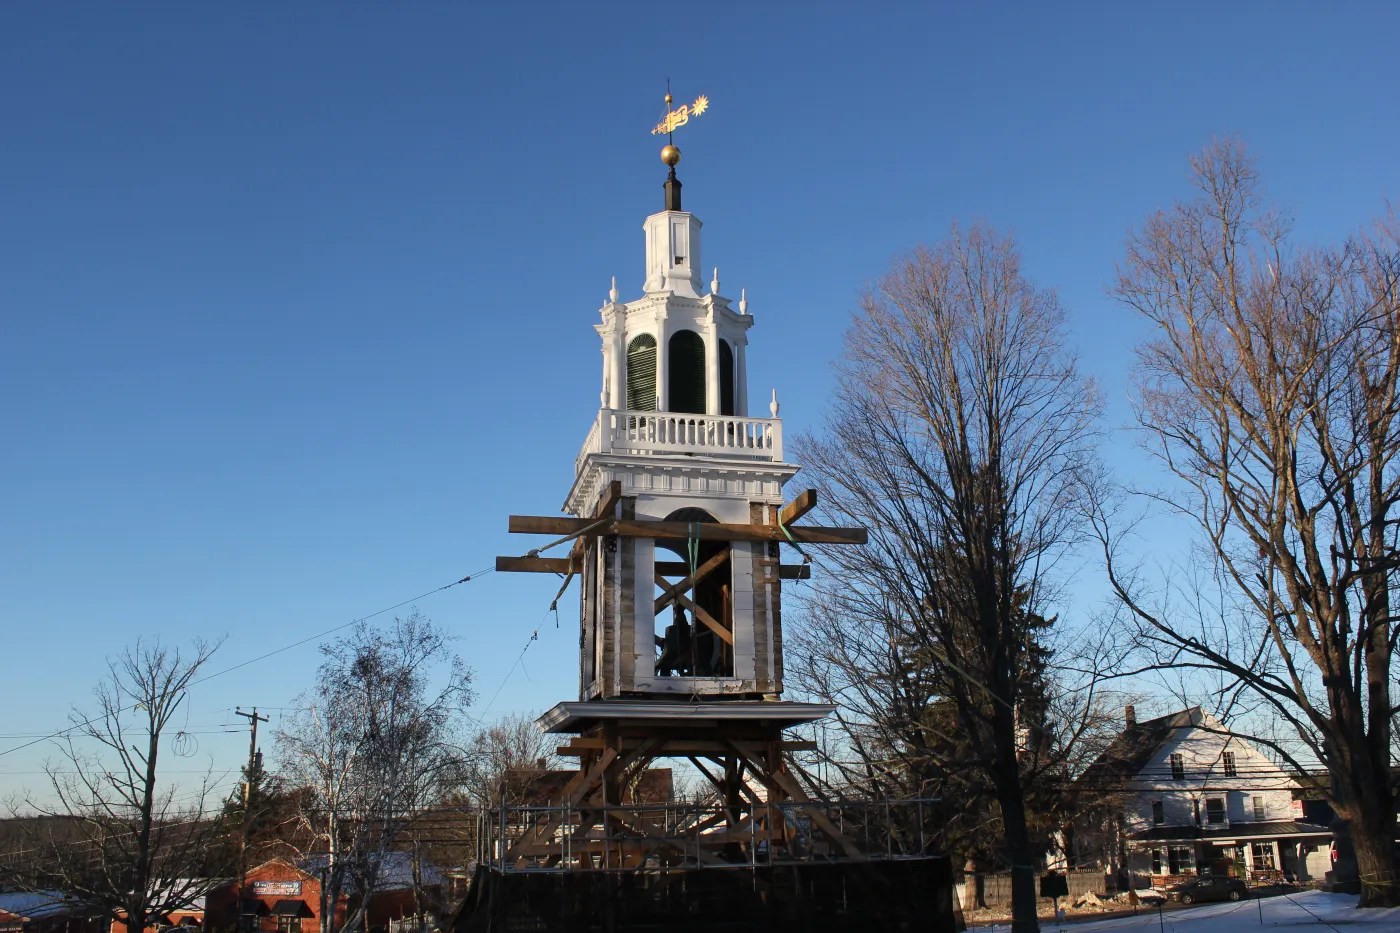
    On Wednesday afternoon, the crane and crew installed the rigging steel. Four steel I-beams were inserted in a grid beneath a ring of ledgers bolted to the belfry posts. The belfry posts extend deep into the tower, 12′ below the tower plates. They emerge 15′ above the tower plate. Stationed on the ground, the belfry, lower lantern, upper lantern and mast are almost as tall as the base tower, rising to just 6′ shy of the tower plates.

    Rigging a tower this tall is a challenge. We want the straps to be long enough so they won’t bind on the tower, but they can’t be so long that we run out of cable on the crane. Our first arrangement of rigging straps was doubly wrong: the straps bound on the belfry baluster and were too long overall; the crane operator couldn’t retract the cable enough to get the stretch out of the rigging. Fortunately, by reversing the upper and lower straps, we were able to clear the balustrade and stay short of the crane’s reach.

    Belfry Roof, Urns, Fans, Columns, and Balustrade
    Belfry Roof, Urns, Fans, Columns, and Balustrade

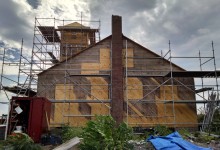
    After the crane took a little weight, we dismantled the front wall of staging and swung the belfry away from the church and the rear staging. The belfry had been built tight to the tower, and the staging had been built tight to the belfry in order to hang the trim and apply copper to the bell deck and lanterns. Brian and Dave planned the restoration so that nearly all the finish work could be done “on the ground” before the belfry and lanterns were lifted into place. It’s a lot easier to fit elaborate trim 20′ – 40′ above the ground rather than 60′- 80′. We needed to break down the staging and swing away from the tower so that the belfry would clear the building on its way up.

    Belfry in Flight
    Belfry in Flight

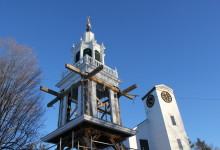
    The lift from the ground to the belfry was slow and steady. Half the crew climbed the staging to the tower plates, and the other half climbed the stairs to the belfry bed timbers, 12′ below. Once the post feet were inserted past the plates, the bed timber crew made minor adjustments to the mortises and pried the post feet a quarter of an inch this way and that. When the post tenons were seated in the bed timbers, the overhangs at the bell deck just kissed the belfry plates.

    Belfry in Place
    Belfry in Place

    There’s still more to do. The cornice trim needs to be hung at the top of the tower, at the edge of the bell deck, and the copper roofing must be extended over the drip edge on the cornice. A second finish coat of paint will be applied. But regardless of the punch list items, the crane day Thursday was a huge achievement. The crew and building committee worked together to prepare for this day, and the celebratory ease of the day was a result of their strenuous efforts.

    We had some excellent news coverage of the day. The Eagle Tribune and Union Leader interviewed longtime parishioners and the folks who made the restoration possible. Watch the lift on WMUR, here and here.

  • The Sleet Hits the Fan

    The Sleet Hits the Fan

    Finished Fan. Photo by Brian Cox
    Finished Fan. Photo by Brian Cox

    On Friday, East Derry First Parish Church will be hosting a celebration in honor of the 300th anniversary of Nutfield, a Scotch-Irish settlement that was the precursor to today’s Derry, Londonderry, and Manchester, NH. The crew at East Derry has been hustling to finish the belfry in preparation for the event. For a bunch of timber framers, they’ve been doing an awful lot of finish work. A more accurate name for Preservation Timber Framing would include an “and”, but the name’s long enough already.

    Belfry Trim, Labeled
    Belfry Trim, Labeled. Photo and labelling by Brian Cox

    The crew was able to preserve some of the ample belfry and lantern trim, including the eight turned columns on the upper lantern. What they couldn’t restore, they reproduced. Every week, Brian creates a photo report to keep the building committee up to date, breaking this behemoth phase into bite-size pieces. It also serves as a documentary record of repair and this basis of this blog post. Between the mutules and the guttae (the swiss cheese and the sawtooths), I’ve been inspired by both the mass production and the attention to detail.

    Tom fastening slats. Photo by Brian Cox
    Tom fastening slats. Photo by Brian Cox

    In between enormous timbers and acres of primed trim, Tom has been quietly reproducing four of the arched fans at the top of the lower lantern louvers. In carpentry, fans are kind of a thing. Their arched tops require a choice between multiple joints, or extensive short grain. In the photo above, you can see that the curve of the arched top was cut out of two wide pine boards, their long grain oriented 45 degrees to the bottom rail. The fan’s slats are precisely twisted. This delicate assembly is then mounted to the side of the lantern and exposed to strafing wind, sun, rain and snow at the top of a hundred foot tower.

    Original Fan and MDF Template. Template by Tom Glynn, Photo by Brian Cox
    Original Fan and MDF Template. Template by Tom Glynn, Photo by Brian Cox

    Four of the fans were in good shape, and required “cosmetic” repairs, glueing and re-fastening. Four needed to be replaced completely. Tom started by transferring the measurements from one of the original fans to a sheet of MDF, creating a full size drawing. He used this template to begin cutting pieces from 2″ thick Eastern White Pine.

    Fan core, with blade angles laid out. Photo by Brian Cox
    Fan core, with blade angles laid out. Photo by Brian Cox

    Tom cut templates from luan on the bandsaw, and traced them out on the pine. He used the bandsaw to cut out his pieces and then laid out the dadoes carefully in pencil, copying the angles from the original fan. He used a dovetail saw and 1/4″ chisel to clean out each groove.

    Those dadoes are cut! Handiwork by Tom Glynn. Photo by Brian Cox
    Those dadoes are cut! Handiwork by Tom Glynn. Photo by Brian Cox

    Each fan blade is 3/16″ thick and was gently twisted as it was installed in its frame. The twist is created and held by the angled dadoes. The angle on the half round core is different than the exterior arch. At the core, the blade is more perpendicular to the face of the fan, which allows all the blades to fit, and gives the appearance that the rays are opening up like a sunburst.

    Fan blades. Photo by Brian Cox
    Fan blades. Photo by Brian Cox

    Fortunately, Tom was able to copy the angles from the original fan blades, rather than calculate the angles from scratch. A lot of folks think it’s easiest to scrap the old and start anew. On a piece like this, we were grateful to retain the knowledge of the old-timers from the evidence left in the original pieces.

    Half-finished. Photo by Brian Cox
    Half-finished. Photo by Brian Cox

    Once the fans were finished, they were primed with two coats of California alkyd primer and two more coats of California latex paint. Commonly, fans are decorative, which means that they were not always used for ventilation, and were applied over solid sheathing as was the case here.

    Fan fit with arched trim. Photo by Brian Cox
    Fan fit with arched trim. Photo by Brian Cox

    Still, each exterior element needs to shed water to protect the elements behind it. Each fan was fit with arched trim. The flush board trim projects 2″, while the frame and blades of the fan are only 1 3/4″ in thickness. This will protect the fan from wind driven rain running down the face of the flush board siding. Each vertical joint is backed with a spacer batten to prevent water from getting between the boards and penetrating into the frame.

    Louvers, Columns and Fans, installed. Photo by Brian Cox
    Louvers, Columns and Fans, installed. Photo by Brian Cox

    With every detail in this tower, the crew considered the path of rain water. We use tight fitting joints and carefully considered flashing details to keep water out, rather than caulking. Caulk is an important tool to stabilize deterioration and prevent further rot. Ultimately, though, it is a band-aid, which is promised to last 20 years, and starts to shrink and fail in the first season. This is why PTF goes beyond the frame and performs finish work. We work on buildings that have commonly withstood 200 years, and we want our repairs to last 200 more. When the bottom of the structure begins 60 feet from the ground, we know that the caulking won’t be re-applied every five years, and the building will be lucky if it gets repainted every twenty. Protecting the frame starts with the finish, and our trim is not only beautiful, it is functional.

    We love to share our work in person. We hope to see you at the Nutfield celebration this weekend! 

  • The Rosenthorns

    The Rosenthorns

    Clock in Clock Tower
    Clock in Clock Tower

    Over New Years, my intentional friend likes us to sit in a big group and practice “Rose, Thorn and Rosebud.” We say the best thing that happened to us this past year, and the worst, and the thing that we’re looking forward to in the coming year. My rose took so much time that it’s been nearly absent from the blog, but it’s an easy pick: the completion of the Hampton Town Clock Tower. (This is me talking for me, Arron would surely have a harder time choosing. There’s the completion of the first phase of Wood Island, the East Derry undercarriage, Northwood Church and Jennison barn. There’s the installation of the trusses at Troy, and the commencement of undercarriage repairs in Readfield. There’s the long-awaited restoration of the windows in the converted barn that serves as our office, shop and home for Michelle and Arron. Scott Lewis returned to PTF to be our Project Manager, a top contender for blue ribbon). My thorn was losing Joe McAllister to the wilds of Minnesota; I hope his rose was one of projects that he’s since completed out that way.

    Hampton Town Clock Tower stands out because it wasn’t the typical repair fare. Instead of repairing a historic building, we re-interpreted one. In 1990, a catastrophic fire destroyed the Odd Fellows Building in Hampton, NH. The only artifact that could be saved was the Hampton Town Clock, and that had been warped by the intense heat. The clock was given to the town by John T. Brown in 1897, with a dial which spelled out “M E M O R I A L G I F T” in place of numerals so that every person who wonders why it’s half past “G” remembers his generosity. Since 2004, a dedicated group of Hamptonians have been working to restore the clock. They wanted the clockworks itself to be on display, in a housing that referenced its original home.

    Most people think of a clock as a round face with hands and numbers, but a tower clock is the size of a sideboard, with large bronze gears and a 9′ pendulum that swings below it. The round face is called a dial and might be the least interesting part of the whole contraption. Hampton’s clock is a Howard Round top, which means that the gears sit between two half-round carriages, about 4′ wide, 4′ high, and 2′ deep.

    Odd Fellowing Building, photo from Lane Memorial Library
    Odd Fellowing Building, photo from Lane Memorial Library

    The original tower, built in 1895, was too small for the clock, and was raised twelve feet and rebuilt in 1897. The roof was unique, with cross gable pitches topped by a spire reminiscent of a witch’s hat. The roof and dials perched above a belfry with large open arches on each face, and pilasters on each corner.  The committee wanted us to build a standalone clock tower that displayed the clockworks at eye level, referenced the original building, and fit into their budget of just under $100,000. We also learned that the clock would work best if the bell was located beneath it, so that the drive train could be relatively straight, and not be diverted around a large bell. This created our biggest design challenge. We wanted to display the clockworks at eye level, but the clock needed to be located above a bell that stands 5′ high in it’s carriage.

    Tower and staging
    Tower and staging

    At first we designed a building that nearly reproduced the belfry, with its open arches and fluted pilasters. We kept the original gables, but eliminated the witch’s hat. We presented the project at the Crit night of the Portland Society of Architects to get their input on the arrangement of clockworks and bell, and ended up getting better feedback about the roof and trim. They encouraged keeping the original roofline and accentuating the timber frame. We learned from the committee that the pilasters didn’t fit into the budget anyway. Ultimately, we arrived at a design that replicated the iconic roofline, over a much simpler box. We enlarged the arches, which echo the round top of the clock, but lost most of the Victorian trim, which took the focus away from the main object anyways. The timber framed floor hovers just above the bell, and is cut away at either window, so that the view of the clock is obscured as little as possible. The bottom of the clock is directly at eye level, so that visitors look up into its workings. One of the architects dismissed the design as looking like a ticket kiosk, which was OK by us, but I think of it as a building-sized display case for a desk-sized clock. The design process was incredibly rewarding, and the inputs from each stakeholder and committee member improved the design. Together we created a building that better fulfills its purpose than we could have on our own.

    Slated Roof
    Slated Roof

    Lee Hoagland, Jake Imlay and I cut and fit the frame at the shop. The new clocktower would be erected on the front lawn of the Centre School in Hampton, and we needed to complete as much offsite work as possible before we could work onsite during summer vacation. The foundation and site work was donated by Kenny Lessard by the end of the school year, and we erected the frame in early July. With Scott Lewis and Seth Rowell’s help, we sheathed the building and completed the trim. Portland Glass manufactured and installed the 10′ high arch-framed windows, many thanks to Paul Vermette and his crew. Skip Heal of Northeast Lantern donated a reproduction of the elaborate wind directional. The Heritage Company graciously accommodated our tight timeline and slated the eight peaks and eight valleys in August. In November, the clock was installed and running and we celebrated with the community, including many residents who fondly remembered the original tower and the clock’s tolling.

    Hampton Town Clock Tower
    Hampton Town Clock Tow

    While I certainly hope for more new design-build jobs in 2017, my “rosebud” for the coming year is the work we are doing with communities throughout Northern New England to preserve their historic landmarks, and that was the real pleasure of Hampton. We will be collaborating with local contractors in Troy, Readfield and Eastport in the Acworth Model to develop repair plans and share specialized skills. From the committee chair to the on-site carpenter, we are fortunate to work with folks who really care about their neighbors. We work with people who donate a lot of time, knowledge and money to a communal cause: saving the structures that serve as a reminder of our shared history and as meeting places that knit the community together.

    Hampton Town Clock Committee
    Hampton Town Clock Committee

  • Good Day, Bad Blog

    Good Day, Bad Blog


    Sub net pier from the top of the Wood Island staging
    Sub net pier from the top of the Wood Island staging

    This blog goes dark when it’s sunniest. Seems like every day this summer has been a good day to be working outside. We’re installing the last repairs to the undercarriage at East Derry First Parish Church, installing electricity for the clock at Hampton Town Clock Tower, waiting for the last of the ceiling to be removed at the Winter St Church in Bath and finally hanging exterior trim at Wood Island. They’re all big jobs, with little updates.

    ext-t1-wall-b-iso-w-church
    East Derry First Parish Church and steeple

    The First Parish Church is the biggest, heaviest building that we’ve ever lifted (thanks to Rick Geddes of Geddes Building Movers). The building was estimated at 188 tons, but actually weighs 288 tons. For the first time in PTF history, we bent a lifting bracket, as well as the shaft on a hydraulic jack (which is why we always use redundant rigging, and shim hard to ground).  “It’s been quite a challenge,” says job lead Brian Cox. A poorly conceived connecting ell was dumping water and moisture onto the historic meetinghouse, resulting in a nearly complete undercarriage replacement. Almost a year ago, we removed the steeple from the building and placed it on the front lawn to await repairs. In the early spring, the building was lifted, a new 4’ basement was excavated and concrete foundation poured. In May, the church was lowered onto its new foundation. Throughout the summer, Brian Cox, Dan Boyle, Seth Richard and Kirk Hennequin have been working diligently to replace any rotten girts and floor joists. Paul Lindemann on the restoration committee has kept a thorough blog to document their process and progress, and the building’s history. Read more here.

    Hampton Town Clock Tower
    Hampton Town Clock Tower

    The small Northern contingent of Lee, Jake, Scott, Seth and Jess built the Hampton Town Clock Tower this Spring and Summer. The standalone clock tower is building-sized display case for Hampton’s historic Howard round top tower clock. The 8-day clock, with dials that read “M E M O R I A L G I F T” instead of numerals, was given to the town in 1897 and ticking in the Odd Fellows Block until the building was destroyed by fire in 1990. The building is a design departure for PTF, as it references the Odd Fellows Tower, but does not replicate it. The four gable roof, topped with a “witch’s hat” spire, and four corner pent roofs was taken from the original building. Below, the body of the building is much simpler than the Odd Fellows tower. The 10’ arched windows reference the original arches, but the elaborate corner trim was eliminated, allowing the historic clockworks to take center stage. The clock will stand on a low lofted floor above the bell, making the clockworks accessible to its civic owners for the first time in history. Phil D’Avanza is completing repairs on the clock, and Skip Heal, of Northeast lantern, donated an enormous reproduction of the original weathervane. Read more about history of this clock, from installation, through destruction, disappearance and ultimate restoration.

    Sagadahoc elevated timber deck, partially erected
    Sagadahoc elevated timber deck, partially erected

    In August 2015, high winds shook loose nearly a third of the coved ceiling at the Winter Street Center in Bath, ME. Enormous swaths of plaster and lath crashed onto the pews, and hung loosely from the trusses. Remediating and repairing the 26’ high ceilings posed a unique challenge. The sanctuary needed to be cleaned of hazardous debris, and the rest of the dangling plaster needed to be removed. Following the removal, Sagadahoc Preservation will need to raise the funds to make necessary truss repairs and ultimately reinstall the ceiling. The process is expected to take years, and a lot of staging. Given the original timber framed floor framing, with large, widely spaced girts and joists, and the time-span of the project, it made more sense to build a timber-framed deck 13’ above the floor, and cantilevered over the balcony. The deck is perfectly flat, and allows EnviroVantage to safely remove the ceiling where it is 6’ above the deck at the eaves, and from rolling baker’s staging at the center of the room. The timber deck even allows Sagadahoc to continue to use and show the sanctuary as they fundraise for the next phase. Jake Imlay wrote a great post describing the building and our approach there. Coming soon.

    Wood Island Life Saving Station boathouse and tower
    Wood Island Life Saving Station boathouse and tower

    The restoration of the Wood Island Life Saving Station, in Kittery Harbor, has had Arron and his salty crew of Tom, Dave, Jake, Tim, Scott, Jess, Gail and Kendall up to their armpits in work. The life saving station was built in 1908 for the U.S. life saving service and became part of the coast guard in 1915. The U.S. Navy used the site to defend Portsmouth Naval Shipyard against U-Boats during World War II. Since the early 1950’s, the life saving station has been unused. Although the island is a popular destination for kayakers launching at Fort Foster, the building fell into dangerous disrepair, with radiators dropping through the floors. The Wood Island Life Saving Station Association applied for National Register status based on the building’s historic significance, and the integrity of the original interior trim and cabinetry. Over the summer, the intrepid crew rebuilt the boathouse, porches and dormers. As ever, sheathing repairs revealed more extensive rot than expected, but we’re finally finished with taking things away, and can focus on rebuilding. This week, we commenced with hanging reproduction trim milled right in our shop in Berwick. I’ve worked in wind like that on one other job-site: Mount Washington. We hope to have the building roofed by the end of September, which will mark the completion of phase one. And we’ve had some good press, from the Portland Press Herald to the Associated Press. Read more here.

    As much as we’ve enjoyed these projects, we’re looking forward to Fall, continuing repairs at the Abyssinian Meetinghouse and Troy Union Church and commencing work at the New Harbor Methodist Church, among others. When it rains, check back for more.

  • East Derry Derring-do

    East Derry Derring-do

    Steeple and Meetinghouse
    Steeple and Meetinghouse

    The First Parish Meetinghouse of East Derry, NH is preparing for a big anniversary, its tricentennial. What does one even get for a church on its 300th? Wood? Copper? Both, as it turns out. Beginning with a thorough assessment and rehabilitation plan in 2011, the congregation has been working steadily to repair extensive damage throughout the steeple and undercarriage. This past fall, we extracted the belfry and lanterns from the steeple stack. After the new year, we documented the upper sections from a woman-lift and dismantled them from finish to frame.

    Lower lantern roof, crowned with urns
    Lower lantern roof, crowned with urns

    As we surgically removed trim, we encountered earlier salvage efforts. Dan and Rod peeled back the gracefully curved roof between the upper and lower lanterns and revealed an oiled sailcloth roofing. The sheathing below was labeled November 1916.

    Lower Lantern Posts
    Lower Lantern Posts

    The frame was in far worse shape than we expected. Years of roof leaks and patchy repairs had finally overtaken the stout timbers. Once the lower lantern posts were exposed, we wondered how the structure was still standing and realized too late the bravery of dismantling it. Above, you can see that the six of the eight posts were hollow or non-existent at the top. An extensive repair campaign in the 1990s consisted of bolting channel steel and L-brackets to the crossing crab members (a “crab” is a horizontal web of timbers that spans the posts of a lower level and support inboard posts above). Looking at this picture, stiffening the crab fell far from the root of the problem.

    Lower lantern crab above belfry ceiling

    The crew struggled to free the timbers from their steel cages only to discover a corpse. It’s tragic that this rot wasn’t addressed when the church raised money for its repair two decades ago. A comprehensive, traditional approach at that time would have prevented the wholesale replacement necessary today.

    Truss spread

    In 1719, Scotch-Irish immigrants, fleeing religious persecution in Northern Ireland, settled the area that became East Derry. In 1722, they built their first meetinghouse on this site. The present structure was built in 1769. By its centennial, in 1822, the congregation had so grown that they cleaved the building in two and dragged one end 24 feet to the east. Above, you can see the first additional bay, indicated by the absent strainer beam and braces.

    East Derry Wall D
    East Derry Wall D

    In our assessment drawing above, the strainers and bracing between the trussses in bents 3 and 4 and bents 5 and 6 are non-typical. The strainers and bracing in bright green are non-existent; that is the bay in the photograph above. The yellow strainers and bracing between bents 5 and 6 do not quite reach bent 5, they are connected by a series of sisters and scabs. The evidence in the frame complies with the history: our hypothesis is that in 1822 the building was split between bents 3 and 6, (originally bents 3 and 4). Bents 6 through 9 were dragged to their current position, and bents 4 and 5 were built as exact reproductions of the originals. The strainer and braces that used to connect bent 6 (originally 4) to bent 3 were sistered to bent 5, and the strainer between bents 3 and 4 was deemed unnecessary. We are curious to uncover more of the eave wall framing, specifically the plates and the sill scarfs, to see whether there is more evidence to support our theory.

    Parallel rafter chord truss

    The East Derry First Parish truss is iconic. It has a king post in the center, with parallel rafter-chords and crossing pairs of ascending and descending struts. The king post is in tension, picking up the tie beam at the middle of its span, and the ascending struts rise from the king post and prevent the rafter from sagging. In the Timber Framing series, “Historic American Roof Trusses,” Jan Lewandowski explains:

    Outward pressure on the walls can be eliminated entirely by affixing the feet of each rafter couple to their own tie beam. The problem of sag can then be addressed by hanging a joggled vertical member, or kingpost, from these rafters and using it in tension to support the midspan of the tie beam… By a less obvious intuitive leap, it might be realized that the midspan of the long rafters can be kept from bending by struts rising from lower joggles on the suspended kingpost.

    East Derry Bents 1-4
    East Derry Bents 1-4

    The parallel rafter-chord is an innovation that protects the Achille’s heel of the king post truss. The casual observer often assumes that the joint between tie and king post is where we would most frequently see failure over time. I’ve seen many iron stirrups that attest to the builder’s concern for this joint. But most trusses fail at the rafter heel, where the upper rafter-chord intersects the tie beam. Of this foot joint, Lewandowski writes:

    Those we can inspect seem more prone to failure and impairment than most other connections in the truss, for a combination of reasons: the lack of relish beyond the mortise and the large forces involved, coupled with the low angle of attack of rafter to tie, all exacerbated by a high incidence of leaky eaves. The significance of the roof slope is that the geometry of low-pitch roofs channels more horizontal force against potential long-grain shear failure in the tie at the foot joint than it does comparable vertical breakout load on the kingpost at the peak (see TF 72, 19). The point: on both empirical and theoretical grounds, the principal rafter-to-tie beam joint is the likely weak sister in the mix.

    In Sedgwick, we saw the foot of the upper chord shear a 2″ x 12″ x 22″ block clear off the end of the tie beam (It was about the size of a hefty wedding-present-breadboard). With a parallel rafter-chord truss, the duties of principal rafter and upper chord are separated. The principal rafter, the top angled timber, carries the roof, while the upper chord, the inner angled timber, carries the compressive loads created by the truss. The upper chord intersects the tie beam farther from the end of the beam, thereby protecting the relish just past the joint from shear. We so liked this truss that we reproduced it in a building where it will be on grand display: the Lewis Conservation Center.

    Steeple extracted

    Paul Lindemann, East Derry historian and devoted parishioner, keeps a detailed website documenting the history of the church and their repair process. The Nutfield History blog is a fascinating read for anyone interested in New Hampshire history or building history in general. The blog also benefits from Lindemann’s web design skills, something that doesn’t always attend the dual callings of historian and parishioner.

    The vigor and ingenuity of the immigrants who built this Meetinghouse is evident in its frame. We honor their labor with our efforts to preserve it. In 300 years, what will historians write about the immigrants seeking refuge in the United States today?

  • Face Lift for an Old Girl

    We have begun replacing the clock faces of the First Parish Congregational Church in York, Maine.  Formed in 1636, the congregation is the oldest in Maine.  The current building was built in 1747, and moved to its position, facing the road, in 1888.

    Big Caulk
    Big Caulk

    It is time for this old girl to get a face lift.  Her frown lines brim with caulk.  The clock faces  are simply painted on the flush siding and framed with trim applied directly to the surface.  Considering the lack of flashing, the trim has held up well, and we suspect that we will be able to restore and reuse approximately 75% of it.  The white painted sides are in good shape, but because the faces are painted directly on the siding, we will have to replace the paneling totally.  We speculated that the deterioration of the black portion was due to the increased heat absorption and movement of black painted wood, but concluded that the difference in wear was more likely due to better maintenance of the white portion.  It is much easier (if you can call painting a steeple easy) to slap white paint on the trim and outer siding, than removing the numbers for painting, and cutting black paint in around the trim.  But we can only apply makeup for so long, and at this point, this clock tower’s going under the knife.  Click on the photos below for more information.

  • Damariscotta Crane Day Shots

    Click on an image to read its description.

Think we can help? Get in touch.