The Press Herald published a lovely profile of the Foleys, our longtime clients and friends this week. Charley is a surgeon and has been called to duty as part of his reserve unit. Sheila is taking care of the farm, the horses, cows, sheep, and new lambs, and she is preparing in case she is called up as well. It seems like Charley and Sheila are always doing the work that needs to be done. On a lesser note, I was excited to see lambs in the barn and an interior shot of the house. We are all hoping that Charley returns soon, and are so glad to know the Foleys exist in this world.
Frames rot from the bottom up. Water condenses on the foundation and rots the sill from below, or enters at the eaves and runs down the wall framing, rotting the sill from above. Some sills are sunk by splash back. In the dead of night, sill rot can haunt you; it seems catastrophic. But rotten sills are so common that their repair is our most standardized process, and can be buttoned up in a little over two weeks. We’ve repaired two church sills already this year. The jobs in Troy and Benton Falls ran smoothly and efficiently in the background, while we tossed and turned over pilaster this and custom-trim that. These sill jobs aren’t flashy, they’re basic (in the best way). They are also amongst the highest repair priorities, and essential to a building’s longevity.
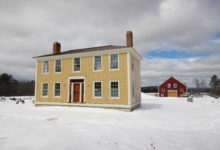
We repaired Troy’s sill first, in January. A short section of sill was completely rotten. The building still has some of its original sill, but the rotted section had been replaced before, maybe 25 years ago, in hemlock. It had been damaged by splash-back off the propane tank and condensation resulting from drilling through the sill for the propane line. The sill was fairly low to the ground and drainage was poor (typical). There was no gutter, which is probably best for the building, but the ten inch overhang didn’t protect the sill from its fate. We connected the posts and studs with a tripled 2×10 ledger. On each post, we hung a stout metal L-bracket. We used hydraulic jacks, resting on short, angled dead men and cribbing, to take the weight of the wall off of the existing sill. The 20th century replacement was installed with a nice stop-splayed scarf, which we matched with our repair. The job took a little over two weeks.
II. Troy, repaired. Photo by Tim SweeneyIII. Troy, buttoned. Photo by Tim Sweeney
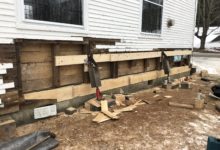
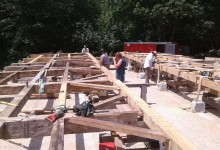
The north eave sill at Benton Falls succumbed to years of organic matter built up along the eave wall, which made the sill nearly earth bound. Poor drainage and splash back didn’t help its cause. This building was different from Troy in that the sills were resting upon original granite capstones that had sunk and shifted over time. Using a laser level up in the attic and measuring the height of the plate at each post, we determined that the rear wall of the building had dropped three inches. During the repair, the crew gently lifted the rear of the building so that it was returned to within a half inch of level. The crew then replaced the entire 8″ x 8″ x 42′ sill. It was in three pieces connected by stop splayed scarfs, like those used at Troy. The building committee has contracted with a company to improve the drainage around the building, and, while they’re at it, pick up the rear cap-stones and install solid stone shims beneath them.
Benton Falls, lifted (here we go again). Photo by Tim Sweeney
You’d be forgiven for thinking I made a mistake and inserted the same lifting photo for Troy and Benton. Not so! The repair process was nearly identical. Don’t be afeared of sill rot. Just fix it, and sleep soundly.
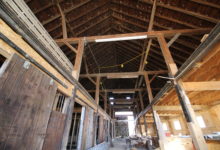
The Barn at Bondgarden Farm has been the talk of Eliot all summer. Nearly a hundred feet long and roofed in slate, the barn was always a stunner, but in July, Rick Geddes lifted the barn 6 feet in the air, and neighbors and newscrews took note. Geddes threaded four 50 foot, 12 inch H-beams into the building running in two parallel lines down the eave bays. Then he crossed the H-beams with eight perpendicular I-beams to pick up the loft joists in each bay. He gently lifted the H-beams using his truck’s hydraulic system, and rested them on six tidy cribbing piles. At this point, the repair work could commence.
Dan explains lifting in front of the hole cut for the steel
Built in the 1860s, the entire undercarriage was rotted, and the basement was no longer necessary. Bob Cantwell crunched up the undercarriage and excavated the basement. Chris McKinnon poured a new frost wall around the perimeter and two level grade beams beneath the drive posts. The new barn floor is crushed stone, which will be more appropriate for its equine occupants.
Bladed scarf repair
Most of the post feet were quite mushy, and required new feet or re-repairs. Fortunately, a few good posts remained, from which Dan and Tom could establish a standard post length. After checking for level with a transit, they used the top of the grade beam as a reference line. From there, they repaired each drive post to the standard overall length. In most cases, the post was repaired with a center tenon scarf, which resists twisting and preserves the maximum amount of original material. In cases where the rot extended above the loft or needed to be removed on one side more than the other, they repaired the foot with a bladed scarf joint, a traditional repair. We commonly see this scarf in old barns, repaired more than a century ago.
Center Tenon Repair
For decades, cattle used the drive posts as scratching posts. Below the loft, their stallside faces have been carved into gentle curves. The joists above were scalloped by the teeth of bored horses. We preserved the patina of the posts and fared the fixes to their organic profiles.
New girts and new eave wall
Once the repairs were installed, Dan and Tom could begin to address the hay lofts. Originally, there were a row of tying girts about halfway up the posts. The barn was converted to house taller livestock, after it had already begun to sink. The remuddlers removed the lower loft girts and snapped a level line on the uneven parallel posts. They neglected to replace the tying girts and erected stall walls, which were clad in 2x6s and filled with insulation. They slapped up loft joists, which broke over the stalls. In some places, the posts had dropped eight inches when replacement clapboards were hung. For now, on the backside of the barn, you can still see how far the barn was out of level by the undulation in the line of clapboards.
New stall studs
The crew used staging boxes to stabilize the loft floors and remove the poorly designed stalls. Then they leveled the lofts to the newly plumbed posts and installed level loft girts between the posts in 6″ x 10″ eastern white pine. The Goranssons will stock the lofts with hay for their horses.
Rear wall wave
Last but not least, Victor Wright, of the Heritage Company, will repair the slate roof. In some ways, all this work was to preserve the intact slate, worth tens of thousands of dollars. There aren’t many barns anywhere that were roofed in slate, but especially in Eliot. As they were interviewed by TV crews, the Goranssons explained why they went through this process to save their barn. They value the craftsmanship embodied within it. During the repair process, they witnessed how much work goes into raising a timber frame of this size. For centuries to come, their neighbors will witness the fruits of their efforts.
For me, it was not love at first sight. The Dummer House, built in 1786, is the oldest in Hallowell. Tucked onto Dummer Lane, the building had already been moved once and was languishing under a pair of overgrown maples, awash in eau du restaurant dumpster. It’s a plank frame building, which means that the 2 inch thick sheathing performs structurally. There are corner and intermediate posts, but no studs. Back when I was a student of preservation carpentry at NBSS, my instructor introduced us to this rare frame style with a not-quite joke: “If you ever get the chance to buy a plank frame house,” he said, “Don’t.”
Plank frames are notoriously difficult to repair. The lack of sheathing means that there is one less barrier between the elements and the frame, and fewer framing members to support the building during stabilization. If the sheathing separates from the sills, the entire wall can fall away from the building, and that’s what I’d seen on my one previous visit to a plank frame. My prejudice was getting the better of me.
Last summer, the Dummer House was moved again, by Geddes Building Movers. After three stress-free moves with the company this summer, we are crushing hard. They do the work of easy-going giants, gently lifting the building onto steel I-beams and rolling it into position using rugged rotating skates. The Kennebec Journal made this sweet time lapse of the move (dear reader, support your local news!)
Dummer House, after
When I returned this fall, the building had been turned 180 degrees and moved uphill to face Second Street at the intersection with Center. The spin returned the house to its original relationship to the street, so that the paired doors leading to the front hall are steps off of the sidewalk. No longer hidden by the brick buildings on Water street, the historic features of the Dummer House make an impression. The historic significance of the building can be better appreciated in an appropriate context with its front and side streets. In back, the building stands a story above a new municipal parking lot. And even this ahistorical view is an improvement. Looking up at the building from the parking lot, I fell in love.
Plank frame window pin
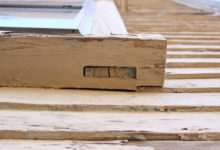
After the entrance, windows are the defining aspect of a building’s aesthetic. Their presence or absence and location communicate building use and place it in a historical context. For this reason, windows are frequently replaced when a building is “updated”. Looking at old buildings, it’s rare to find the original windows, and especially rare to find original sash or glass. Whenever I visit an 18th century building, I look at the ends of the windowsills in search of the shadow of a wooden pin behind the thick paint. The pin indicates the mortise and tenon joint at the heart of plank frame window construction. Rarely am I lucky enough to see the pin, much less the joint itself.
Plank frame window tenon
From the parking lot behind the Dummer House, a visitor can see the underside of the windowsills and the ends of tenons poking through – be still my beating heart! Instead of falling away from the sills, the walls have retained many of their original adornments: front entrance, clapboards, and plank frame windows. In a contemporary window, the frame is constructed from a hollow, 3-sided post. Three 3/4″ thick boards are rabbeted, nailed, and glued into a C-shape and make up the interior casing, the jamb and the exterior casing. In a plank frame window, the frame is constructed from stout timbers, about 3-4″ wide and 4-6″ deep. Because the jamb is solid, the front casing is the dressed front edge of the jamb. The jambs are joined to the hefty header and windowsill by a mortise and tenon joint. Seeing the end grain of those tenons poking through the bottom of the sill warmed the cockles of my heart.
In the winter, we hope to begin restoring the house, which will serve as a historic house museum. First, the undercarriage needs to be completely rebuilt, so we’ll get practice in rigging a plank frame building. Restoring the plank frame windows will come later; we’re lucky they’re still there. If you’re thinking of replacing your old or original windows, think twice. A restored window, with interior and exterior storms, can perform as well as a triple glazed window. Vinyl windows are almost impossible to restore (why bother?) and start to sag in a few years. If you’re interested in a turn-of-the-century wood window restoration, read more here.
Hey, real quick! We’ve been cutting scarf fixes for enormous post feet, and fitting teleport pads for octagonal lanterns. Updates on Chestnut St Lantern, Brasen Hill Barn, and Jennison Barn, below.
Teleport Pad, Photo by Jacob Imlay
Chestnut St Church Lantern, Camden, ME: This cute little lantern was cut and fit at the shop, and is ready for transport to the Lyman-Morse boat shop later this week. There it will be fit with a 50-foot fiberglass spire and four 7-foot half-round hoods. Jake laid out the frame and Tim, Zach and Charlie cut and fit the joinery. Zach’s experience building guitars and Tim’s experience making furniture helped maintain tight tolerances. The entire lantern and spire will be laid down on a low-riding flatbed for final transport to the church, where a crane will tip the entire assembly up vertical. It is important that the joinery is tight in order to withstand the torque and lateral loads. Scott, Tim and Arron worked with Taylor-made builders up in Camden to plumb the tower and repair the belfry post feet at the Chestnut St Church. More about removing the old spire, here.
Lady Lantern, photo by Jacob Imlay
Brasen Hill Barn, Barrington, NH: Led by Dave and Dan, the rest of the crew have been busy with an enormous barn restoration at Brazen Hill Farm. The barn is beautifully hewn, with drive posts like tree trunks. The deterioration was extensive and the barn was completely dismantled for repairs. The extent of rot meant that the barn was heavily braced and was disassembled piece by piece by a crew of eight over two days.
Brasen Barn from above, photo by Josh McNally
Dave, Dan, Tom, Byam and Michael have been busy making traditional timber frame repairs at our shop in Nottingham, NH. Given the extent of damage, the crew worked hard to preserve any viable original material. That means a lot of dutchman and post feet fixes. Dan Boyle documented the repair and fitting process. A few of his process photos, below.
Undersquinted face fix, photo by Dan Boyle
An under-squinted dutchman repair can be used to repair the cheek of a mortise where a pin has blown out the relish. The rest of the post was in good condition and of a dimension and quality that is difficult (but not impossible) to find today.
Get (in the) Bent Brian, photo by Dan Boyle
After the rotten timbers are repaired or reproduced, we use come-alongs to pull the joinery tight and the bent square. Then we drill holes for the 1-inch oak pins that will hold the joinery together.
Eave fitting, photo by Dan Boyle
The barn is big, almost 70-feet long and 40-feet wide. It contains seven bents. The finished frame was raised almost a month ago, and Dave and Scott documented the process by helmet-cam. Stay tuned for the movie.
Jennison Barn, photo by Josh McNally
Jennison Barn, Lee, NH: New Hampshire Preservation Alliance has featured the Jennison Barn as one of their 52 barns in 52 weeks. The NHPA article captures why preservation is important on a human scale, from families to communities. Read their story, here.
Last Thursday, I popped out of bed at 4 am, like Sal on her way to Bucks Harbor. Scott informed me that if I wanted to help remove the Chestnut St Church spire in Camden, I needed to be there by 6:00. By the time I arrived, Scott and Arron had set the rigging. About a third of the way up the spire, eight laminated KD 2x10s poked through the spire like an avocado pit ready to sprout. PTF was hired to direct the spire removal and design a timber-framed transition from the old belfry frame to the new fiberglass spire. We’d worked with the G.C. before on True-Randall farm, Taylor-made Builders are good folks who do high-quality work; so even though fiberglass replacements are not our thing, we got over ourselves because Taylor and his crew are such a pleasure.
This steeple is so tall that a 120′ man-lift couldn’t reach the weathervane on the day we went up there to remove the weathervane (oops). The main church is two full-height stories. Starting just below the main ridge-line, the belfry posts rise 30′ to a plate level just below the clock dials. The original spire rafters penetrate into the belfry, landing on a girt 5′ below the plates. The spire rafters pass through the dial level, behind four 6′ diameter glass dials. Above the dials, the original spire rafters were severed and sistered with relatively light, laminated 2x4s. That repair was performed in the 1990s by a talented and eager Eagle Scout. This go-round, we designed a timber-framed “lantern” that crosses the belfry plates like a crab. Eight 8×8 posts rest upon the lower crab and support a maintenance floor behind the clock faces. The upper lantern plates, or upper crab, extends well into the fiberglass spire, 6′ above the horizon of the clock faces. Four new fiberglass dial hoods will protect the dials, and be structurally fused to the new fiberglass spire. The lantern frame we’re cutting reproduces the telescoped framing levels found in this building and other historic steeples.
Lantern Iso, X-Ray
The model we’d created for the lantern design allowed us to accurately calculate the height at which the rigging would need to be placed in order for the spire to be slightly bottom-heavy as it flew. In fact, once prone in the driveway, the spire balanced like a seesaw on the fulcrum of its rigging. A top-heavy spire might flip mid-air, which would be just as dangerous and scary as it sounds.
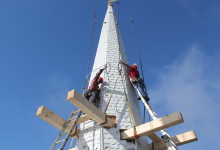
Chestnut St Church, Crane, and Rigging
We hung a cage from the main ball of the frame to protect the weathervane from the rigging straps. We linked together the crane operators’ longest cables and our longest rigging straps, to connect the four corners of the metal frame to our rigging beams. The last strap was doubled over, resulting in an eight point pick.
Spire cage
The crane flew the rigging up to the crew on the top of the staging, and we pulled the rigging straps away from the spire as the operator located the ball directly over the weathervane. The rigging was accessed by ladders off the staging, which was less efficient than it was photogenic.
Teamwork
Once the rigging was securely attached, we crawled inside the spire and used saw-zalls to cut first the spire sheathing, then the mast and then all eight rafters. In my experience, the penultimate step of severing the last connections is the most stressful and variable part of the entire crane day. As Arron warned the crew, a forgotten toe nail could prevent the spire from releasing safely and evenly. We were lucky to have a skillful crane operator from Keeley. We wanted the crane to take enough weight, and put enough tension on the rigging to prevent our sawzall blades from binding, but we did not want the spire to bounce or release with any energy.
Witch’s hat with a crown of thorns
Scott and Arron checked in with the operators. When we started cutting the sheathing, the crane had 1500 lbs of weight on the ball. For the mast, 2500 lbs. As the last of the rafters were cut, the crane was taking 3500 lbs. Unfortunately for the spectators on the ground, a safe spire removal looks slow and boring. Unfortunately for my story, the spire released without any hitches. The spire weighed about 8800lbs, which reflects its light framing.
A Bittersweet Triumph
The crane operator lowered the spire safely to the street, and the crew cut the cone into sections small enough to carted away by a pulp truck. The Penobscot Bay Pilot got some beautifully boring drone footage of the removal, and covered the story, here. For more photos of our process, visit our Flickr album.
Sub net pier from the top of the Wood Island staging
This blog goes dark when it’s sunniest. Seems like every day this summer has been a good day to be working outside. We’re installing the last repairs to the undercarriage at East Derry First Parish Church, installing electricity for the clock at Hampton Town Clock Tower, waiting for the last of the ceiling to be removed at the Winter St Church in Bath and finally hanging exterior trim at Wood Island. They’re all big jobs, with little updates.
East Derry First Parish Church and steeple
The First Parish Church is the biggest, heaviest building that we’ve ever lifted (thanks to Rick Geddes of Geddes Building Movers). The building was estimated at 188 tons, but actually weighs 288 tons. For the first time in PTF history, we bent a lifting bracket, as well as the shaft on a hydraulic jack (which is why we always use redundant rigging, and shim hard to ground). “It’s been quite a challenge,” says job lead Brian Cox. A poorly conceived connecting ell was dumping water and moisture onto the historic meetinghouse, resulting in a nearly complete undercarriage replacement. Almost a year ago, we removed the steeple from the building and placed it on the front lawn to await repairs. In the early spring, the building was lifted, a new 4’ basement was excavated and concrete foundation poured. In May, the church was lowered onto its new foundation. Throughout the summer, Brian Cox, Dan Boyle, Seth Richard and Kirk Hennequin have been working diligently to replace any rotten girts and floor joists. Paul Lindemann on the restoration committee has kept a thorough blog to document their process and progress, and the building’s history. Read more here.
Hampton Town Clock Tower
The small Northern contingent of Lee, Jake, Scott, Seth and Jess built the Hampton Town Clock Tower this Spring and Summer. The standalone clock tower is building-sized display case for Hampton’s historic Howard round top tower clock. The 8-day clock, with dials that read “M E M O R I A L G I F T” instead of numerals, was given to the town in 1897 and ticking in the Odd Fellows Block until the building was destroyed by fire in 1990. The building is a design departure for PTF, as it references the Odd Fellows Tower, but does not replicate it. The four gable roof, topped with a “witch’s hat” spire, and four corner pent roofs was taken from the original building. Below, the body of the building is much simpler than the Odd Fellows tower. The 10’ arched windows reference the original arches, but the elaborate corner trim was eliminated, allowing the historic clockworks to take center stage. The clock will stand on a low lofted floor above the bell, making the clockworks accessible to its civic owners for the first time in history. Phil D’Avanza is completing repairs on the clock, and Skip Heal, of Northeast lantern, donated an enormous reproduction of the original weathervane. Read more about history of this clock, from installation, through destruction, disappearance and ultimate restoration.
Sagadahoc elevated timber deck, partially erected
In August 2015, high winds shook loose nearly a third of the coved ceiling at the Winter Street Center in Bath, ME. Enormous swaths of plaster and lath crashed onto the pews, and hung loosely from the trusses. Remediating and repairing the 26’ high ceilings posed a unique challenge. The sanctuary needed to be cleaned of hazardous debris, and the rest of the dangling plaster needed to be removed. Following the removal, Sagadahoc Preservation will need to raise the funds to make necessary truss repairs and ultimately reinstall the ceiling. The process is expected to take years, and a lot of staging. Given the original timber framed floor framing, with large, widely spaced girts and joists, and the time-span of the project, it made more sense to build a timber-framed deck 13’ above the floor, and cantilevered over the balcony. The deck is perfectly flat, and allows EnviroVantage to safely remove the ceiling where it is 6’ above the deck at the eaves, and from rolling baker’s staging at the center of the room. The timber deck even allows Sagadahoc to continue to use and show the sanctuary as they fundraise for the next phase. Jake Imlay wrote a great post describing the building and our approach there. Coming soon.
Wood Island Life Saving Station boathouse and tower
The restoration of the Wood Island Life Saving Station, in Kittery Harbor, has had Arron and his salty crew of Tom, Dave, Jake, Tim, Scott, Jess, Gail and Kendall up to their armpits in work. The life saving station was built in 1908 for the U.S. life saving service and became part of the coast guard in 1915. The U.S. Navy used the site to defend Portsmouth Naval Shipyard against U-Boats during World War II. Since the early 1950’s, the life saving station has been unused. Although the island is a popular destination for kayakers launching at Fort Foster, the building fell into dangerous disrepair, with radiators dropping through the floors. The Wood Island Life Saving Station Association applied for National Register status based on the building’s historic significance, and the integrity of the original interior trim and cabinetry. Over the summer, the intrepid crew rebuilt the boathouse, porches and dormers. As ever, sheathing repairs revealed more extensive rot than expected, but we’re finally finished with taking things away, and can focus on rebuilding. This week, we commenced with hanging reproduction trim milled right in our shop in Berwick. I’ve worked in wind like that on one other job-site: Mount Washington. We hope to have the building roofed by the end of September, which will mark the completion of phase one. And we’ve had some good press, from the Portland Press Herald to the Associated Press. Read more here.
As much as we’ve enjoyed these projects, we’re looking forward to Fall, continuing repairs at the Abyssinian Meetinghouse and Troy Union Church and commencing work at the New Harbor Methodist Church, among others. When it rains, check back for more.
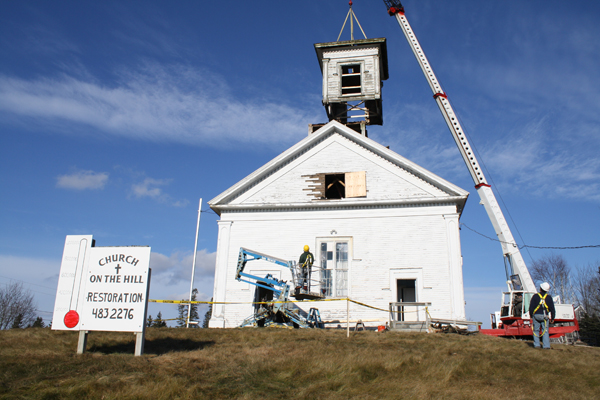
The Troy Union Meetinghouse had a crane day last week. The long-leaning steeple was partially dismantled, leaving behind the two front posts to stand like wooden antennae. The entire replacement frame has been cut by a crew of local craftsmen, and will be resurrected before the end of the summer. Read more about the process here, and show your support. If you don’t see a video below, click on the link to watch the story.
Church on the Hill – photo credit Maine Steeples Project
The Maine Steeples Project provides crucial support to the communities that are preserving Maine’s most iconic structures. A collaborative effort of Maine Preservation, the Maine Community Foundation, and a donor-advised fund, the foundation matches community-raised funds and provides professional guidance. From their newly-updated website:
The Maine Steeples Project supports local efforts to assess and restore church steeples of historic, cultural, and community significance to cities and towns in Maine. The program seeks to match local resources devoted to restoring steeples. Its priority is to support efforts to restore existing steeples, but reconstruction requests may be considered in unique circumstances.
For those interested in preserving a steeple in their community (or steeple-enthusiasts in general), we encourage you to visit their fresh website with information about the program, and eligibility requirements.
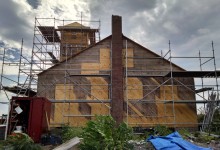
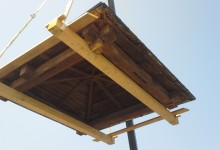
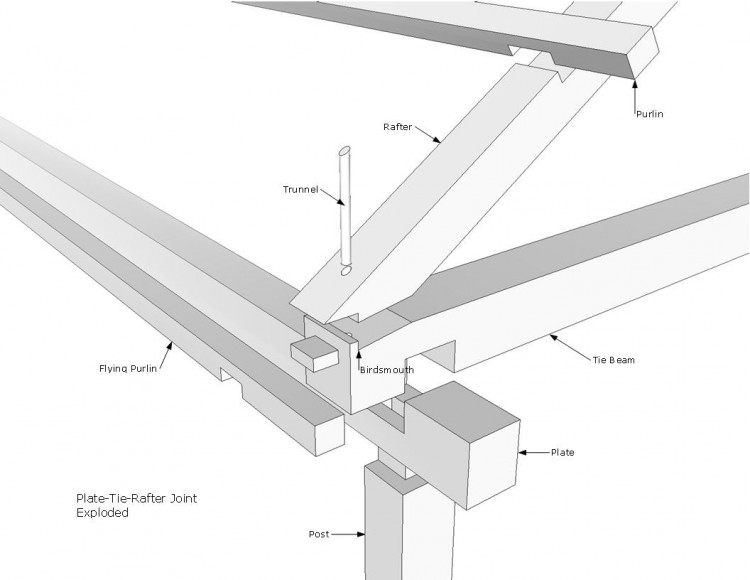
Last week, Arron and I saw a neat roof framing detail at a Greek Revival home in Brunswick. The rafter was joined to the tie beam with a birdsmouth and pinned with a trunnel, the tie overlapped the plate and supported a flying purlin, and the plate ran past the gable end post to create the overhang for the return.
Roof frame detail at return
There were areas that were badly deteriorated by critters and leaks, but the tie-plate joints were as tight as the day they were assembled. The relish at the ends of the tie beams, after the birdsmouth, were all still intact, probably due to the work of the trunnel, pinning the rafter foot in place. This was the first time I’d seen this particular joinery in a roof assembly; it’s always nice to see how well timber frame joinery withstands the pressures of weather and time.