Maine Preservation held their annual honor awards ceremony last Thursday, to “recognize owners, developers, professionals and leaders responsible for transformative historic preservation efforts throughout the state.” We were proud to be part of the team honored for the restoration of The Mill at Freedom Falls. Read the full list of honorees, here.
Chris Glass, Tony Grassi, Carmen Bombeke, Jay Fischer and Arron Sturgis accept a Maine Preservation Honor Award
This project was a true collaboration between client, architect, architectural historian, general contractor and ourselves, the traditional timber framers. There are so many folks who should be proud of their participation, who gave their time, energy, intelligence and passion to completing a very challenging project. Thank you Ed Bell, Reese Crotteau, Shawn Perry, Lee Hoagland, Chuck Michalek, Tom Glynn, Scott Lewis, Jesse Turgeon and Rod Bishop. Read more about the finished project, here.
Nov. 15, 2013 – When I tell people what I do, I sometimes run into the misconception that preservationists are single-minded, inflexible, and uninterested in innovation and design. It’s true that at Preservation Timber Framing we think that if a frame stands strong for 200 years, it probably has good design to thank, and that time-tested building details last longer. We also think it’s possible to combine contemporary design with the stewardship of a historic property, and achieve successful results. True-Randall Farm was just such an example. The connected farmstead required repairs to house, barn and ell. The clients have a strong preservation ethic and want to preserve the original framing members but they also wanted a functional kitchen with clean, modern lines. The ell had been extensively renovated by previous owners, and the clients decided to dedicate that portion of the house to the new kitchen. They preserved any original framing within the ell (and without) that remained.
Even working within a strict preservation ethos requires adaptability. The house and barn at Randall’s Hill retained most of their original elements and were repaired traditionally, with in-kind materials. Both house and barn had rotten corner posts, but the repairs to each post were entirely different in scope and in design.
Barn corner post removed, from interior
The barn repair was a more typical, and traditional, fix. It was also more extensive, because the rot extended above the girt that supports the right loft bay, and the frame was more accessible to repair. In order to get access to the post, we stripped the corner of trim, clapboards and sheathing. We affixed an L-shaped bracket, custom-made for lifting, to the exterior of the post, and built a cribbing pile beneath and just to the outside of it. Beneath the bracket and on top of the cribbing pile, we inserted a dead man (temporary post) and hydraulic jack, which would be used to level the corner, and support the weight of the post and roof above it (See first photo, above). We also inserted a deadman beneath the loft girts to pick up the weight of the loft (See “Barn corner post removed…,” center of photo).
Corner post, with center mortise repair
Lee carefully cut away the post where it was rotted, and removed the braces. With a circular saw, auger bit and timber framing chisel, he cut the female half of a center tenon scarf joint onto the part of the post that remained. We used a center-tenon scarf on this post to preserve both the reference (outside) face of the post and the inside face that was most visible. The fix was also oriented to resist any outward thrust that was transferred from the rafters.
Lee and his corner fixes, (the center tenon post repair is on the bottom, a repaired nailer is on the top)
Lee cut the second half of the post out of a large 10 x 10 timber, the same dimension and species of the piece that was removed. In order to fit the post fix into place, we used a free tenon at the bottom of the post fix (see diagram, below).
Installation of a free tenon
Lee cut an extended mortise into the front gable sill and a long open slot on the adjacent face of the post fix. After the post fix was installed, and the center tenon scarf was fit and pinned, a free tenon was inserted vertically into the extended mortise in the sill and slid into the slot in the post. The remaining mortise space in the sill was plugged with a wedge, and the free tenon was pinned into the post.
Barn front gable, rebuilt in place
After the post was fixed, I replaced the loft girt in the front gable, and neighboring braces, door post, and nailer. Unfortunately, this barn typified the worst case scenario involving hidden rot. Working in preservation we face a harsh reality in which, sometimes, significant rot can be completely hidden, and once rot is uncovered, it can’t be re-sheathed until repaired.
Open house
We also performed a post repair on the Federal-style house and, in contrast with the barn, we could disturb none of the interior surfaces. In this way, the repair was similar to the timber frame repair at the Marrett House in Standish, where the framing had become detached from the plaster and lath, but the plaster and lath still needed to be preserved, with early 19th century wallpaper left intact.
House corner post repair, installed.
The post requiring repair was located at the front-right corner of the house. We first noticed that the front eave and right gable sills were punky. The rot in this post did not extend upwards past the second floor girts, or inward throughout the post thickness, except at the very bottom. This fortuitous turn of events allowed us to repair the post with a three-stepped lap joint – cutting away the exterior surface of the post to the depth of the rot, and using epoxy and fasteners to install a new-in-kind repair that fills the negative space left by the rot. Relative to the post repair in the barn, this was a non-traditional fix, utilizing modern epoxy and fastener technology. It was the appropriate fix for the level of rot and its context.
House corner, post repair.
The contrast between these two methods of post foot repair, and the combination of traditional repair and contemporary use in the ell, shows that the best preservation is adaptable. Our process is developed from traditional methods, but it isn’t staid or prescriptive. Part of the reason we document the multitude of barns we come across is that they provide us with a greater variety of long-lasting approaches to repair. We’re always eager to learn a design solution that is new to us, it’s just that the best solutions we’ve found have been proven over 200 years.
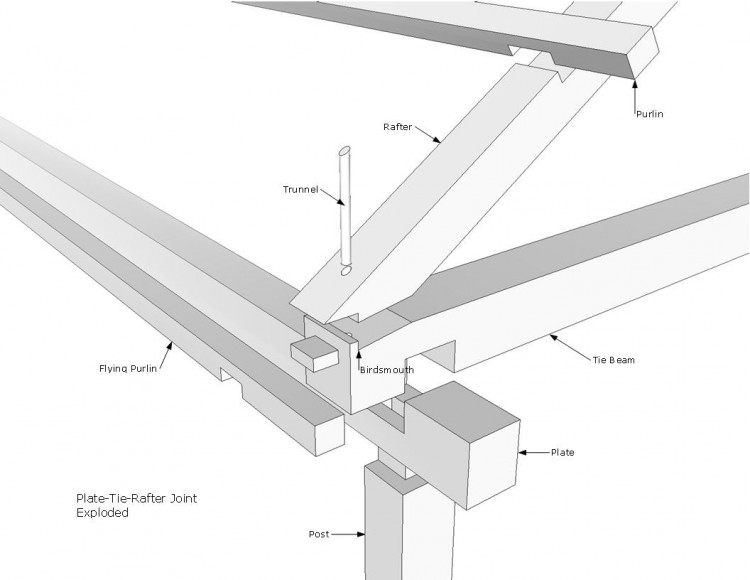
Last week, Arron and I saw a neat roof framing detail at a Greek Revival home in Brunswick. The rafter was joined to the tie beam with a birdsmouth and pinned with a trunnel, the tie overlapped the plate and supported a flying purlin, and the plate ran past the gable end post to create the overhang for the return.
Roof frame detail at return
There were areas that were badly deteriorated by critters and leaks, but the tie-plate joints were as tight as the day they were assembled. The relish at the ends of the tie beams, after the birdsmouth, were all still intact, probably due to the work of the trunnel, pinning the rafter foot in place. This was the first time I’d seen this particular joinery in a roof assembly; it’s always nice to see how well timber frame joinery withstands the pressures of weather and time.
PTF began work on the undercarriage of the True-Randall barn in November 2012, and recently completed a comprehensive timber frame repair of the house, barn and ell. George and Karin Look, owners and custodians of the True-Randall Farmstead, researched the history of their property extensively and are deeply committed to ensuring its preservation. The following account is a summary of their findings, which they’ve graciously allowed me to publish here.
True-Randall Barn, from below
True-Randall Farm: A Quintessential Maine Connected Farmstead
In 1813 Deacon Ezekiel True’s twin sons, Moses and Paul, built him a “house on the hill” above his mills on the St. Georges River, in what is now South Montville, Maine. A barn, which has the same timber frame construction as the house, was built for the farm across the road in 1814. Its largest timbers, primarily second growth hemlock, were hand hewn, most likely on the farm. They include 60 foot long continuous timbers for the plates. The farm passed by marriage from the True to the Randall family in the mid 1830s and remained in that family until 1984.
Barn bent framing, from loft
In 1889 the barn was moved to its current position and connected to the house by an ell. Local history indicates that it was rolled across the road using oxen and logs and that a small American Elm run over during the move stood back up and grew into a giant tree in front of the barn. The roof was removed before the move and roof elements, including the purlins, were used in building the deck for the barn, which was converted into a bank barn. At the time of the move an original eve wall was moved to the east 6 feet to increase the size of the milking parlor to accommodate the new, larger breeds of dairy cows that were becoming popular at the time. Also, the new roof was built with higher pitch to allow for storage of more hay. The barn was in use in a dairy operation until the 1970s.
Another of Deacon True’s sons, John, built the Mill at Freedom Falls (Maine), in 1834. PTF was intimately involved in the restoration of that Mill in 2012.
-George and Karin Look
Read our first post about True-Randall farm, about leveling the barn, here. In upcoming blog posts, we will describe our process for repairing the timber posts in house and barn, and in-place tie beam repair.
Reading Dave Ewing’s paper on the history of moving buildings, I started thinking about the part lifting buildings plays in our work (it’s a starring role), and the part that screws and other simple machines play in that lifting (co-starring the skid steer).
Skid Steer as Narwhal
This year, we repaired a barn on Randall’s Hill in Montville. It was a big lift, and hold. The crew spent late fall and winter under the barn digging footers and preparing the ground for both the lift and the posts that would be installed below the undercarriage. The crew cut 6″ x 7″ cribbing into 4′ lengths and piled them, Lincoln-Log style, into ten boxes. Building cribbing piles is something of an art; the piles need to be perfectly level, and when they are neatly cut, they can be checked for plumb at the corners as they are stacked. We build with the 7″ on edge so that each layer is 7″ high. This allows us to slide other cribbing, laid flat on the 6″, in and out of the stack when it comes to lifting and lowering the steel with hydraulic jacks.
Dead men and cribbing piles, under the barn
We built a wooden track atop the cribbing piles, and placed rollers along them. Derek Davis, of Davis Dirtworks, inserted 35′, 1000 lb H-Beams under the building, and onto the rollers. The rollers we use come from our clapboard supplier, Steve Jeffery, from the center of the log that is left over from manufacturing radial-sawn clapboards. In the 1890s, they also used wooden rollers to move the barn, but instead of a skid steer, they used steer.
So, we slowly rolled the H-Beams into place, and then Derek threaded four 25′ I-Beams under the building (called the “needles.”) The entire grid was leveled across the cribbing piles and then raised to the underside of the first floor framing. We lifted sequentially, using hydraulic jacks set onto cribbing that crossed the “ladder rungs” of the cribbing piles. Considering that the throw of the jack was less than 7 inches, I was surprised that we finished lifting the grid the same afternoon that the beams were installed.
Barn, block, steel, steer
The beams were used to stabilize the building while the cinder block foundation was demolished and replaced with proper footers, frost wall, and timber posts that were tenoned to the sills above. Drainage was installed around the exterior to manage the water that formerly ran through the basement and contributed to undercarriage decay.
Demo dayHolding the barn with steel, cribbing piles, and dead men
One of our main tasks was leveling the posts. Over time, the sills and summer beams had sagged and spread to such a degree that the posts were all over the place. We determined a reference post at the beginning of the project, in the front corner adjacent to the connector ell. At each of the other 23 posts, we used both a water level and laser level to determine how far from level the top of each post was from the top of the reference post. One of the drive posts was more than 5 inches out of level; most of the rest ranged between 2 and 4 inches.
frost wallNew posted wall
When we were finished repairing the foundation, the steel beams were removed as they’d been inserted. It took an afternoon to lower the beams, using hydraulic jacks, cribbing pile rung by cribbing pile rung, and removed just as gracefully by Derek in the skid steer.
Elsewhere on the project, both during and after the insertion of steel, we repaired posts using a more typical method of lifting and holding, with brackets, screw jacks and jack posts. I will describe multiple approaches to post repair in an upcoming blog post, and more about Randall’s Hill over a series to be published this month. The barn was part of a much larger project to repair the house and barn, and renovate the connecting ell with a clean, modern kitchen. The completion of a project that combined honest, best-practice preservation and the installation of a high-modern contemporary kitchen required a clear vision from the clients and a lot of stamina. I look forward to describing our process in future posts.
If forced to choose, I think most of the PTF crew would choose hand-tools over machines, our chisels and mallet. Fortunately, we don’t have to choose, and one of the pleasures of our job is that we have a broad range of woodworking tools with which to solve the problems we face in the shop and in the field. There are those of us who drool over the machines, and those of us who jealously guard our antique molding planes. I tend to fall into the latter category, but I am here to admit that the three-year-olds were right. On a beautiful spring day, big yellow lulls and tall blue manlifts are even better than my little buddy Quinn thinks they are.
Barn and lull
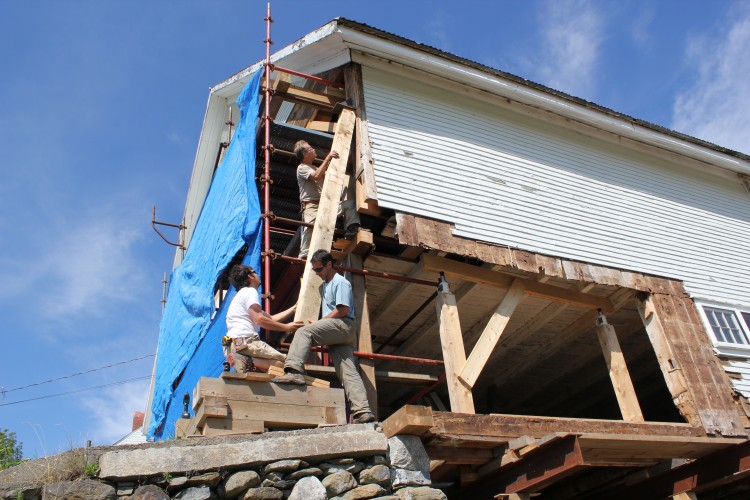
A couple months ago, Shawn and I were facing the end of an enormous barn that looked as if it had been attacked by a pair of xylophagus tyrannosaurs. The two corners posts, and the sheathing around them, were absent, and the large triangle of the gable end teetered on a center post, which was significantly supported by a neighboring tree. The ends of the tie beam had rotted off just enough to disconnect from the eave plates, but not so much that their weight was reduced.
Interior frame
The framing of the barn is unique. A center drive post extends to the ridge, and is connected to the left eave by a tie beam. On the right, a strut rises to the right rafter, and the right rafter heel joins directly with the top of the right post. This gives the barn an incredibly high drive on the right side. The client wanted to repair the entire barn, but due to financial concerns, and the fact that the gable end was disintegrating before our eyes, we decided to sacrifice the last gable bent. If the condition of the last bent is cautionary tale about the consequences of roof leaks, the condition of the rest of the bents is a testament to good timber framing. Above the deck, the frame is in remarkably good condition; below the deck is frankly a little scary, and we will be stabilizing there next.
Gable triangle, afloat
The challenge was to disengage the gable end from the roof, without allowing it to crash into the barn, and to do that, we used the lull, man lift and chain saw to great effect. A man lift allowed us to stay above the fray, and carry the purlins and roof sheathing to the pile on the ground. Once the plate, purlins and roofing in the last bay were removed, the gable end was composed of a center post, braces, a tie beam and two rafters. The rafter-tie beam connection was completed rotted through. The stability of this limited framing in a stiff breeze is a testament to braced joinery. We were able to cut the rafters into pieces above the floating gable end tie beam, and then chop the center gable post into pieces from the top down.
Scribe line, 2 ft below the plate; the details afforded by man lift access
This job challenged my perceptions of preservation and the kinds of work I enjoy. This barn will serve as a good example of a preservation through triage and we were able to save an interesting structure for a client who had limited funds. I learned that big machines can be as attuned to their task as a hand plane, and just as fun on a sunny day.
Preservation in the field can take many forms. Most of the time, preservation is the most practical and reliable answer to a client’s needs, but there are times when pure preservation isn’t feasible, or reasonable (see Demeritt-O’Kane). The New Castle Congregational Church and gazebo offers an alternate model. The congregation has endeavored to preserve the main body of the church, repairing the undercarriage framing, and rebuilding the foundation under the rear additions of the building. When it came time to repair the dome topping the steeple, however, the building committee was faced with a proposal: if they allowed a cell tower to be built on top of the tower box, the cell company would pay for a new dome, in addition to monthly rent during the long-term lease. When the congregation chose to lease the space to the cell company, the dome was replaced with a hollow, fiberglass replicate.
Additionally, the cell company contributed to funds raised by community members for the complete restoration of the original dome. Some of the money from the cell tower helped to pay for a custom gazebo to support the restored dome. Its historical integrity was compromised, but at least the dome would be put to use.
The design process was a challenge. The building committee wanted a gazebo space that was large enough for weddings and other functions, but the original footprint of the belfry wasn’t big enough. From a design perspective, the gazebo needed to echo the original tower trim, but not overpower it. Due to distance and perspective, steeple cornice trim can be comically large when viewed up close; it is one of the most persistent surprises since I’ve started doing this work. Given these restrictions, Ed and Keith designed a gazebo that honored the original craftsmanship of the dome, without distracting from the classic composition of the church.
Frame design, shop drawings
The preservation of the dome was completed first. The huge, curved rafters reproduced using a Prazi beam cutter, which is a chainsaw bar and chain attached to a circular saw in place of the saw blade. The Prazi functions like a jigsaw on steroids. Other elements of the original framing were retained, like the struts that run diagonally from plate to mast.The gazebo’s timber frame design was ingenious. The eight-sided structure consisted of four main bents and four diagonal plates, which overlapped and connected the main bents.
Keith using drawknife to smooth curved brace
The curved braces were cut from a solid, 3″ thick glue-up. The curve was roughed out by the Prazi, and smoothed with a combination of drawknife, spokeshave, and sander.
Bent Stack
The main bents were assembled in the shop, their joints were pinned, and then stacked neatly. They were loaded onto the trailer and driven to New Castle, where we were met by a crane. The crane unloaded each bent from the trailer and stood the frame onto its feet already located on an octagonal concrete pad.
Placing Bents
As the bents were unloaded, they were braced temporarily, and capped with their respective plates, creating the alternate four faces. Working against the crane operator’s clock, we carefully laid sleepers across the plates and tapped them into their final resting places. Once the sleepers were placed, the crane lifted the cherry-colored dome and placed it on top.
Tarp-tented gaze-bo
The weather in the weeks that followed started with a heat wave and finished with a week-long downpour. When the weather threatened to derail and July 4th deadline, we opted to drape the entire structure in an improvised tarp tent.
Cornice detail
Under the tent, we were able to complete the cedar shingling of the skirt roof, hanging the cornice, casing the posts and braces and hanging beadboard on the ceiling. Our friend Iain Mackenzie turned and installed a custom balustrade. By July fourth, the tarp was removed, and New Castle was able to dedicate the gazebo on Independence Day.
Gazebo, completed (unpainted)
New Castle’s approach may not fit the preservation ideal, but it was a compromise that ultimately led to a new community space and the adaptive re-use of a significant architectural artifact. See more photos in our Flickr set.
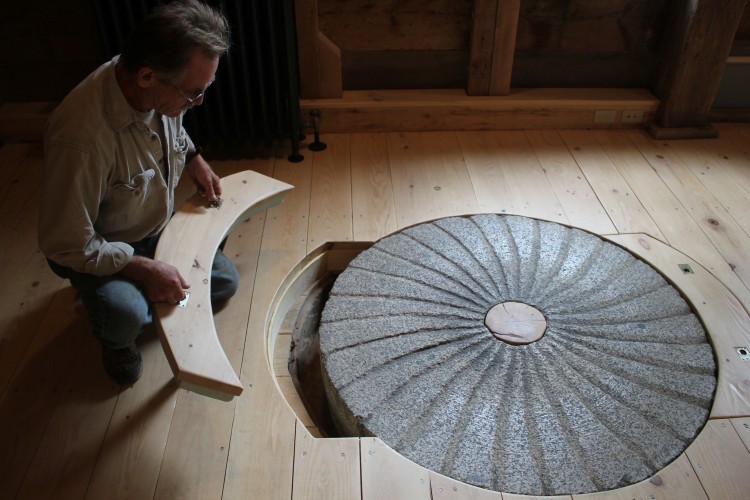
Chuck pulls up the access hatch and examines a millstone
If you grew up in Freedom, ME you’ve probably already toured the Freedom Mill, in high school, under the cover of darkness, at risk to life and limb. At its height during the 19th century, the mill had served as an economic engine for the area, using the water power at Freedom Falls to process grain and manufacture wooden dowels. By the 21st century, the mill was filled with piles of rotting sawdust, and teenagers who had nothing better to do and a misplaced trust in the floor framing. In 2011, Tony and Sally Grassi bought the property, seeing in the detritus an opportunity to preserve an historic landmark while stimulating the local economy.
Jesse Turgeon’s first post fix
The mill’s place in Maine’s history made this restoration especially meaningful for the crew at PTF. Our work places us within the long history of New England building craft, which includes its water-powered mills and early industry. PTF’s Northern Contingent had the pleasure of touring the nearly finished mill last week. A restaurant and an independent school are moving in. What the renovated mill now lacks in mischief and sheer danger, it makes up for by interpreting the industrial history of Maine, and creating a space for people to incorporate that history into their daily lives. We recommend heading up and taking a tour, before classes begin.
Foundations, old and new
Repairing the frame posed a number of unique challenges. The undercarriage needed full replacement, and because the mill was water-powered, it was built more than sixteen feet above a rushing stream. The crew rebuilt the undercarriage exactly as it was originally framed, threading 12″ x 16″ x 22′ joists through the building and over a complicated network of staging.
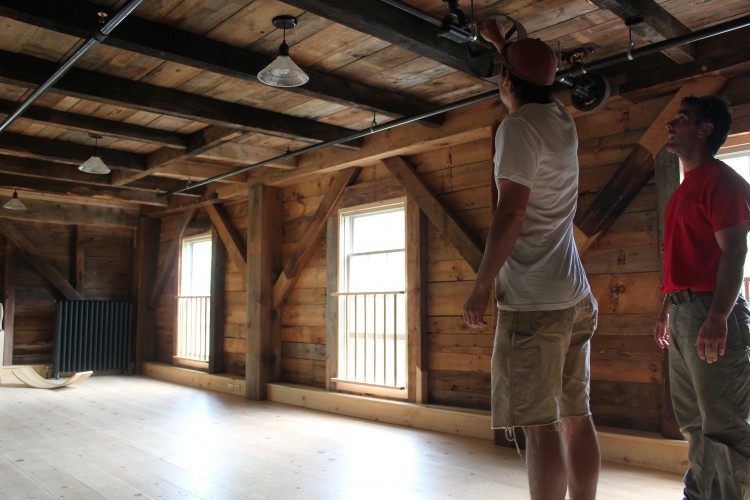
Scott marvels at the massive floor framing
In addition to the exposed wall framing and the antique mill-works hanging from the ceiling, view hatches throughout the building allow visitors to discover how the building functioned as an industrial space. In the main space, a hatch allows visitors to get a close look at an old mill wheel (see first photo, above). In the main entrance, the dowel drying racks were preserved, and a viewing window shows the series of radiator pipes over which they were built.
Lee points out a detail of the mill works
A small school is moving into one of the upper floors of the mill, the exposed framing surrounding the classroom and steeping students in their heritage. It is on these upper levels where the brace repairs are best observed, right at eye level.
Marriage Marks
The crew also dismantled, repaired and rebuilt an original ell addition. The roof framing is visible as students climb the stairs to their classroom, and in the commercial kitchen.
Preserved framing in rebuilt ell
Over lunch, we saw but a small slice of the work that has been completed at Freedom Mill. The Grassi’s website offers a lot more information on the history, the restoration, and opportunities to visit. It stands out among restoration-project-websites in its simple design and readability.
The historic nature of our work gives Independence Day special meaning for us here at PTF. Two of our recent projects will be holding special celebrations to unveil their restored buildings:
New Castle Gazebo, almost finished
July 4, 2013, New Castle Congregational Church, New Castle, NH – Parade and ribbon cutting at the New Castle Congregational Church, 10a-2p. We have been negotiating with the rain these past two weeks to finish the trim on the gazebo. Since Friday, the gazebo has been covered by an enormous green tarp tent; so in this case, I mean unveiling literally.
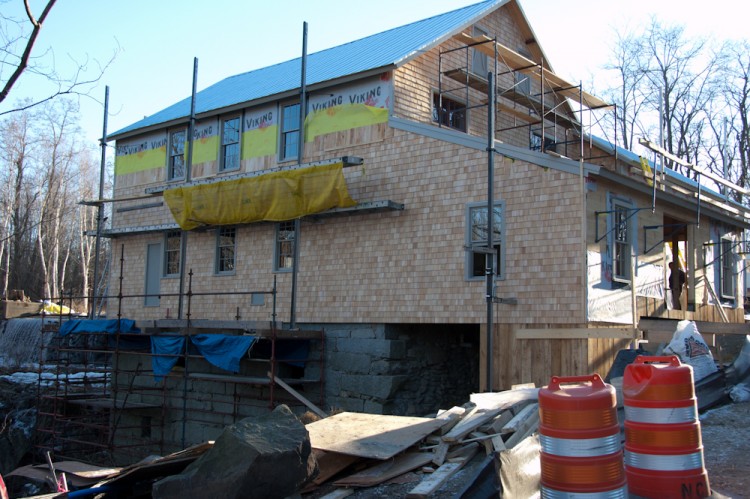
Mill at Freedom Falls, almost finished. Photo from millatfreedomfalls.com
July 6, 2013, Mill at Freedom Falls, Freedom, ME – In honor of Freedom, ME’s Bicentennial, the Mill will be giving tours on July 6, from 8:30 – 3:30. Read more about the tours on their blog, and please stop by.
Marrett House Panels, laid out, from loft above. Photos by author
A year ago last April, just after rush hour, a man stole a Suburu in Cape Elizabeth, drunk-drove it to Standish, crossed two lanes of traffic, surfed a lawn and crashed into the Marrett House, coming to rest in its historic parlor. The stout framing members were fractured and the frame and panel wainscot splintered, but the wall’s 12-lite window survived. Not a single pane of original glass was broken. The plaster wall adjacent the window was thrust inwards and the split lath separated from the broken studs, but the 1847 wallpaper pasted to it remains intact. It’s wacky that, out of all the buildings along the way, the driver hit a well-preserved relic of the late 18th century, set well back from the road. And I can’t decide whether that’s good fortune or bad. Route 25 is a well-traveled road, and at least that part of the Marrett House is uninhabited.
Broken stile, just below window. Photo by Shawn Perry
The night of the crash, employees of Historic New England worked late into the night stabilizing and weatherizing the wall. In the following weeks, conservators carefully collected and organized the shards of woodwork and PTF assisted with flashing and estimated the repairs. When PTF came back to site three weeks ago, nearly every piece of splintered woodwork was inventoried and accounted for. Half of the paneled wall was still ajar, in place, and the other half lay in the barn loft, spread out like an exploded schematic.
Broken framing, shoved wall. Photo by Shawn Perry
This is an exciting and challenging project for us. The specifications are detailed and Historic New England requires strict oversight, but the process allows us to learn about other conservation technologies and refine our methodology. Museum clients prioritize conserving material and reversibility more than private clients. Where a private client might want a dutchman repair to a broken stile or rail, well-cemented to the original material, Historic New England wants to preserve the shards of original material, and a barrier layer of Paraloid B-72 between the epoxy and the original wood. While we usually would use West System, a brand of epoxy that has good adhesion, penetration and permanance, here the client requested Araldite, an epoxy that doesn’t penetrate the surface and, with a barrier layer, is ultimately reversible. Ultimately, it is much nicer to work with a client who really cares about their property rather than one who doesn’t really care what we do or how we do it. Fortunately, clients who don’t care about their building don’t choose PTF.
Shawn, the left stile, and mortising chisel marks from a hand-chopped mortise.
For me, the exciting part of this project is fitting together the shards of wood like a jigsaw puzzle. The task allows me to connect with the mind of the original builder, and explore his methods of construction, as well as reminisce about the 1000-piece jigsaw puzzles my aunt, my mother and I used to construct every Christmas. With all the work that Historic New England completed before we got there, I think the Christmas puzzles might have been harder.
Riven lath with the quality of stain-grade trim
The plaster hangs on individual riven lath, which fell out of fashion soon after the Marrett House was built. By 1800, most houses were built with split-board, or accordian lath, in which a single wide board, of low quality, is split and stretched down the studs. The riven lath at Marrett House is perfectly clear with impossibly straight, tight-grain; the kind of wood that many carpenters lament can’t be found today to be used for interior trim and parlor reproductions.
The quality of lath may have contributed to the survival of the plaster and wallpaper that hung on it. In the third photo, above, one can see the degree to which the wall was pushed into the room, and the damage to the studs. It should be noted that the original studs and sill were in unusually sound condition, and showed no signs of rot. The car hit the wall with enough force to completely sever the studs from their joinery.
The Marrett House project is already well on its way to completion. The stud repairs have been fit, the B-72 and epoxy arrived yesterday, and we will begin test-gluing the panels tomorrow. It’s a shame that such an historic artifact suffered from the random recklessness of a drunk driver, but the very qualities that lent this building its longevity allowed it to survive such an injury. Many of our historic buildings have suffered far worse from roof leaks and poor maintenance.
Marriage marks in stud and sill
I hadn’t seen before marriage marks like the ones used to align framing members in the west wall; I wonder whether they might be unique to the builder or to the region. Has anyone out there wandering the interwebs come across this type of marriage mark before?
For more photos of the marriage marks, riven lath and the rest of our process, click on the slideshow, below:


")


")