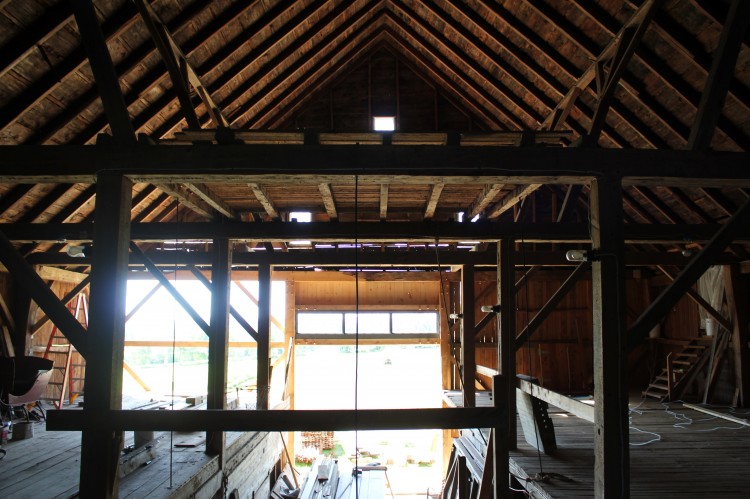
To the crew at least, the most impressive piece of the French frame is the roof system. The roof has a very low pitch: the apex of the ridge is little more than 4′ above the tie beams. There are two continuous ridges, each about 30′ in length, that meet on top of a short mast at the center of the crotch of the L. Each hip-roofed end also has mast resting on a mid-span tie beam, which catches the rugged hip rafters. Each full length tie beam is topped by a pair of principal rafters which tenon into the ridge beam.
Plate installation with Jake and Scott. Photo by Timothy Sweeney
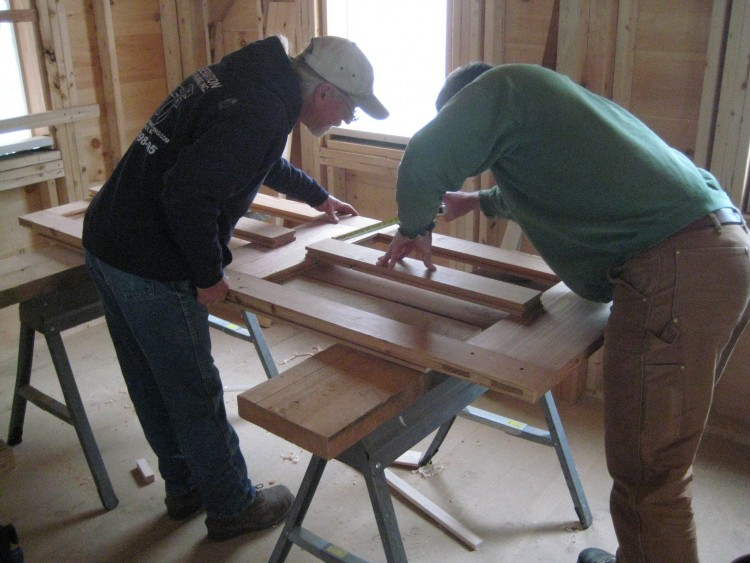
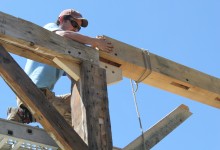
The tops of the posts are ringed by a set of co-planar plates, joined to one another by mortise and tenon. There is 38′ plate along the south eave and a 36′ plate along the west eave. There is another full-length plate along the north eave connecting the east gable to the west eave. At the inside corner, where the valley collected rainwater, and where an interior post was removed or missing, the north eave plate failed, and required a long double-scarf repair (being assembled, above). For this house, we used plate to refer to the gable end timber that tops the studs and connects the corner posts. To create hip construction, this beam itself is crossed by a set of tie beams.
Foley Roof Frame
The tie beams cross over the plates using a partial half dovetail joint and overlap the plate to a depth of 3″. There are four full length tie beams in the main portion of the building and five full length ties in the ell. The ties closest to the gable are about nine feet from the end of the building. Two short tie beams cross the gable end plates and join the full length tie beam with a pinned mortise and tenon joint. A hip, or dragon, tie extends diagonally from the short tie and clasps the plate joint at the corner.
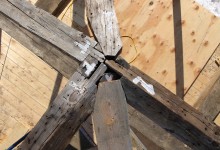
Hip tie clasps plate joint.
Each tie type is topped by a distinctive rafter. The full length tie is topped by a pair of principal rafters, which tenon into the end of the tie beam. The hip tie is topped by a hip rafter, and the short tie is topped by a jack rafter, which joins the hip rafter at a compound angle and full mortise and tenon joint. Zach had fun scribing one of these babies.
Masts in the Grass
A short four-foot mast supports the apex of the roof, receiving the end of the ridge, two principal rafters and two hip rafters. When we were inventorying the frame, the mast joinery looked rough, like it had been hacked with an axe. There was no consistency to the cuts, and no way to accurately model the joinery. When the frame was in parts, we weren’t crowing about the original builder.
Jake installs a jack rafter
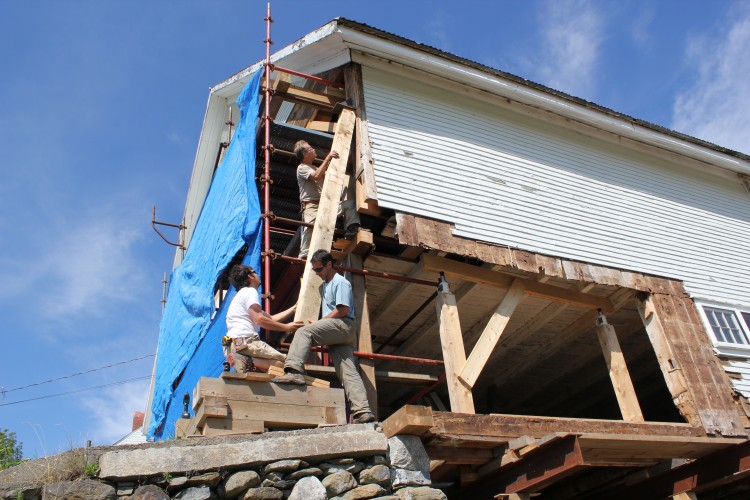
We assembled the frame using a lull, dead men and muscles. Considering the inconsistency of the bents, and the complications of the second floor, hiring a crane wasn’t efficient. Using a crane on-site for more than one day is a huge investment, and more than two days was beyond the scope or need for this project. So the raising was incremental, and slow.
Raising in progress. Photo by Timothy Sweeney
We waited to assemble the roof parts until after the rest of the frame was raised. There was no advantage to fitting the parts on the ground. We had almost all the original roof framing, and we were going to sheath the second floor as soon as it was raised, providing us with a contiguous deck on which to roll staging. When we finally placed the first roof timber, we were more than a year into the project.
Scott fits rafters to mast
Where assembling the house frame was frustrating, assembling the principal roof frame was gratifying. The original principals landed on the original masts like they were going home. The ugly axe cuts at the top of the mast were beautifully scribed to the undersides of the hip rafters. In modeling the roof frame, we could tell that the design was complex, but until we fit the pieces together, we had no idea that it was also beautifully crafted. It inspiring to witness, and to contribute our skills to its repair.
Two ridges, three rafters, one mast. Photo by Timothy Sweeney
This is the third post in a series about the Foley-French House. Check out more in progress photos, here, or by clicking on the slideshow below. If any of the photos look professional, but they don’t say “by Tim”, I forgot to credit Tim. Next up, scarf joints.
Joe McAllister, fitting Bent 6. Welcome back, Joe!
On Monday, the Pennell crew erected the ell by hand. They had a roustabout on-site, which is like a more portable, telescoping gin pole, but the bents were light enough to raise with a crew of four. The ell, a drop-tie frame built in the mid-1800s, was dismantled earlier this spring during the first phase of Pennell House repair. The frame parts were transported back to the shop in Berwick, repaired, and test fit. Our most recent North Bennet Street School intern, and newest employee, Joe McAllister devoted his final school project to the cutting and joining of two additional bents to prepare the frame for re-use as a contemporary kitchen.
East gable, dismantled
Following the ell, repairs to the house were extensive. The frame was lifted on steel I-beams in order to replace the foundation and completely rebuild the undercarriage. Seven of the eight house posts needed repairs, two of which required full replacement. The first floor studs of the north, south and east walls all required lap repair or replacement. Along the north eave, all three second floor girts and eight of their associated braces were replaced. Ultimately, the entire east gable bent was completely dismantled, repaired, and rebuilt, while the rest of the building was left standing. See “before” picture, above, and “after”, below.
East gable attic, reassembled
Revisiting the job-site this week, I realized that the diversity of joinery matched the broad scope of repairs. The decision to use a particular scarf, spline or lap joint is dependent on a number of factors including location, level of deterioration, difficulty of installation, historic significance, and whether or not the joint will be in tension, compression, or subject to twisting. For joinery enthusiasts, I’ve recommended Historic American Timber Joinery, by Jack Sobon, and I’ll recommend it again; it is the definitive reference manual for those pursuing traditional repair of historic timber framed buildings (I’ve linked to a PDF, if you want a hard copy, it’s worth ordering one from the Timber Framer’s Guild). On a hybrid job like this one, combining preservation, energy retrofitting and adaptive re-use, we used both traditional scarf techniques like those in Sobon’s book, and contemporary approaches, like splines and free tenons. Paradoxically, sometimes the newer repair techniques are able to preserve the most original material.
Bladed scarf, you old so-n-so
If you visited our site before, job or web, you’ll know that our bladed scarf is an old standby. It works well for post fixes, because the keys prevent the joint from slipping or twisting under outward pressure. The outward thrust of the rafters from above, in combination with the possibility of a rolled sill, and the inward tension of the tie beams and tie girts, means that a post scarf should have some means of “locking” to prevent slippage. This could also take the form of an under-squint (see below) but in this instance, we prefer the square-bottomed keys of the bladed scarf. These multi-directional forces are what make a simple lap joint inappropriate for post repairs. We expect our repairs to last for as long as the building has already been standing. Over the course of 150 or 200 years, there may be shifting in the foundation, or deterioration in a sill, that would complicate the pressures acting on our post fix. A bladed scarf joint is designed to withstand those forces, so that in 100 years, if a sill needs to be replaced, the post foot and associated repair can remain intact. (I hope Athena, protector of woodworkers, notices that we strive only to double the lifespan of a building, we don’t expect to triple it.)
Halved and bladed scarf in the undercarriage
A bladed scarf is also used to repair an unsupported section of sill. When a sill, summer beam or floor girt is supported on posts or piers, rather than a full foundation wall, it needs a repair that can support itself and prevent sagging without introducing metal brackets or plates. The introduction of big plates of metal, especially in potentially moist environments, like a basement, risks the danger of condensation and its dreaded associate, rot. While a lap joint may be sufficient for many sills, on stable, continuous foundations, the keys in a bladed scarf give it compressive strength perpendicular to the joint.
True-Randall Tie Beams
In a timber under considerable tension, such as a tie beam, a bladed scarf joint may not be appropriate. The joint has considerable resistance to compression and twisting, but relies on pins and friction to prevent spreading. We’ve long used a tabled, wedged joint to prevent spreading in tie beam repairs, but at the True-Randall Farm in Montville, we encountered a stop-splayed, under-squinted and wedged scarf that had been used to extend the length of tie beams by more than ten feet. The barn was moved over a hundred years ago, and the joints had loosened, but held up considerably well under the strain of a crumbling mid-century concrete block foundation. The biggest threat to a barn’s frame is water infiltration. When tying joints fail, allowing plates and rafters to spread, roof leaks can result, leading to water infiltration that will accumulate on any available horizontal surface: plates, girts and, often, all the way to the bottom of the frame, at the sill.
Stop-splayed, undersquinted and wedged scarf in the east gable tie girt
We used this stop-splayed, under-squinted, and wedged scarf joint to repair the east gable tie girt. The east gable bent contained two tying timbers: a tie beam above, which runs from plate to plate and required full replacement, and this tie girt, which supports the second floor joists, and is fully supported by studs from below. The under-squinting is the little angled cut two inches from the top and bottom faces of the timber; this angled cut also helps to mechanically “lock” the joint, and prevent twisting.
Slope-shouldered and under-squinted bolster. Note free tenon in second story girt, above.
Elsewhere in the house, we found another instance of under-squinting, in a slope-shouldered bolster used to repair a post. This was a really cool fix that was probably installed sometime after a renovation that involved hacking out the interior faces of the posts, so that they wouldn’t intrude on the interior wall plane (how dowdy and old-fashioned!).
Mortises: Exposed!
This assault on the frame resulted in some posts being sliced in half, immodestly revealing their joinery. Unfortunately, this hackery also removed the bearing shoulder of the post which formerly supported the ends of the second story floor girts. The bolster above was installed around 100 years ago to support the end of one of these girts.
North eave, center girt, before.
Three second-story girts along the north eave were rotted and needed full replacement. The second floor joists fit into cogs cut into the interior faces of the girts, and stayed put during installation of the repairs. Likewise, the four north eave posts could not be moved (the east gable post was replaced in full, but needed to be installed before we replaced the girts). The conditions created by a standing frame required that we use a free tenon or spline connection to repair these elements. We cut the girt to length, shoulder to shoulder, and cut a slot in the underside of the timber the full length of the free tenon.
Free tenon repair between girt and post. Extended mortise in post is plugged.
We install the girt between the standing posts, and then insert a free tenon into the slot. Then we slide, or pry, the tenon laterally so that in engages with the accompanying mortise in the post. Lastly, we plug the gap that is left in the girt. In those instances where the posts are in better condition, the post mortise can be extended. The free tenon is inserted below the girt and slid up into the slot. Then the extended mortise in the post receives a plug (see above).
Half lap, and partial bladed scarf joint
Seven of the house’s eight posts required repair or replacement. In each case, we preserved as much original post material as possible, resulting in some fairly idiosyncratic fixes. In the one pictured above, an interior corner of the post had been removed in the previous “renovation” and required a slightly more complicated version of the bladed scarf joint.
Halved and bridled scarf repair in south plate
The twin threats of squirrels and rot wreaked havoc on the east ends of the north and south plates, requiring a scarf repair for each of them. Plates endure considerable torque, created by the outward thrust of the rafters and inward tension of the tie beams. Lee used a halved and bridled scarf on the ends of these timbers in order to retain the most material, and prevent twisting or rolling.
Splining the ell plates
The original ell plate was full length, and in good condition. The plans required an extension of the ell by two bents to accommodate a contemporary kitchen, but we didn’t want to remove any more original material from the plate than was necessary. The plate had its own interesting joinery, worth preserving, in the form of a rabbet along the top interior edge, that caught the birdsmouth on the rafter tails. A traditional scarf joint would have required the plate to be cut back as much as two feet. Instead, Ed designed a spline-joint, that connected the original plate, the new plate extension, and the post, all in one (above).
South eave stud repairs
Three quarters of the first story studs required repair or replacement. Where feasible, we used a simple half-lap repair on the athlete’s feet of rotten studs. The half lap, instead of a full length stud replacement, allowed us to replace studs with tenons on either end, even when the stick was captured by a sill below and second-story girt above.
Rafter foot and tie connection. This one wins worst.
Often, we encounter bolts and L-brackets employed to little effect. Sometimes, these metal band-aids do more harm than good, due to the introduction of large plates of metal, against which water can condense and be held against the timber, or by creating a tensive or compressive force where it does not belong. There are instances, however, where a metal bolt or bracket is the best solution. The tie beam ends at the Pennell House were one such case. Each of the 5 remaining tie beams showed various levels of rot at either end, outside of the plate and the rafters’ birdsmouth. Other than the east gable tie, none of ties were rotted enough to require a scarf repair. However, the joinery on the end of the tie, the angled cog capturing the rafter’s birdsmouth, needs to resist considerable force, especially from the rafters that carry the cupola.
Rafter tie connection, repaired with bracket and bolt
We wanted to ensure that the tie beams would continue to prevent the bottoms of the rafters from spreading. Ultimately, we used a combination of 3/4″ threaded rod, and Simpson-brand L-brackets to create an economical solution to this pervasive, but relatively minor, problem.
Preservation work can be frustrating, because every building is unique, and every problem is interconnected with others. The lack of a universal solution makes preservation work almost as difficult to estimate as it is to execute. Fortunately, it is the very same combination of variety, unpredictability and creative problem-solving that makes this work so much fun.
Teamwork! Look at what fun Joe, Lee and Scott are having!
For more photos of our process at Pennell; please visit our Flickr page.
There exists in wood a quality so satisfying that the proper use of it in the structural features of a house produces an effect of completeness which does away with the need of elaborate furnishings or decoration.
Every now and then, I encounter a windbag who wants to tell me how I can no longer find the wood needed to properly restore 18th-century buildings. And he’s partly right, as windbags unfortunately are. Wainscot found in the Demeritt-O’Kane house was composed of a single clear panel 26″ wide and 17′ long. It is difficult, and not even always ethical, to obtain boards of that quality, and that is just one reason we preserve and repair original material whenever feasible. But sourcing wide, clear, heartwood pine (as well as large timbers) is challenging, not impossible. If one sources further afield than the local lumberyard and invests in good relationships with a variety of sawyers, it is possible to obtain wood qualified to our task.
Shawn Perry is one such partner with which PTF is fortunate to work. Most clients know him as the stout and skilled joiner found on jobs that range from a cylindrical water tower in Boxford, MA to a steeple in Castine, ME. With his wife Rebecca, Shawn manages their homestead in Lebanon, NH and often supplies PTF with black locust pulled from his woodlot by Judy and Aurora, their draft horses. Shawn, neighbor Steve Collins, of Belgian Meadows Farm and Les Burden, of Burden Tree Farm in Farmington, are three off-the-beaten path suppliers who help us source the wood required for especially discriminating jobs. Through these relationships, Shawn was able to procure pine logs 27-30 inches in diameter, knowing immediately their value if not their ultimate destination. He milled the logs to 1″ boards and stickered and seasoned them, slowly, over years. The resulting boards were almost entirely heartwood, very nearly clear, and 16-22″ wide.
Fireplace wall, evened to the eye
The boards were destined for the interior of the c.1790 farmhouse at iFarm. The client and architect specified a simple fireplace surround appropriate to the date and station of the original house. It consists of a beaded panel wall with a beaded, horizontal lintel. The tongue and groove boards serve both as wall paneling and as trim at the door openings (rather than an applied door casing). The lines are clean, and, for all their traditional authenticity, modern-looking. Fine carpenters will recognize that this austerity of line leads to the most demanding construction. From our perspective, the real purpose of casings and moldings is not to add ornament, but to hide the joints at borders; without it, every cut must be perfect.
Flush door “casing”
Dan, Dave and Tom milled the boards at the shop and finished preparing the surface with careful hand-planing. They used a very sharp and very shallow blade, in order to prevent tear-out. Progressing slowly and incrementally, they were able to identify a change of grain before the plane dug in, and would duly switch direction. Many people recognize the fine scallops associated with a traditionally hand-planed surface, but don’t know that a sharp hand-plane also leaves pine with an iridescent sheen. Side-by-side, the crisply cut fibers of a hand-planed surface is an obvious improvement over the hazy, abraded surface left by fine sandpaper (even without the scallops, which should be shallow, and whisper rather than shout).
Tom cut the beaded edge with a tablesaw cutter with a 1/4″ round bead and a quirk that comes to a point. Usually, he’d cut the bead with his selection of molding planes but their flat-bottomed quirks did not match the original profile found at iFarm.
Back on the iFarm, the fireplace wall in the living room was slightly curved and well out of plumb. Before fitting the paneling, Tom strung a series of mason lines along its length and furred out the wall to within 1/2″ of flat. If he had attempted to make the wall perfectly plumb and true, the wall would have appeared drastically uneven at the corners, at the door openings and worst, in the middle of the room, where the wall intersects the masonry of the fireplace.
Wall paneling scribed to original joists and second story floorboards
A final challenge awaited Tom at installation. The wide pine paneling runs full length, from floor to ceiling. Each board needed to be scribed to both the new floor and to the original second story floorboards that create the ceiling. The undersides of the second floor boards were rough and uneven, and not one of the original oak joists was square. When necessary, Tom first cut a pattern out of 1/4″ luan, and fit that before using the pattern to cut the pine.
Tom and the wall – if only the photographer was as careful with her focus as Tom is with his carpentry.
The results are impressive. Even as construction continues, the room is very pleasant to be in. The raw pine is warm, and even though the design is very simple, the fine craftsmanship is evident. As I was admiring his work, I asked Tom if, after all that effort, this wood was perfect, and he said, “No.” Which is true, and evidence of his standards as much as his loquacity. I was reminded of Robert Adam, our teacher at North Bennet, who taught us to choose sticks of Eastern White Pine that are devoid of sapwood and tightly vertical grained, even if they contain pin knots. These are highly preferable to the clear flat-grained stock often found in “Select” piles. The rot-repellent extractives that give Eastern White Pine heartwood its pinkish hue are why we still find 200-year old trim on New England’s capes – trim which is often “marred” by tiny pin knots. In a 1909 article in the Craftsman,Gustav Stickley addresses the selection for perfection in wood. He wrote:
…We are too apt, when we are choosing wood for the interior of our houses or for the making of our furniture, to put a money value on it rather than to allow ourselves to appreciate its natural beauty. For it is a fact that the greatest beauty often lies in wood that is faulty and comparatively valueless from a commercial point of view, and that by throwing this aside we sacrifice the most interesting characteristic of the woodwork. When we do strive for the effects produced by crooked growth and irregular grain, we go to the other extreme and instead of studying each particular piece of wood and using it exactly where it belongs with relation to the rest, we hunt out deliberately the most gnarled and knotted pieces, so that the result instead of being interesting a natural and inevitable way, is eccentric and artificial.
This is the greater pity because, after all, it requires only a little interest, care and discrimination to give to the woodwork of a room just the kind of interest and beauty that belong to it. Instead of that we are apt either to imitate the wealthy man who built a cottage in the Adirondacks and paneled it throughout with spruce so carefully selected that not a single knot appeared throughout the entire house, or else we go to the opposite extreme and deliberately select the wood of irregular and faulty grain for the entire house, instead of letting it appear here and there as natural
Nov. 15, 2013 – When I tell people what I do, I sometimes run into the misconception that preservationists are single-minded, inflexible, and uninterested in innovation and design. It’s true that at Preservation Timber Framing we think that if a frame stands strong for 200 years, it probably has good design to thank, and that time-tested building details last longer. We also think it’s possible to combine contemporary design with the stewardship of a historic property, and achieve successful results. True-Randall Farm was just such an example. The connected farmstead required repairs to house, barn and ell. The clients have a strong preservation ethic and want to preserve the original framing members but they also wanted a functional kitchen with clean, modern lines. The ell had been extensively renovated by previous owners, and the clients decided to dedicate that portion of the house to the new kitchen. They preserved any original framing within the ell (and without) that remained.
Even working within a strict preservation ethos requires adaptability. The house and barn at Randall’s Hill retained most of their original elements and were repaired traditionally, with in-kind materials. Both house and barn had rotten corner posts, but the repairs to each post were entirely different in scope and in design.
Barn corner post removed, from interior
The barn repair was a more typical, and traditional, fix. It was also more extensive, because the rot extended above the girt that supports the right loft bay, and the frame was more accessible to repair. In order to get access to the post, we stripped the corner of trim, clapboards and sheathing. We affixed an L-shaped bracket, custom-made for lifting, to the exterior of the post, and built a cribbing pile beneath and just to the outside of it. Beneath the bracket and on top of the cribbing pile, we inserted a dead man (temporary post) and hydraulic jack, which would be used to level the corner, and support the weight of the post and roof above it (See first photo, above). We also inserted a deadman beneath the loft girts to pick up the weight of the loft (See “Barn corner post removed…,” center of photo).
Corner post, with center mortise repair
Lee carefully cut away the post where it was rotted, and removed the braces. With a circular saw, auger bit and timber framing chisel, he cut the female half of a center tenon scarf joint onto the part of the post that remained. We used a center-tenon scarf on this post to preserve both the reference (outside) face of the post and the inside face that was most visible. The fix was also oriented to resist any outward thrust that was transferred from the rafters.
Lee and his corner fixes, (the center tenon post repair is on the bottom, a repaired nailer is on the top)
Lee cut the second half of the post out of a large 10 x 10 timber, the same dimension and species of the piece that was removed. In order to fit the post fix into place, we used a free tenon at the bottom of the post fix (see diagram, below).
Installation of a free tenon
Lee cut an extended mortise into the front gable sill and a long open slot on the adjacent face of the post fix. After the post fix was installed, and the center tenon scarf was fit and pinned, a free tenon was inserted vertically into the extended mortise in the sill and slid into the slot in the post. The remaining mortise space in the sill was plugged with a wedge, and the free tenon was pinned into the post.
Barn front gable, rebuilt in place
After the post was fixed, I replaced the loft girt in the front gable, and neighboring braces, door post, and nailer. Unfortunately, this barn typified the worst case scenario involving hidden rot. Working in preservation we face a harsh reality in which, sometimes, significant rot can be completely hidden, and once rot is uncovered, it can’t be re-sheathed until repaired.
Open house
We also performed a post repair on the Federal-style house and, in contrast with the barn, we could disturb none of the interior surfaces. In this way, the repair was similar to the timber frame repair at the Marrett House in Standish, where the framing had become detached from the plaster and lath, but the plaster and lath still needed to be preserved, with early 19th century wallpaper left intact.
House corner post repair, installed.
The post requiring repair was located at the front-right corner of the house. We first noticed that the front eave and right gable sills were punky. The rot in this post did not extend upwards past the second floor girts, or inward throughout the post thickness, except at the very bottom. This fortuitous turn of events allowed us to repair the post with a three-stepped lap joint – cutting away the exterior surface of the post to the depth of the rot, and using epoxy and fasteners to install a new-in-kind repair that fills the negative space left by the rot. Relative to the post repair in the barn, this was a non-traditional fix, utilizing modern epoxy and fastener technology. It was the appropriate fix for the level of rot and its context.
House corner, post repair.
The contrast between these two methods of post foot repair, and the combination of traditional repair and contemporary use in the ell, shows that the best preservation is adaptable. Our process is developed from traditional methods, but it isn’t staid or prescriptive. Part of the reason we document the multitude of barns we come across is that they provide us with a greater variety of long-lasting approaches to repair. We’re always eager to learn a design solution that is new to us, it’s just that the best solutions we’ve found have been proven over 200 years.
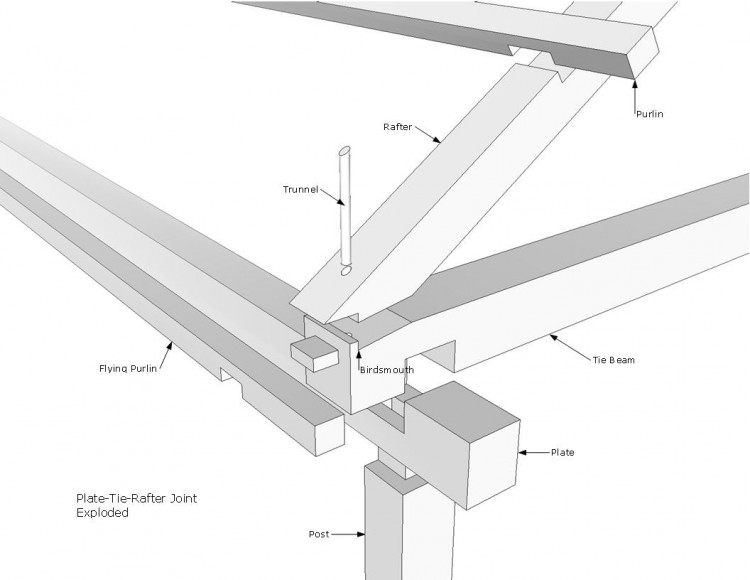
Last week, Arron and I saw a neat roof framing detail at a Greek Revival home in Brunswick. The rafter was joined to the tie beam with a birdsmouth and pinned with a trunnel, the tie overlapped the plate and supported a flying purlin, and the plate ran past the gable end post to create the overhang for the return.
Roof frame detail at return
There were areas that were badly deteriorated by critters and leaks, but the tie-plate joints were as tight as the day they were assembled. The relish at the ends of the tie beams, after the birdsmouth, were all still intact, probably due to the work of the trunnel, pinning the rafter foot in place. This was the first time I’d seen this particular joinery in a roof assembly; it’s always nice to see how well timber frame joinery withstands the pressures of weather and time.
PTF began work on the undercarriage of the True-Randall barn in November 2012, and recently completed a comprehensive timber frame repair of the house, barn and ell. George and Karin Look, owners and custodians of the True-Randall Farmstead, researched the history of their property extensively and are deeply committed to ensuring its preservation. The following account is a summary of their findings, which they’ve graciously allowed me to publish here.
True-Randall Barn, from below
True-Randall Farm: A Quintessential Maine Connected Farmstead
In 1813 Deacon Ezekiel True’s twin sons, Moses and Paul, built him a “house on the hill” above his mills on the St. Georges River, in what is now South Montville, Maine. A barn, which has the same timber frame construction as the house, was built for the farm across the road in 1814. Its largest timbers, primarily second growth hemlock, were hand hewn, most likely on the farm. They include 60 foot long continuous timbers for the plates. The farm passed by marriage from the True to the Randall family in the mid 1830s and remained in that family until 1984.
Barn bent framing, from loft
In 1889 the barn was moved to its current position and connected to the house by an ell. Local history indicates that it was rolled across the road using oxen and logs and that a small American Elm run over during the move stood back up and grew into a giant tree in front of the barn. The roof was removed before the move and roof elements, including the purlins, were used in building the deck for the barn, which was converted into a bank barn. At the time of the move an original eve wall was moved to the east 6 feet to increase the size of the milking parlor to accommodate the new, larger breeds of dairy cows that were becoming popular at the time. Also, the new roof was built with higher pitch to allow for storage of more hay. The barn was in use in a dairy operation until the 1970s.
Another of Deacon True’s sons, John, built the Mill at Freedom Falls (Maine), in 1834. PTF was intimately involved in the restoration of that Mill in 2012.
-George and Karin Look
Read our first post about True-Randall farm, about leveling the barn, here. In upcoming blog posts, we will describe our process for repairing the timber posts in house and barn, and in-place tie beam repair.
Tom and Dan, fitting the center stile of a frame and panel door. Photos courtesy of the author
Since 2009, the iFarm in Boxford, Massachusetts has been keeping crews from PTF busy. Christine Barensfeld, the owner of the farm, has collaborated with PTF to restore the farm which consistently operated from 1750 – 1932. Chris purchased the farm in 2009 a midst the threat of developers who would have purchased the property and parcelled the land for the construction of new homes. Since then, Chris has been accruing as much information as possible about the farm’s history, originally known as Towne Farm. She has held several events at the farm providing lectures, slides shows of historic photographs, exhibits of archaeological artifacts found on the farm, and tours of the property.
iFarmhouse, 2013
Chris’ concept to restore the farm covers both architectural restoration as well as re-establishing 19th-century agricultural operations. She has composed a team of professionals who have been collaborating to help her reach this goal. Preservation Timber Framing is proud to be a part of this unique team which includes Benjamin Nutter Architects, Howell Custom Building, Landscapes by Lillabeth.
When I arrived to iFarm in August of 2012, efforts to restore the farm had been well underway. The projects that had been completed included the restoration of the barn, carriage house, utility shed, and water tower. Focus during the early fall of 2012 was directed to the construction of a timber framed kitchen-ell addition to the original late-18th century farm house. The frame was raised just before thanksgiving in November of 2012.
Repaired second floor system
Since that time we have been concentrating on the marriage between the old and new through the restoration of interior structural and finish components. This has included tandem maneuvers re-leveling floors systems while selectively replacing deteriorated floor joists and a severely rotted beam which supported the chimney hearth. Work has also been done to slightly reconfigure the room layouts in an effort to reestablish the original late 18th century design.
Casing detail
Along the same thread of re-establishing the original design Dan, Keith, and Tom have used their combined expertise to determine what interior casing details are original to the construction of the house. In the north-west bathroom we found the original interior casing of the window to be simple, with a single bead on the corner. This discovery matches the single beaded baseboard and post casings in rooms on the second floor. Using this information we have embarked on repairing existing casing and replicating this detail by custom milling identical 3/4 and 1 inch pine casing for the doors, windows, structural frame, and as baseboard.
Door, partially assembled
Additionally we have fully restored all of the doors original to the house, as well as doors for the addition that Chris and Benjamin Nutter Architects bought from a local architectural salvage yard. The steam box method of scraping large quantities of doors, windows, etc. has proven to be the most effective and non-toxic method of removing lead paint.
As work is steadily heading in the direction toward a full restoration of the farmhouse, complete with a new historically compatible kitchen-ell, there is never a dull moment on the farm. Most recently in a collaborative effort with Lillabeth, Chris has recruited us to construct six 30’ tall bamboo teepees. The teepees will be used as a trellis to aid in the growth of hops. Taking approximately three years to harvest the hops, Chris will be starting her nano-brewery this summer. Any ideas on a name for this sure-to-be-tasty brew? I, for one, like the name Towne Road Beer!
David Ewing came to PTF through the Maine Preservation intern program. While working at PTF, he is pursuing a degree from Boston Architectural College. David lives in Dover, NH with his wife and beagle.
Last week we assembled Marrett House‘s 15 foot frame and panel wall and installed it. The day felt like a mini-crane day, with shoulders instead of cranes, and a mini-rush of adrenaline. When the day was over, and we’d reversed the effects of last April’s drunken car crash, I realized that time machines are not made from plutonium and flux capacitors, but patience and the right epoxy.
Shawn, administering a B-72 injection
The broken panels and stiles were glued together using Araldite, an epoxy filler, over B-72 as a release agent. A single piece required as many as three clamping stages and often requiring a custom clamping jig for each stage. For instance, in the case of a panel split down the middle, we needed to make a jig that protected the beveled, feather edges of the panels, and use cauls to ensure that the panel glued up flat.
Panel 10, epoxied and clamped
That same jig was much too large to be used to repair breaks in the bevel edge itself, and too narrow to repair the broken thumbnail on a stile. Each clamping jig needed to be large enough to distribute pressure evenly, but refined enough to allow us to observe the joint as we applied pressure. Because it was essential that we preserve the paint on either side of the break, if the pieces shifted even 1/32 of an inch during glue up, it would be too much, and the paint lines would not align.
Paint patch test, latex primer, then light filler
The client’s goal was to preserve as much material as possible, and for those repairs to be invisible on the surface. Where paint had flaked as a result of impact, we were asked to use fillers to even the painted surface, erasing ubiquitous paint “craters”. This phase of panel repair was best approximated in Paula Abdul’s song “Opposites Attract” featuring DJ Skat Cat; as we approached the right combination of barrier, epoxy and filler, it required a process of two steps forward and one step back. We completed a series of test swatches with using araldite, Dap filler and oil paint to determine which best produces an even surface. Ultimately, we settled on ready patch, a medium-weight spackling compound that dries almost too quickly.
When it was finally time to install the panel, it was so long that we couldn’t carry it though the building. It was so long that it would have been impossible to assemble in the room itself with the added length of clamps and human bodies. So we went through the front window. Scott, Lee, Shawn and I packed the assembled wall carefully in a cage of 2x lumber, carried it from the barn and passed it though the front wall.
Panel assembly, inside, from behind
Preserving the existing paint surface was important to the curators at the Marrett House, and they requested that we infill paint only. After three attempts of trying to approximate the color, I wish I could say that we found a paint that blended perfectly, but that would require more than just one color. There were more than six different shades of cream along the panels due to fading, dirt accumulation and previous attempts to clean the wall. Fortunately, the curators were pleased with the even surface and invisible seams and weren’t interested in us finding the right shade of dinge with which to wash parts of the wall. For right now, they are happy with the way the primer patches help them to tell the story of this wall’s ordeal.
As self-aggrandizing as it seems (this is a company blog, after all) I can’t recommend a tour of the Marrett House this summer highly enough. As much as I would like you readers to visit the North parlor and exclaim, “I can’t believe a drunk driver drove through that!” It is even more exciting to learn about the Marrett sisters and the history of preserving their family home. One sister taught Helen Keller at the Baxter School for the Deaf on Mackworth Island and you can read Keller’s letters upstairs. There is a likely story about how the locks on doors of the front parlor protected Portland’s gold during the War of 1812. If you are lucky and intrepid visitor, you can puzzle over the attic framing, the whole of which was lifted 2′ during the mid-18th century.
Sill repair, brace repair and stud repair
It’s too bad that Scott, Shawn and Lee’s meticulous frame fixes will be invisible to the visiting public, but more photos are available to the public visiting our Flickr page, and an upcoming blog post focusing on the frame repairs.
Frame repairs, laps and sisters
I know in my head that it is a terrible shame that a careless criminal drunk drove a stolen car through the parlor of a 220-year-old impeccably preserved home, but in my heart I feel fortunate for the opportunity to work closely with such fine craftsmanship.
On Wednesday, the crew down at iFarm raised a new timber-framed kitchen ell. The modified English frame is based closely on joinery found in the late-18th century house. We based the size and location of the addition on evidence found in the house frame of an original, and now demolished, ell. Like the house frame, the reproduction ell is constructed of White Oak and Eastern White Pine, in addition to Spruce, a species dictated by engineering requirements. We worked with structural engineer Joe Fix, and architect Ben Nutter, as well as Howell Custom Builders, to build an historically accurate, traditionally-joined frame that met all Massachusetts building codes and regulations. Click on the slideshow below for more information:
FOR SALE – The Israel Demeritt House is a two-story, center-chimney, timber-frame dwelling, 40’ x 32’ with attached cape ell, 40’ x 21’. NH state historian, Jim Garvin, reports that it “is the best example so far identified in Durham of a two-story, center chimney house in the federal style.” Out of seven original fireplaces, three are incorporated within fully-joined raised panel walls. The remaining four mantels showcase the craftsmanship of Nathaniel Demeritt, the original builder, with reeded moldings derived from Asher Benjamin‘s A Country Builder’s Assistant (Demeritt’s own copy is housed at the New Hampshire Historical Society). Original crown moldings, chair-rail and casing are unique and have been preserved in nearly every room. The house also retains all original sash and corresponding “Indian” shutters. There are six bedrooms and room for two full bathrooms. The summer kitchen, 20’x 23’, is large enough to accommodate modern amenities with minimal retrofit of historic features. The house is dismantled, documented and preserved in its entirety. Please contact Arron Sturgis, (207) 698 1695, and peruse the articles below for more information.
View the architectural model of the building, in PDF form.
Read our series, “The O’Kane Notebook,” on dismantling the building, and the craftsmanship revealed in the process.
Read James Garvin’s report on the history of the building and its residents. You’ll never read a more well-written application for National Register status.
Peruse all of John Butler’s stunning photos of each interior and exterior wall, with trim carefully itemized and outlined, below:


")