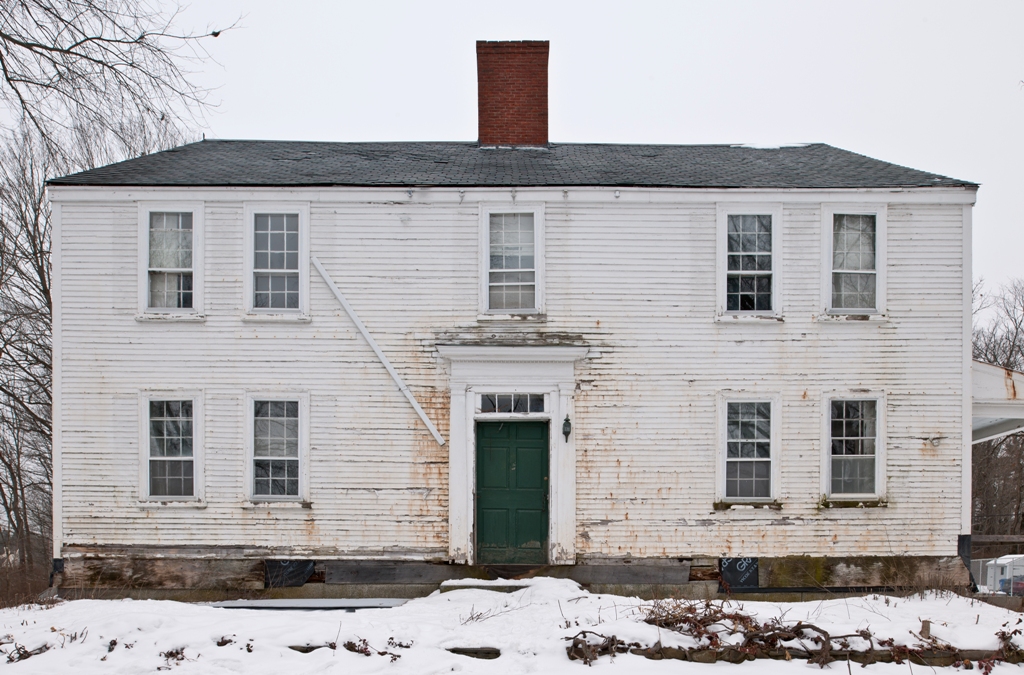
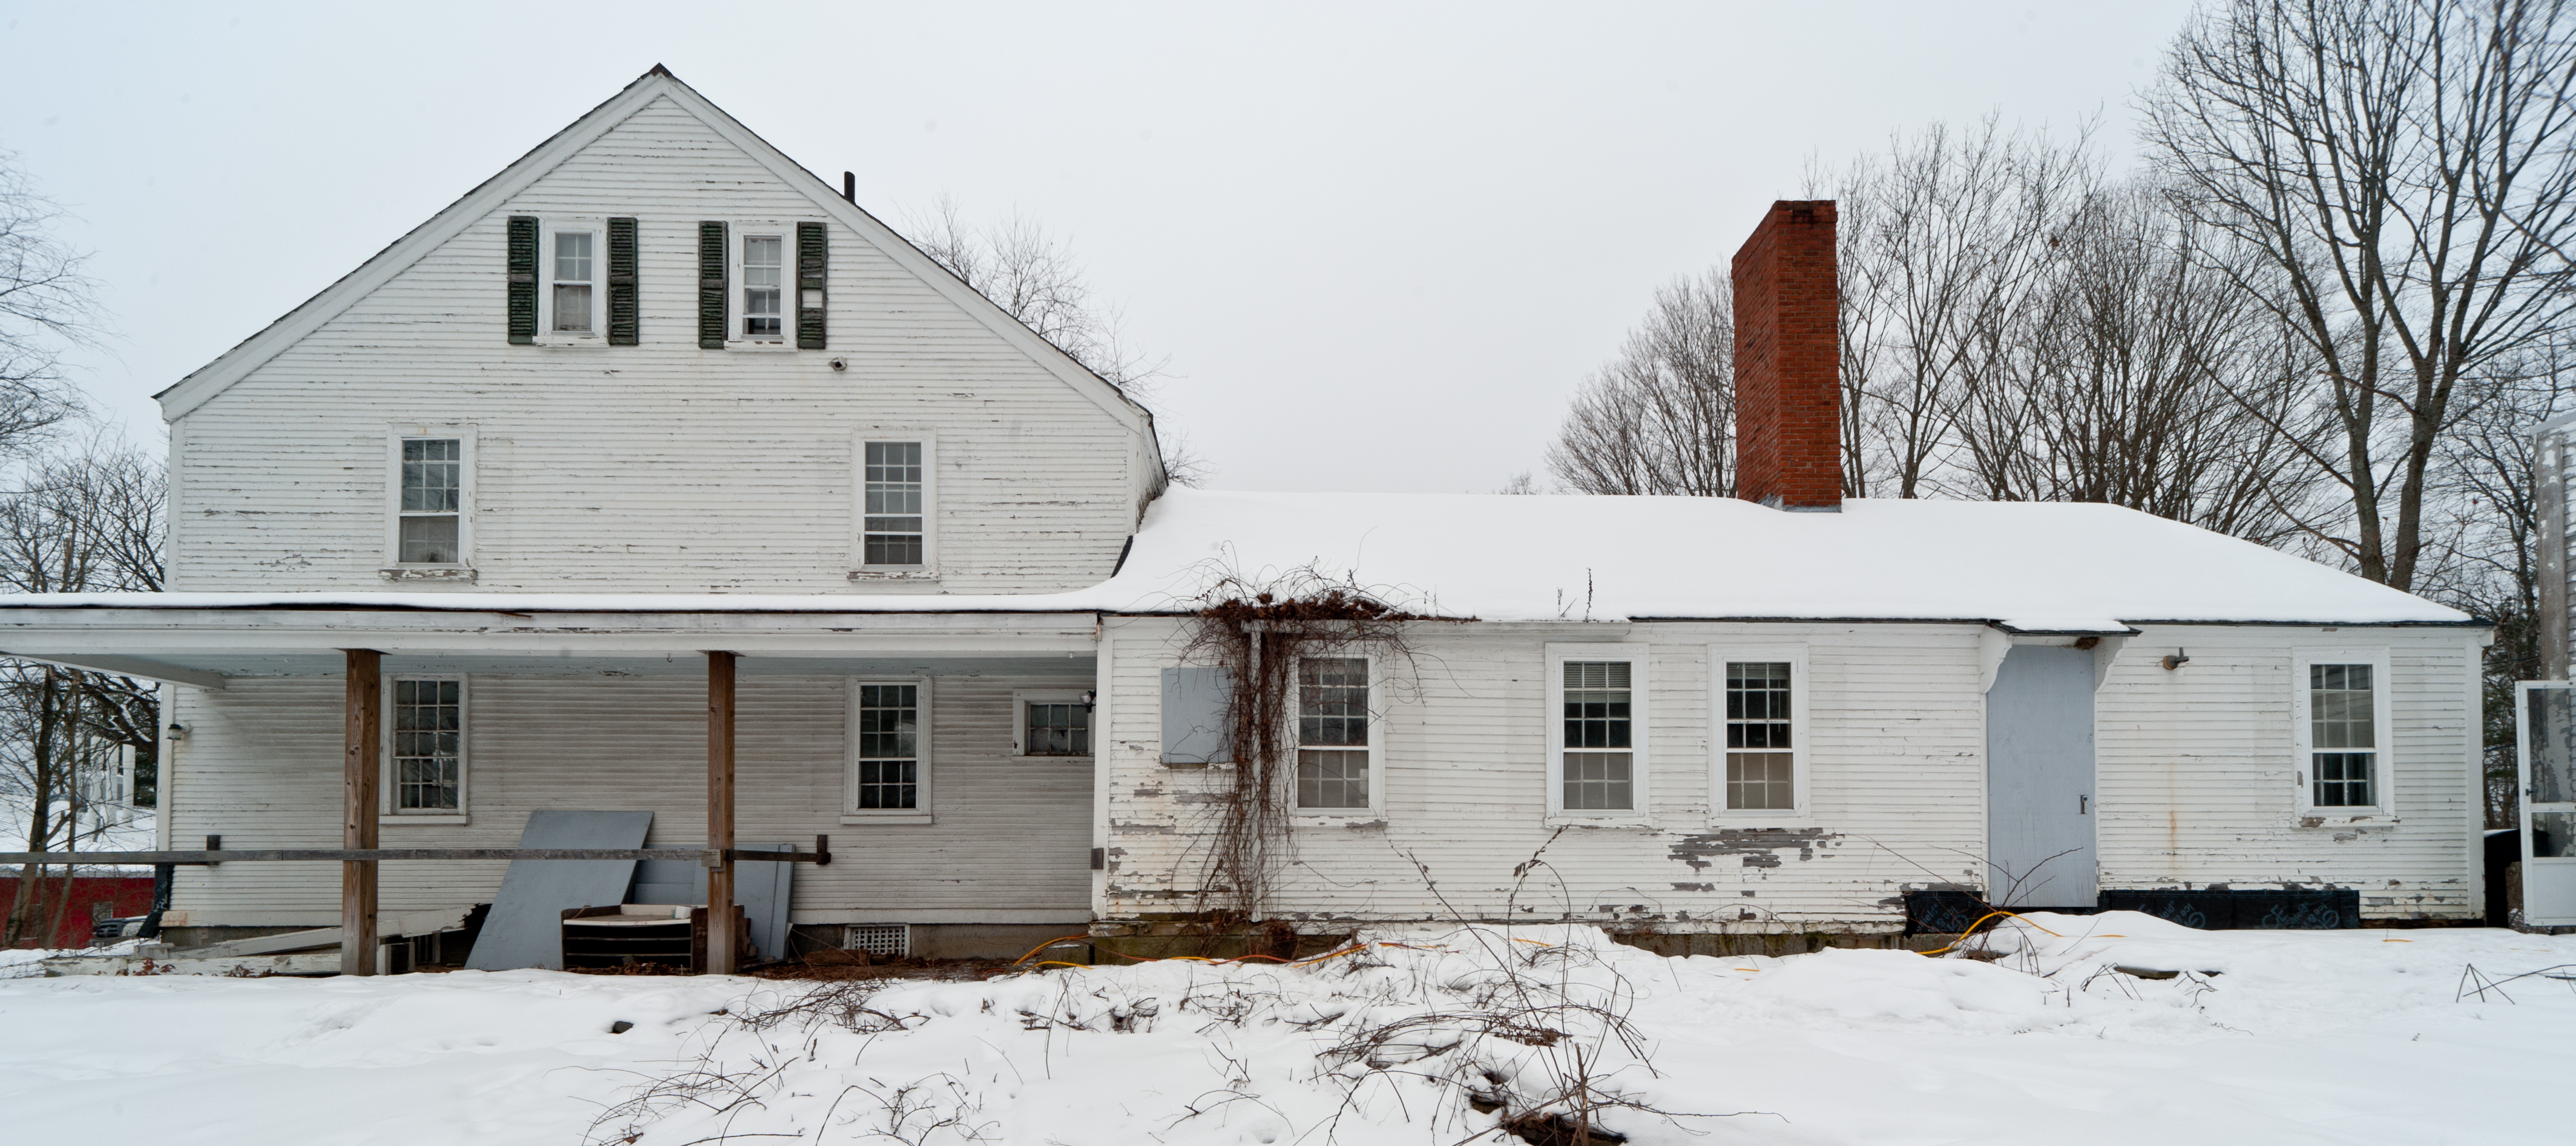
We’ve begun in earnest the dismantling of the O’Kane House, in Durham, NH. It began with a training day with John Butler, a photographer and carpenter who has worked with us on a number of museum de-installations. He showed us how to remove trim without damaging the surface using a variety of softwood wedges, and other specialty tools. He has also been working with us to develop a streamlined process for labeling and documenting all of the parts we will remove.
As we dismantle the house, I hope to keep the blog up to date with a series of posts and pictures of the neat stuff we find. Consider the following the first:
Look at that enormous Chimney Girt!
The interior door jambs were rabbeted into the casing. Those dadoes and rabbets were all plowed by hand!
When the carpenter who milled this piece of baseboard ran into some squirelly grain, or screwed up and ran off the edge of the board, he just flipped the piece over, and ran the molding on the opposite edge of the opposite face. We revel in connecting to other carpenters in this way. We all make mistakes, it’s the good carpenters who know how to fix them.
The Hill fireplace is nearing completion. From the outset, this project has been among our most rewarding. We designed the panelled wall using HABS drawings from a house built by the father of the builder of this house. Knowing that the design is grounded in historical precedent lends the project a sense of purpose greater than that of simply filling in the space around a fireplace.
Fireplace Return Panel
The paneled wall is composed of three frames, joined by mortise and tenon. One, that surrounds the fireplace opening itself, contains a large panel approximately 3′ x 6′. Its 8′ stiles extend past the panel to the floor, and the joint between the flat panel and the stile is covered by a bolection molding developed from the John Cram HABS drawings. The same bolection molding will cover the joint between the lower half of the stile and the masonry.
Adjacent the right side of the large panel is an open frame that will enclose a bookshelf, and perpendicular to the left edge is a third frame with a panel in its lower half, and a bookshelf above.
Pilaster Layout Close Up
The front wall plane will be adorned with three pilasters, designed from the Cram drawings, which handily obscure the joint between the two front frames, and their edges. The pilasters are not only decorative, as their obfuscation allows the front frames an expansion joint, that will move with the weather.
When I first approached this job, I was sure that the many mortise and tenon joints would pose the greatest challenge. And while they were a lot of fun, they came together with relative ease, and the glue ups were the most interesting aspect of the first phase of the process. Years ago, I used to wonder whether there was a word for glue-up phobias, because I clearly had it. The idea of the glue dripping and drying as I scrambled to fit the swelled joinery once filled me with dread, but over time I’ve borrowed tips here and there to develop a stress-free system that results in remarkably flat panels.
The larger of the two panels was 6′ x 3′. Historically, a plane of this size would have been broken up by a stile or rail to accomodate panels composed of single boards, some of which were over 2′ in width. However, the client has a specific painting that she wants to hang over the fireplace, and we thought it an appropriate compromise to create the panel by gluing together four boards. We’ve seen wide glued up panels in houses of a similar age, such as in the O’Kane House, in Durham, NH.
Half Glue Up
The biggest challenge when gluing together a wide panel is keep the whole assemblage flat. My contemporaries would recommending gluing together narrower pieces to keep it stable, but we wanted to use wider boards to better approximate the panel that may have originally been; so we used four, 9 1/2″ wide, eastern white pine boards. Tom and I started by jointing a face (flattening the face on a jointer), and then running the board through the thickness planer to create a parallel face, and then jointing an edge, and using our new SawStop to create a parallel edge. I then laid the boards out with their best faces up, arranging and rearranging to achieve the tightest joints and flattest initial surface. I then drew marriage marks across each of the joints, and used the marks to reference the biscuit jointer. A biscuit jointer adds to the prep time for glue ups, but I think that it has been the most important changes in my path towards glue-up enlightenment. After the glue is applied, no longer do the boards twist and slide past one another like Jamiroquai and his couch in the Virtual Insanity video. As the pipe clamp is tightened, the biscuits help to hold unruly boards to their better behaved brothers. They allow you more time to arrange your pipe clamps and cauls.
Panel, half scraped, see its shine?
I glued the panels in two pairs, and then glued the pairs together. I then used a cabinet scraper to remove some of the larger globs that had squeezed from the joint, and followed it with a random orbital sander. I tend to be snobby about sandpaper, thinking it a lesser method of smoothing and flattening, but for taking down the glue between joints (if it has hardened too long) I have found nothing better. Sandpaper abrades the surface of the wood, always leaving a slightly fuzzy surface, while planes and cabinet scrapers cut the fibers, leaving a smoother, shiny surface. In most cases, a plane is also faster. But I couldn’t risk the tear out that might occur if the flat-sawn boards had adjacent grains that run in the opposite direction. I was still able to achieve a traditional finish by following the sander with a cabinet scraper and extremely sharp block plane.
Raising Panel
After the panel was smoothed, I relieved the backside, creating a raised panel. Because the client wanted a flat panel on which to hang her painting, the work will never be seen, but like a lot of traditional forms, the fielding serves a purpose. It relieves the edge so that it will fit in a dado (groove) that runs in the edge of the stiles and rails, but allows the center of the panel to remain at a full 3/4 inch thickness, which increases its stability.
I transported the frames and panels to Hampton Falls, where they were assembled, and pinned. Tom and I spent the last week installing the frames, and adding the pilasters and trim. Please peruse the installation photos below, and check back for final shots of the completed work.
On Friday, we peeled plaster from the walls of the Blue Parlor, in the O’Kane Farmhouse. Scott was Bill and I, Ted, as we traveled in our proverbial telephone booth through layers of plaster, lath, wallpaper and time.
There were clues to some of what we might find. Surrounding the door openings were wooden strips, wedge-shaped in profile, that served as plaster grounds. They were a little over an inch thick, and were nailed four inches away from the opening itself, creating a border around the door opening that looked like a recessed casing. The application of these plaster grounds became popular in the mid-18th century, and allowed the plasterer to create a flat wall plane within the borders of the ground (Much of this initial dating information comes from James Garvin’s A Building History of Northern New England, pp 65-71). In most cases, the chair rail, baseboard, and door and window casings were applied directly to the frame, and served as the plaster ground. In Shaker buildings, for example, the casing is nearly flush with the plane of plaster. But in this wall, the plaster plane was an inch proud of the recessed door border, due to the applied ground, and there was a vertical, beaded joint between the side sections of the border and the top. It looked like a larger section of beaded paneled wall was peeking through.
As we carefully peeled the plaster from the lath, we paid attention to the composition of the plaster. Older plasters have a higher concentration of goat hair, and regularly one will uncover a multi-colored tuft that was was never fully mixed in. Older plasters were applied in three coats, a base coat, a straightening, or “brown” coat, and a skim coat. The base coat is thickly applied and creates the keys that lock the plaster onto the lath. The base coat squeezes through the slits between the pieces of lath, and droops behind. A skilled plasterer will use the right amount of pressure to create an even pattern of keys, enough pressure to create a key big enough to hold, but not so much that the plaster breaks off and splooges into the wall cavity. After the base coat has dried to a leather hard consistency, the brown coat is applied, and the plasterer drags a long straight-edged board, or screed, over the surface, flattening the wall plane between the grounds. The brown coat is usually where you see the most goat hair. The skim coat is the last, thinly applied coat, devoid of hair and leaving that hard, cured, eggshell finish. On the first two sections of wall, we found sawn lath behind the plaster, hung with machine-cut nails. This dates the added plaster surface to sometime after the mid-19th century, as we suspected (Garvin, p. 67).
One Wall, Many Coverings
Behind the lath we found beautiful, psychedelic wallpaper. The profile of beaded paneling telegraphed through, and punched vertical lines in the wallpaper at each panel’s joint. On the wall, one could see three different periods all at once. The horizontal shadow lines left behind by the lath, the lively geometric pattern of the wallpaper, and the vertical beads poking their noses through the surface.
Scott, Salvage Detective
So I liked that, but the most exciting discoveries were yet to come. So far, all we could determine in terms of dates was that the plaster was applied before the advent of wire nails during the late-1800’s, leaving no real indication of the date of the beaded paneling. Farther along the north wall, to the west, was a section that appeared to have once been partitioned off into a different room (according to a long joint in the floorboards). When Scott began dismantling this section, the wall cavity was different. There was a void behind the lath, and in its depths he could see the horizontal, bevelled profile characteristic of feather-edged paneling, and shiny, chrome yellow paint. The paneled wall he uncovered was was hung horizontally, and it had a feather-edged profile, where the edge of the board is beveled to a thin tongue that slips into a groove on the adjacent board. Conversely, beaded tongue and groove has a bead with an edge perpendicular to a quarter inch tongue. The joints in such boards are typically tighter. Both styles were used and re-used during the first half of the 18th century, but the feather-edged stuff is reminiscent of an earlier era.
Across the face of the older, yellow paneling, we saw the regular shadow lines of shelving, leading us to believe that this section of wall had been obscured by pantry storage and left alone when the rest of the room was upgraded. The wall plane of the beaded section is sufficiently proud of the feather-edged wall plane that the beaded paneling could be hiding more yellow feather-edged paneling–but this is only one of a number of possible scenarios. The beaded paneling could be contemporary with the feather-edged paneling; the feather-edged paneling might have been recycled from elsewhere, or simply used to delineate a different room in the house. In most homes, we’d never know the answer to these queries, because we wouldn’t dismantle the wall any more than was needed to make repairs, but the O’Kane house will be completely dismantled, and it is exciting to know that as we proceed, some questions will be answered, and even more created.
Three Walls in One
Adjacent the feather-edged paneling was the most exciting section yet. A section so exciting as to make the author flap her arms in an improvised, peacock-like dance. Behind the plaster Scott found accordian, or split board lath, hung with wrought nails. Accordian lath is hung using a wide, rough, knotty board. The first edge is nailed to the studs, and then the board is split along the grain and checks are stretched open and nailed, creating voids for the plaster to “key” into. This kind of lath supplanted the use of split, or riven lath around 1800. It was used until the mid-19th century, with the introduction of sawn lath.
Wrought Nail Detail
Wrought nails were used until the advent of machine-cut nails, invented in 1790. So we were finding a relatively newer lath style with an older nail technology allowing us to date the wall to sometime between 1790 and 1800 (Garvin, p 66). Dating a building without recorded documentation is a fuzzy practice. Often, the invention of a technology allows us to bracket a building’s date into “well, we know it wasn’t built before such-and-such,” and this is an unsatisfactory conclusion. Most technologies were in favor for at least fifty years. We use all these time brackets, and the popularity of certain styles throughout the house, to come up with an approximate date. It is unusual, and thrilling, to uncover a wall that so neatly falls between the advent of one technology and the extinction of another–and that was why I found myself flapping my arms, wildly.
Please peruse the photos below for more information about our process, and stay-tuned for more exciting discoveries.
O'Kane Farmhouse, South Face, photo by John Butler
Preservation Timber Framing has been involved in a number of museum projects in the past. We reconstructed the Brown-Pearl and Manning Rooms for the Boston MFA, rebuilt the Moffatt-Ladd coachhouse in Portsmouth, and dismantled 16th c. Carved Ceiling Beams for the Fogg Museum at Harvard, to name a few. We are honored to have been a part of these prestigious projects, but where does this leave the many historic houses that remain on the chopping block? There are a number of legitimate reasons that a historic building cannot be, and should not be, preserved on its original site and usually this results in the building being demolished. Is it possible to take the standards used in a museum setting and apply them towards preservation in the private sector?
O'Kane East Face, photo by John Butler
The O’Kane farmhouse, c. 1790, typifies this dilemma. It is currently located across from the Child Study and Development Center on the UNH campus in Durham, NH. Thanks to the university’s stewardship, the farmhouse retains many original or early features, including indian shutters in many of the rooms, and very nearly its original room layout and partitions. Much of the panelling is likely original, and the trim elements appear to have been hung during a Federal-erarenovation. But the Child Development Center needs to expand, and the Farmhouse is wildly inappropriate for that use. Firstly, the original trim retains its original lead paint, and many decades of lead chips saturate the surrounding soil. Secondly, even if the lead were abated, the building would need to be renovated for the Center’s needs, and in the process we would lose much of the building’s architectural history.
O'Kane Cape Fireplace, by John Butler
When UNH decided to sell the building to a responsible buyer who could dismantle the building, and re-erect it faithfully elsewhere, it presented an incredible opportunity, and a unique challenge. In a museum, we are usually working on one or two rooms, long ago removed from their frames. The O’Kane farmhouse is a two-story house, with attached cape ell. In addition to its hewn, white oak frame, it has original wide-panel partitions and a fireplace surround in every room. Could we apply a curator’s techniques for careful removal and inventorying and apply it to an entire farmhouse, frame and all?
To guide us in this endeavor, we have looked to John Butler, a man with unparalleled expertise in the field of historic documentation and assessment. A long time colleague, Arron most recently worked with John on the MFA project. Since then, Butler has refined his inventory and documentation techniques still further at the Yale University Art Museum. In the past couple of weeks, Butler has completed the initial photo documentation of the building’s interior walls. His cameras are capable of capturing an entire wall, without distorting the plumb and level lines of architectural elements. After first marking a level datum line around the entire room, Butler is able to rectify the photos to an astounding level of accuracy. Using the datum, and other grid lines, we will be able to measure off of the photos, greatly saving drafting time. The photos will also be used during dismantling. Each element will be carefully removed using softwood wedges. The element will be then be traced on a large photograph, and given a number, brief description and initial assessment. The room number, wall letter, and item number will be marked in Sharpie on a patch of white shellac on the back of the piece, in the upper left hand corner. A pair of inventoriers will work with a pair of dismantlers for each room.
O'Kane Floor Plan
This past week, I have been working on measuring and drawing a simplified SketchUp model that records the rough layout of architectural elements. I measured and drew all the floorboards so that we can have a map of their item numbers, as well.
On Friday, our client, Charlie, is coming down to Durham to help with the removal of the first of the plaster layers. Some of the plaster appears to have been added later, obscuring Georgian Era partition walls. We can’t wait to see what we will find.
Tomorrow we embark on the building of the Hill fireplace. The Hill house is a turn of the 19th century farmhouse, with all the attendant revisions and additions. The owner wants to restore her fireplace to reflect the time period it was built and the building trends in her region.
Through her own research, she believes the original building may have been constructed by John Cram, a prolific local builder. Fortunately, the John Cram farmstead, also in Hampton Falls, NH, was documented by the Historic American Building Survey, and was available through its database online. The Historic American buildings Survey was a program of the National Parks Service, that was developed in 1933 to provide work for architects, draftsmen and photographers left jobless by the Great Depression. Not only are the drawings and photos an incredible resource for our work, browsing through them leaves one with an incredible sense of patriotism. They document the best work of craftsmen throughout America, and are evidence with our abiding connection with history. Not only that, but one happens upon some pretty great photography.
John Cram Fireplace
So, the John Cram Farmstead. Out of the three documented fireplaces, the design above best fit the bare hearth that we are working with. We experimented in SketchUp with a number of pilaster designs. The others were faithful to classical elements and proportion, with a proper capital, and entablature. We kept coming back to this John Cram design, however, with its unorthodox use of crown incorporated into the capital. Though purists might reject it, the John Cram pilaster is simpler, and more appropriate to a vernacular building. This pilaster may not have been found in Greece, but it was found here, in Hampton Falls, NH. It makes sense, given the house’s location and style, but more importantly, because of HABS, we have good evidence that this was what was built in this area at that time.
Hill Molding Profiles, from Cram
The John Cram HABS drawings also gave us detailed molding profiles. Using a Williams and Hussey molder shaper, we will mill custom crown, bolection, and bed moldings based on the HABS details. The client wanted to make one significant change to the John Cram style, instead of the raised panels, she wanted flat panels with a bolection molding, which would accommodate a painting to be hung above the fireplace. In A Building History of Northern New England, by James Garvin (pg 137), we found a bolection molding that was identical to the astragal found at the top of the John Cram pilaster. The only difference is in the millling of a rabbet on the back of the bolection molding stock. Utilizing HABS, we were able to design a fireplace surround that not only fits the house’s age and vernacular style, but adjusts to the needs of its contemporary homeowner.
Tomorrow, we will lay out the framing around the hearth. Dave and Brian will prepare a plumb and level wall, while Tom and I will mill the stock, and cut and fit the joinery back at the shop. I can’t wait to get started on the frame and panels, but I’ll pause to post about our progress along the way.
Allow me, for a moment, to wax about about windows: They are the eyes to a building’s soul. The transom light above a Yankee barn door and the triple-hung sash in a meetinghouse facade help to distinguish a building, or relate it to its peers. Even when dismantling the most decrepit of barns, we are careful to preserve their idiosyncratic sash. Often, the sash has been adaptively reused, and may be older than the barn itself, reflecting the high embodied energy in these handcrafted elements. As craftspeople, one of the most important tasks we can undertake is the preservation of historic windows.
Some say that the preservation of old sash is at odds with energy efficiency, but this is a fallacy; it is only the neglect of old windows that make them unsustainable. A weatherstripped, double-hung sash in conjunction with storm windows will perform better over time than a vinyl window, and will be easier to maintain, and repair. In combination with the energy embodied in old windows, window preservation is not only the better aesthetic option, it’s also the greener one.
The ceiling, after cleaning
Late this Spring, one of our clients suffered a fire in the last stages of the restoration of their historic gymnasium. The building was originally was built for the Goodrich family in the 1910s; it has a monitor roof, and sides that are more window than wall. Last summer, we installed trusses in the monitor, and interior posts to support it. Unfortunately, a fire during the final painting phase left a car-sized hole in the floor, and the Titanium white paneling soot-black. Fire fighters saved the building by not only breaking every pane of glass, but most of the muntins too. We were called back in to repair the floor, the undercarriage and every one of the windows.
Gym Sash, 6-over-1 light
The first step was to carefully remove the sash, knotting the sash cord and leaving the sash weights waiting longingly in their pockets. The sash were transported to the shop and steamed in custom-built boxes to soften the glazing, and fifty years of paint.
After the paint was stripped, we popped the pins securing the mortise-and-tenons and dismantled the joinery. About half of the original stiles and rails could be restored, but the muntins (the molded bars that divide the glass) were smashed, sacrificed in the efforts to rescue the rest of the building, and the woods surrounding it.
Contemporary Muntin Profile
Window sash poses a unique challenge to a builder. The sash must be strong, to withstand the weight of the glass, and the forces applied by wind and by the folks who open and shut them. But windows must also be as lightly framed as possible, to allow the maximum amount of light through. In a many-lighted sash, the difference between the additional light let in by thinner muntins can be significant. In the Georgian period, when wooden dividers became popular, the molding profile was fat, round, and squat. The Georgian glazing bar was shorter, and the profile of the wedge of glazing was wider than it was high. Throughout the Federal and Revival periods, up to the Victorian, muntins lost weight, profiles became more delicate and oblong, and glazing bars were made narrower and higher. Over the same period, glaziers in the states transitioned from making crown glass, which was blown into 50″ rondels, and cylinder glass, in which glass was blown into 6′-8′ cylinders and cut open and laid flat, through table glass, in which the glass is poured onto a table and rolled flat, and, in the 20th century, to float glass, in which molten glass is floated over molten metal. The weight of the larger sheets of glass produced by these innovations only added to the challenge of creating strong and secure joinery.
Our first task was to locate materials. You’ll hear many a carpenter today complain that wood today just isn’t what it used to be. In taking apart old buildings, we find wood that has much tighter growth rings, with straight and even grain, than what you can find in today’s lumberyards. It is the paradox of old growth timber. Unfortunately for our forests, lumber produced from old growth is typically stronger and more stable. Fortunately, we were able to locate the old Southern Yellow Pine stock we needed from some boards we had saved for a special case such as this. Due to the requirements of the joinery, it is essential that the joiner uses tightly grained heartwood for window sash. For the glass, we cleaned and reused every scrap we could, cutting broken, larger panes into smaller ones. It was important to the client, and therefore to us, that the glass not be reproduction, and actually be as old as the sash. For the larger pieces, up to 26″ x 44″, we were calling all over the Northeast to find satisfactory glass.
Milling the muntin stock, fed from the left, and making good use of featherboards.
Reproducing the muntins was a multi-stepped process. We traced the muntin profiles and ordered shaper knives so that we could mill exact reproductions of the original stock. One shaper knife cuts the molding profile along the length of two sides of the muntin stock, as well as the interior face of the stiles and rails. Using fingerboards to hold the narrow (3/4″ x 1 1/4″) muntin stock against the fence, we ran one face of the stock through the shaper, then flipped it, and cut the opposite face.
In the 18th and early 19th century, joiners made muntins using a sash molding plane, that had a molded blade and body, and a sticking board, a custom jig that held the tiny stock for planing.
Coped Stub Tenon JointOkay Fit
Each end of the muntin is coped (scribed) to the profile of the stile, rail or muntin to which it joins. You may be able to find something similar in your kitchen, in the cope and stick assembly of contemporary cabinet doors: the ends of the rails of the door are coped and glued to the stile. The difference in window joinery (and in handcrafted cabinetry) is that the rails and cross muntins are also tenoned into mortises in the stiles and long muntins, respectively, and the long muntins are tenoned into the rails. A hollow-chisel mortiser streamlined the process of cutting 19 mortises for every 6-over-1 light window, while one 18-light sash had 24 mortises alone. A second shaper blade was used to cope the tenons on the rails and muntins.
Setting the height of the shaper blade, and coping the shoulders of the rails.
Traditional joiners would have used a coping saw, gouges and a handmade coping jig, that clamped to both sides of the muntin, and had the perfect negative of the molding cut into one end. A pair of precise shaper blades can make quick work of joining a completely new window today. However, the imperfections that give handcrafted work its character make coping new muntins to old stiles and rails a challenge. An airfoil shaped wood file came in handy to make the adjustments necessary for a snug fit.
Using the tenoning jig to cut a "dovepin" into a meeting rail.Bridle Joint with a Half Dovetail
In addition to the coped mortise and tenons, the original window makers used a bridle joint with a half dovetail in the connection of stile to meeting rail. We cut the dovepins in the meeting rail by modifying our shop-made, tablesaw tenoning jig. This jig holds a rail (or any tenoned piece) vertically against the fence, in order to cut the cheeks of a tenon. In order to cut the pins, we ripped two long wedges at the angle of the dovetail, and used those to rotate the meeting rail, in order to adjust the angle at which it met the tablesaw blade. The jig was a handy solution to the complicated joinery, but we had to be careful to check and adjust the tablesaw with every cut, to account for variations in the old stiles and rails.
After the joinery was cut and fit, we assembled the sash and pinned the stile and rail joints. We prepared the glazing rabbets with primer and bedded the glass in a thin layer of putty. Pushing the glazier-points into the hard Yellow Pine was an oath-inducing experience. Then we kneaded the putty with linseed oil and whiting until it was warmed by our hands, and soft and pliable. We applied the glazing to the glazing bars like a child makes a mud pie, and then trimmed the excess with a even pressure and a steady hand. The glazed windows were then placed in a window rack for as long as we could let them set, before having to prime and reinstall them.
Sash assembled, old stile meets new rails. Note sash cord channel on outside of stile.
The ease of hanging the finished sash was a testament to old, double-hung window construction. In many old houses, the window weights can be accessed by a little door cut into the jambs, easing maintenance like changing a sash cord. The gym windows had no little door, and so we carefully removed the side casing in order to access the window weight pockets. We tied new sash cord to the window weights and knotted the other end of the sash cord that rides in the channel on the outside of the sash (see bridle joint diagram, above). Starting with the upper sash, we pressed the knot into the round hole at the base of the channel and then pushed that side of the sash against its track in the window frame (between the exterior casing and the parting bead.) The opposite stile was angled inside over the window sill. Then we pulled down the knot on the opposite jamb and pressed it into the cord channel on the opposite stile. With one parting bead removed, we eased the second side of the upper sash into its track, and replaced the second parting bead. The upper sash slid easily up and down in its track. We repeated with the bottom sash, replaced the window casing and any hardware, and moved onto the next window.
Six sash, repaired and installed.
Repairing hundred-year-old sash is a challenge, and a long process, but it is worth it. It preserves a building’s character, and improves it’s aesthetics. When combined with the proper weatherstripping, and appropriate interior storms, these windows can achieve the same U-values as modern double-paned sash. Most importantly, with the right maintenance, these windows will last another hundred years.
Click on the photos below for more information about our process:
Built by Elias Carter in 1821, the Acworth Meetinghouse, with its double lantern spire, is a masterful representation of historic building craft. But by 2008, the building was in desperate need of repair. PTF was called in to give an estimate, but Acworth, NH is far, and endowed already with a number of seasoned carpenters. Arron, along with members of the Acworth Meetinghouse Restoration Project, developed a model by which the Acworth meetinghouse was repaired by local craftspeople who were trained and supervised by PTF in techniques unique to steeple repair, and timber framing. Last month, at the National Preservation conference in Buffalo, New York, the Acworth Meetinghouse Restoration Project was awarded a Preservation Honor Award. Read more about the award here. Now, the Acworth Meetinghouse serves not only as an example of New England’s architectural history, but as an example of how preservation creates jobs, expands skills, and builds community.
Last week, the Wall Street Journal published an article about I-Farm and Chris Barensfeld’s efforts to restore it. Online, the story was accompanied by a video and slideshow. From the article:
For years, Christine Barensfeld dreamed about fixing up and living in a property down the street from her home: a historic white barn, carriage house and farmhouse on 17 acres, one of the last intact Federal-era farmsteads in Essex County.
She was finally able to buy it in 2009. Ms. Barensfeld is now immersed in a highly detailed, historically accurate renovation of the property. Her goal is to build a working, animal-powered farm as it would have been in the 19th century, back when it was a 200-acre property and Boxford had 900 residents.
Chris Barensfeld is a visionary thinker and has been one of our best clients. Projects like I-Farm, and opportunities to collaborate with preservationists like her and her architect, Ben Nutter, are why we are in this business. Click here to read about our current efforts to restore the water tower.
Since last we updated, PTF has been busy on a number of projects. The Northern contingent documented and dismantled a barn in West Poland, which will be repaired and rebuilt on a new site five miles away. The Southern contingent is repairing the trim on the Federated Church in South Berwick, as well as putting the finishing touches on some large sash for an historic gymnasium in York, ME. The work on the water tower at I-Farm continues, and will soon move on to the house. Two weeks ago, our best timber framers traveled to Reading, MA to assist Howell Custom Building with the raising of a frame at the Calareso Farm Stand in Reading, MA.
Projects like the West Poland Barn are our bread and butter, and we always feel lucky to get them, but this one felt especially fateful. One weekend weeks ago, Arron took his son on a drive to West Poland to inspect an old barn he had seen listed on a real estate website. When he got there, he met Charley, another potential buyer. The barn was for sale, but not land beneath it; it would need to be dismantled, moved, and repaired. Arron was interested in repairing the barn, but not owning it, and Charley was interested in the barn to shelter his draft horses, but needed someone to fix it. It was serendipity.
Scott pries the sheathing off of the tie beam and upper nailer.
The first step in these old barns is cleaning them out, which can often take as long as taking them down. The floor and loft joists were compromised, and collapsing beneath the debris. We had to watch where we stepped.
The owner is an avid woodworker himself, and wants to save all of the viable sheathing. While it may not be reused as exterior sheathing, the wood will be good for stalls and smaller projects. With careful prying, the boards popped off whole.
Rafter and Tie Beam end
We used a man lift to get to the badly deteriorated roof. From the inside, we could see that half of the sheathing had been replaced, along with a few of the purlins, but all of the rafters looked original, and old. Besides massive bat colonies, we weren’t sure what we’d uncover when we removed the roof sheathing. Unfortunately, eight of the ten rafters were beyond repair, and we were shocked to find that rafters as badly rotted as this (see photo, right) had simply been sheathed over. The sheathing looked relatively recent, and TimberLock screws were used to secure the purlins. While rot may have accelerated in the past few years, the rafters even then were not in a usable condition. On the bright side, the barn was raised high off of the ground, and nineteen out of the twenty posts will be reused with minimal repair.
Bent 1 Tagging Drawing
After stripping the boards, we were ready to tag the building. We drew the frame using Google Sketchup in order to make tagging drawings and to create a model of what will need to be repaired and replaced. While this building needed to be dismantled regardless, in other buildings, this model helps us to navigate the road to repair. Each and every piece of the frame is pinned with a metal tag stamped with its unique code so that we can rebuild the barn precisely.
Barn and its Neighbor
By Friday, we had the entire frame stripped and tagged, and Arron, Shawn, Dan, Wyl and Charley joined the West Poland crew for a crane day. It was a challenge. The first task of the day was using the crane to cut down a large tree that had grown up next to, and over, the barn. Additionally, many of the joints were nailed right through their tenons with enormous spikes, which weren’t always visible until the joint was being pulled apart. But we got the barn down safely, and are now in the process of organizing the pieces to store them at Charley’s new home. Before we can repair this frame, Charley has another barn on the new property that needs stabilization. When that is finished, we will use the space in the stabilized barn to repair this frame. Timber frame repairs are good work for winter.
Please peruse the photos below for more on our process:
Over the past year, part of our crew has been busy repairing a barn at I-Farm, a multi-building complex soon to become a working farm that teaches early farm technology and sustainable agricultural practices.
Around the turn of the century, the barn that had been there previously, a hand-hewn English frame (eave entry) was converted into the barn standing now, a Yankee hay barn (gable entry) and dairy. We’ve worked closely with the architect, Benjamin Nutter, and the owner, Chris Berensfeld, folks who care about their work, and really “get” preservation.
This past week, Shawn has been busy at the shop restoring the cylindrical top of a water tower that was built around the same time that the barn was converted. Please peruse the photos, below:

 Look at that enormous Chimney Girt!
 The interior door jambs were rabbeted into the casing. Those dadoes and rabbets were all plowed by hand!
 When the carpenter who milled this piece of baseboard ran into some squirelly grain, or screwed up and ran off the edge of the board, he just flipped the piece over, and ran the molding on the opposite edge of the opposite face. We revel in connecting to other carpenters in this way. We all make mistakes, it’s the good carpenters who know how to fix them.