Tag: Church preservation

  • A Historic Steeple’s Speedy Recovery

    A Historic Steeple’s Speedy Recovery

    Chester Church, Front Facade
    Chester Church, Assessment, March 2018, Photos by Arron Sturgis and David Ewing

    Chester Congregational Church is a Greek Revival cutie with a facade that can stop traffic. It was originally built in 1773, 90 degrees to its current orientation, with a tower that stood proud of the end bent, an open belfry, and eight-sided spire. In the 1840s, the building was turned, the tower was enclosed within the body of the church, and a narthex was added, with an enclosed belfry and four-sided, oblique spire. In 2018, PTF was called to assess the building, and investigate damage to the tower frame. In the attic, we encountered an incredible queen post truss system.

    Chester Queen Post Truss system
    Queen Post Truss Frame

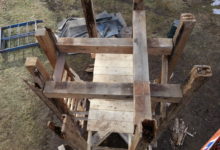
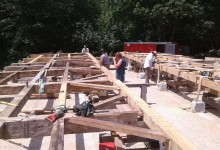
    A queen post truss allows a church to have a large open sanctuary, uninterrupted by interior posts. The vertical queen posts support the bottom chord, which stretches from eave wall to eave wall. King post trusses are common in late 18th and 19th century churches, but a modified queen post truss like this one is rare. This truss contains two queen posts connected by a horizontal strainer, and braced by two upper chords, which are the diagonal timbers running parallel inside the rafters. The trusses are connected down the length of the building by a sturdy series of girts and ascending braces. They are further stabilized by those big, long logs running the length of the building. Those were likely used to help erect the frame, especially the front tower.

    Belfry interior, March 2018 assessment
    Belfry interior, March 2018 assessment

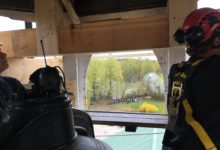
    The belfry tower posts were in more trouble. Previously, this corner had been stabilized with metal gussets. Unfortunately, large plates of metal can cause ambient moisture to condense against the posts, and prevent them from drying out, exacerbating the rot.

    Belfry corner post, prior to repair
    Belfry corner post, August 2021, prior to repair

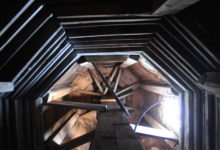
    The post was badly rotted behind the metal plates, and required a timber scarf repair. Additionally, the horizontal bed timbers supporting the spire were rotten, and needed to be replaced. The design of the tower frame is unusual, the bed timbers rest on a ring of girts that run just below the tower top plates; the beds are sandwiched between the two rings of timbers.

    Spire removed, September 2021
    Spire removed, July 29, 2021

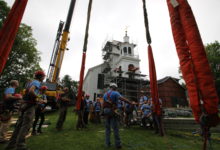
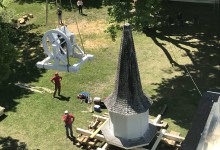
    In order to replace the bed timbers and repair the belfry posts, we removed the spire to the ground. It can seem dramatic to remove a big piece of the building, and can spook the congregation, but ultimately, this was the most efficient (and economical) way to repair the tower. With that weight on the ground, we were able to make repairs without setting staging and rigging through the center of the sanctuary.

    Belfry corner post, repaired
    Belfry corner post, repaired

    Arron repaired the corner post with this custom scarf joint, which preserved good original material and joinery. Timber repairs are the most effective and longest-lasting way to repair an old frame. Metal plates will lead to further rot, and many (but not all) metal brackets are not strong enough. We find scarf joints like these in many old frames, old repairs that have lasted for centuries. We cut the same scarf joints with the benefit of power tools. These days, Arron, our boss, doesn’t get out in the field as much as he would like, but he cut this scarf himself. Dan whispered to me that the fix fit on the first try, no kerfing required. Turns out Arron’s still got it.

    Repaired Belfry Plates
    Repaired Belfry Plates, Post and Girts, August 2021

    A few of the girts and plates were replaced as well. The new top plate was joined to the old using a floating tenon, which is a like a big spline, fastened with oak pins. We find that wooden mortise-and-tenon joinery is stronger and longer-lasting than modern brackets and fasteners. All wood moves over time resulting in metal fasteners working free, which is dangerous if the fasteners are the only thing supporting your girt. We generally use metal fasteners as tension connectors, and timber joinery to support the weight of the frame. We reproduce joinery that has been proven over time, or improve the joint so that the girt is solidly supported on the post, compensating for any shrinkage. Here, the girts supporting the bed timbers receive a little extra help from new studs within the wall plane.

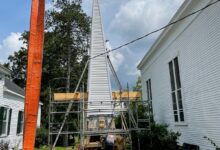
    Unfortunately, our crew, Dan, Erik, Tom W., and David G., have been working so fast and have been so focussed on repairs that they neglected to take any pictures of the spire’s return to its aerie. A crane placed the old spire on its new bed timbers on September 16, 38 days after it was removed. Ultimately, spire removal was the speediest road to recovery, and the church can continue to stop traffic.

    The Union Leader covered the raising here, and they have some great pictures.

  • Community Building

    Community Building

    We work on a lot of buildings with small congregations. We’ve rebuilt churches with fewer than ten active members, and nary a millionaire among them. Most building committees rely on a combination of grants and community contributions to reach their fundraising goals. How does a tiny community raise the admittedly significant capital to restore a steeple when many congregants have long-deferred repair plans at their own homes? The answer lies somewhere in re-establishing the centrality of these places within their communities, to the secular and devout alike. It’s easy to appreciate the solemn presence of a spare steeple amongst the foliage of a sleepy Maine village; it’s harder to imagine how to transform that appreciation into funds to pay for its preservation.

    We’ve been so busy over the past year that we’ve neglected to shed light on the impressive fundraising efforts put forward by our clients to support their projects. Below are links to better coverage than ours.

    East Derry Belfry, rigged and ready
    East Derry Belfry, rigged and ready

    First Parish Church in East Derry has come a long way; they’ve rebuilt their entire foundation and undercarriage and a multi-stage clock tower more than 100′ tall. On November 2, their Story of the Steeple dinner raised about half the funds needed to restore the clockworks. The Union Leader covered the event, here. Elsewhere on the internets, Judy Hayward interviewed Arron about the project and our process. Her extensive quoting of my blog post on the subject reminded me that I need to do a better job copy-editing, sheesh.

    The last bell to leave the Revere Foundry leaves its perch. Photo by Scott Lewis
    The last bell to leave the Revere Foundry leaves its perch. Photo by Scott Lewis

    Benton Falls church will hit 200 in the coming decade. Last year, its steeple was removed in their first step towards preserving it and restoring it to its perch. Since then, eave sills and cornice have been replaced. In October, the 42-member congregation hosted a Harvest Fest to raise funds and build community support for the project. The Morning Sentinel covered the event, here.

    Assessing Bell Hill, prior to repairs
    Assessing Bell Hill, prior to repairs

    Back in July, Bell Hill Meeting House held their 100th annual summer service, following the restoration of that church’s copper dome. In 2020, Bell Hill will embark upon the next phase of their restoration, repairing the truss that supports the rear wall of the steeple. Get at ’em.

    In September, the West Auburn belfry was restored to its former perch almost exactly a year after it had been removed. The restoration was funded by Maine Steeples Fund in conjunction with harvest suppers and grassroots fundraising.

    Norway UU Crew
    Norway UU Crew

    We are inspired by the perseverance of our partners in preservation. These multi-year projects require a few individuals to be dedicated to a cause that benefits many. The impact of their efforts is both small and large, concrete and indefinite. It doesn’t take a religious calling to preserve a religious building, but it does take a leap of faith. 

  • Crane Daze, Part 2: East Derry Lift

    Crane Daze, Part 2: East Derry Lift

    Arron Orients the Crew
    Arron Orients the Crew

    If crane days were measured by weight, last Thursday’s crane day would be our biggest to date. East Derry’s belfry, bell and double lantern weighed 43,400 pounds, not including the rigging. The crane day might also be the biggest in terms of scope. Since 2013, we’ve lifted and moved the church onto a new foundation, rebuilt the undercarriage, replaced two tower posts, 60′ in length, and disassembled, reproduced and rebuilt the belfry and lanterns. This crane day was the culmination of more than five years of nearly continuous site-work following more than two years of fundraising, assessment and preparation. Brian, Dave, Tom and Dan have persevered through a lot of guano. Paul Lindemann and the rest of the building committee stuck with the project after the scope and cost ballooned past our earliest expectations. From the start, they’ve stayed rooted in the history of Nutfield, the colonial settlement that built the church. On Thursday, the entire crew was there, along with a few news crews, the building committee and good crowd of East Derry residents.

    Scott Tightens the Rigging Clamps
    Scott Tightens the Rigging Clamps

    On Wednesday afternoon, the crane and crew installed the rigging steel. Four steel I-beams were inserted in a grid beneath a ring of ledgers bolted to the belfry posts. The belfry posts extend deep into the tower, 12′ below the tower plates. They emerge 15′ above the tower plate. Stationed on the ground, the belfry, lower lantern, upper lantern and mast are almost as tall as the base tower, rising to just 6′ shy of the tower plates.

    Rigging a tower this tall is a challenge. We want the straps to be long enough so they won’t bind on the tower, but they can’t be so long that we run out of cable on the crane. Our first arrangement of rigging straps was doubly wrong: the straps bound on the belfry baluster and were too long overall; the crane operator couldn’t retract the cable enough to get the stretch out of the rigging. Fortunately, by reversing the upper and lower straps, we were able to clear the balustrade and stay short of the crane’s reach.

    Belfry Roof, Urns, Fans, Columns, and Balustrade
    Belfry Roof, Urns, Fans, Columns, and Balustrade

    After the crane took a little weight, we dismantled the front wall of staging and swung the belfry away from the church and the rear staging. The belfry had been built tight to the tower, and the staging had been built tight to the belfry in order to hang the trim and apply copper to the bell deck and lanterns. Brian and Dave planned the restoration so that nearly all the finish work could be done “on the ground” before the belfry and lanterns were lifted into place. It’s a lot easier to fit elaborate trim 20′ – 40′ above the ground rather than 60′- 80′. We needed to break down the staging and swing away from the tower so that the belfry would clear the building on its way up.

    Belfry in Flight
    Belfry in Flight

    The lift from the ground to the belfry was slow and steady. Half the crew climbed the staging to the tower plates, and the other half climbed the stairs to the belfry bed timbers, 12′ below. Once the post feet were inserted past the plates, the bed timber crew made minor adjustments to the mortises and pried the post feet a quarter of an inch this way and that. When the post tenons were seated in the bed timbers, the overhangs at the bell deck just kissed the belfry plates.

    Belfry in Place
    Belfry in Place

    There’s still more to do. The cornice trim needs to be hung at the top of the tower, at the edge of the bell deck, and the copper roofing must be extended over the drip edge on the cornice. A second finish coat of paint will be applied. But regardless of the punch list items, the crane day Thursday was a huge achievement. The crew and building committee worked together to prepare for this day, and the celebratory ease of the day was a result of their strenuous efforts.

    We had some excellent news coverage of the day. The Eagle Tribune and Union Leader interviewed longtime parishioners and the folks who made the restoration possible. Watch the lift on WMUR, here and here.

  • The Sleet Hits the Fan

    The Sleet Hits the Fan

    Finished Fan. Photo by Brian Cox
    Finished Fan. Photo by Brian Cox

    On Friday, East Derry First Parish Church will be hosting a celebration in honor of the 300th anniversary of Nutfield, a Scotch-Irish settlement that was the precursor to today’s Derry, Londonderry, and Manchester, NH. The crew at East Derry has been hustling to finish the belfry in preparation for the event. For a bunch of timber framers, they’ve been doing an awful lot of finish work. A more accurate name for Preservation Timber Framing would include an “and”, but the name’s long enough already.

    Belfry Trim, Labeled
    Belfry Trim, Labeled. Photo and labelling by Brian Cox

    The crew was able to preserve some of the ample belfry and lantern trim, including the eight turned columns on the upper lantern. What they couldn’t restore, they reproduced. Every week, Brian creates a photo report to keep the building committee up to date, breaking this behemoth phase into bite-size pieces. It also serves as a documentary record of repair and this basis of this blog post. Between the mutules and the guttae (the swiss cheese and the sawtooths), I’ve been inspired by both the mass production and the attention to detail.

    Tom fastening slats. Photo by Brian Cox
    Tom fastening slats. Photo by Brian Cox

    In between enormous timbers and acres of primed trim, Tom has been quietly reproducing four of the arched fans at the top of the lower lantern louvers. In carpentry, fans are kind of a thing. Their arched tops require a choice between multiple joints, or extensive short grain. In the photo above, you can see that the curve of the arched top was cut out of two wide pine boards, their long grain oriented 45 degrees to the bottom rail. The fan’s slats are precisely twisted. This delicate assembly is then mounted to the side of the lantern and exposed to strafing wind, sun, rain and snow at the top of a hundred foot tower.

    Original Fan and MDF Template. Template by Tom Glynn, Photo by Brian Cox
    Original Fan and MDF Template. Template by Tom Glynn, Photo by Brian Cox

    Four of the fans were in good shape, and required “cosmetic” repairs, glueing and re-fastening. Four needed to be replaced completely. Tom started by transferring the measurements from one of the original fans to a sheet of MDF, creating a full size drawing. He used this template to begin cutting pieces from 2″ thick Eastern White Pine.

    Fan core, with blade angles laid out. Photo by Brian Cox
    Fan core, with blade angles laid out. Photo by Brian Cox

    Tom cut templates from luan on the bandsaw, and traced them out on the pine. He used the bandsaw to cut out his pieces and then laid out the dadoes carefully in pencil, copying the angles from the original fan. He used a dovetail saw and 1/4″ chisel to clean out each groove.

    Those dadoes are cut! Handiwork by Tom Glynn. Photo by Brian Cox
    Those dadoes are cut! Handiwork by Tom Glynn. Photo by Brian Cox

    Each fan blade is 3/16″ thick and was gently twisted as it was installed in its frame. The twist is created and held by the angled dadoes. The angle on the half round core is different than the exterior arch. At the core, the blade is more perpendicular to the face of the fan, which allows all the blades to fit, and gives the appearance that the rays are opening up like a sunburst.

    Fan blades. Photo by Brian Cox
    Fan blades. Photo by Brian Cox

    Fortunately, Tom was able to copy the angles from the original fan blades, rather than calculate the angles from scratch. A lot of folks think it’s easiest to scrap the old and start anew. On a piece like this, we were grateful to retain the knowledge of the old-timers from the evidence left in the original pieces.

    Half-finished. Photo by Brian Cox
    Half-finished. Photo by Brian Cox

    Once the fans were finished, they were primed with two coats of California alkyd primer and two more coats of California latex paint. Commonly, fans are decorative, which means that they were not always used for ventilation, and were applied over solid sheathing as was the case here.

    Fan fit with arched trim. Photo by Brian Cox
    Fan fit with arched trim. Photo by Brian Cox

    Still, each exterior element needs to shed water to protect the elements behind it. Each fan was fit with arched trim. The flush board trim projects 2″, while the frame and blades of the fan are only 1 3/4″ in thickness. This will protect the fan from wind driven rain running down the face of the flush board siding. Each vertical joint is backed with a spacer batten to prevent water from getting between the boards and penetrating into the frame.

    Louvers, Columns and Fans, installed. Photo by Brian Cox
    Louvers, Columns and Fans, installed. Photo by Brian Cox

    With every detail in this tower, the crew considered the path of rain water. We use tight fitting joints and carefully considered flashing details to keep water out, rather than caulking. Caulk is an important tool to stabilize deterioration and prevent further rot. Ultimately, though, it is a band-aid, which is promised to last 20 years, and starts to shrink and fail in the first season. This is why PTF goes beyond the frame and performs finish work. We work on buildings that have commonly withstood 200 years, and we want our repairs to last 200 more. When the bottom of the structure begins 60 feet from the ground, we know that the caulking won’t be re-applied every five years, and the building will be lucky if it gets repainted every twenty. Protecting the frame starts with the finish, and our trim is not only beautiful, it is functional.

    We love to share our work in person. We hope to see you at the Nutfield celebration this weekend! 

  • Sill Life with Woodpecker

    Sill Life with Woodpecker

    Frames rot from the bottom up. Water condenses on the foundation and rots the sill from below, or enters at the eaves and runs down the wall framing, rotting the sill from above. Some sills are sunk by splash back. In the dead of night, sill rot can haunt you; it seems catastrophic. But rotten sills are so common that their repair is our most standardized process, and can be buttoned up in a little over two weeks. We’ve repaired two church sills already this year. The jobs in Troy and Benton Falls ran smoothly and efficiently in the background, while we tossed and turned over pilaster this and custom-trim that. These sill jobs aren’t flashy, they’re basic (in the best way). They are also amongst the highest repair priorities, and essential to a building’s longevity.

    I. Troy, lifted. Photo by Tim Sweeney
    I. Troy, lifted. Photo by Tim Sweeney

    Troy Union Church

    We repaired Troy’s sill first, in January. A short section of sill was completely rotten. The building still has some of its original sill, but the rotted section had been replaced before, maybe 25 years ago, in hemlock. It had been damaged by splash-back off the propane tank and condensation resulting from drilling through the sill for the propane line. The sill was fairly low to the ground and drainage was poor (typical). There was no gutter, which is probably best for the building, but the ten inch overhang didn’t protect the sill from its fate. We connected the posts and studs with a tripled 2×10 ledger. On each post, we hung a stout metal L-bracket. We used hydraulic jacks, resting on short, angled dead men and cribbing, to take the weight of the wall off of the existing sill. The 20th century replacement was installed with a nice stop-splayed scarf, which we matched with our repair. The job took a little over two weeks.

    II. Troy, repaired. Photo by Tim Sweeney
    II. Troy, repaired. Photo by Tim Sweeney
    III. Troy, buttoned. Photo by Tim Sweeney
    III. Troy, buttoned. Photo by Tim Sweeney

    Benton Falls Congregational Church

    The north eave sill at Benton Falls succumbed to years of organic matter built up along the eave wall, which made the sill nearly earth bound. Poor drainage and splash back didn’t help its cause. This building was different from Troy in that the sills were resting upon original granite capstones that had sunk and shifted over time. Using a laser level up in the attic and measuring the height of the plate at each post, we determined that the rear wall of the building had dropped three inches. During the repair, the crew gently lifted the rear of the building so that it was returned to within a half inch of level. The crew then replaced the entire 8″ x 8″ x 42′ sill. It was in three pieces connected by stop splayed scarfs, like those used at Troy. The building committee has contracted with a company to improve the drainage around the building, and, while they’re at it, pick up the rear cap-stones and install solid stone shims beneath them.

    Benton Falls, lifted (here we go again). Photo by Tim Sweeney
    Benton Falls, lifted (here we go again). Photo by Tim Sweeney

    You’d be forgiven for thinking I made a mistake and inserted the same lifting photo for Troy and Benton. Not so! The repair process was nearly identical. Don’t be afeared of sill rot. Just fix it, and sleep soundly.

  • First Parish Church, East Derry: A Whole Host of Hollow Posts

    First Parish Church, East Derry: A Whole Host of Hollow Posts

    Lower lantern, outside
    Lower lantern, outside. Photo by author

    At East Derry, we knew the lantern was in bad shape, but we couldn’t know the full extent until we had it on the ground. Brian Cox was the job lead. He says, “The will of the church was holding that thing together, many layers of lead paint, and band-aid flashing details.” It was chilling to observe the extent of the damage, and know the structure was in this condition when it was still 80′ above the congregation.

    Lower lantern, inside
    Lower lantern, inside. Photo by author

    Once the frame was exposed, we documented and measured every piece. The design is both complex and well-balanced. Each post is connected to its opposite with an upper and lower girt, and a plate across the top. The eight posts hold hands like four couples in a square danceDavid Ewing produced cut drawings for each unique timber. To orient the crew, he provided a key alongside each drawing, highlighting the timber’s location within the frame. This helped the crew organize all the pieces, and to double-check their layout. The color-coded cut key is an innovation we’ll continue to use on all future drawing sets.

    Lantern Posts
    Lantern Posts C1 & B4. Drawing by David Ewing

    The lantern posts are five-sided; when the building is trimmed out, a turned column will adorn each point of the octagon. Four parallel bed timbers cross the belfry plates and support the eight posts. The bed timbers are crossed by a fifth perpendicular timber, which bears the foot of the mast. The plate level is co-planar and arranged like a hashtag. Two full length plates run parallel to the beds, and two interrupted plates run counter to them. The timber hashtag is connected by hefty mortise and tenon joinery.

    Lower Lantern, before. Photo by Arron Sturgis
    Lower Lantern, before. Photo by Arron Sturgis

    The lower lantern frame was test fit in our yard in Nottingham, NH. The assembly was smooth and painless thanks to thorough drawings, accurate cutting, and the lull. The doubled, overlapping girts make for a stout frame, capable of enduring high wind-loads at the top of the tower. In dimension, this lantern frame is similar to the one we built to support the Camden spire last year, but the design is very different. Camden was reinforced by an array of braces and had stacked, overlapping plates. The bed timbers there were a stacked hashtag, while the ones here are co-planar and parallel. One of the great joys of this job is seeing the ways in which builders solve the problem of constructing a steeple or spire. The vocabulary of design in a barn is much more consistent; I can accurately model a barn from a phone description. Steeples are not that way, every time I crawl through the hatch, I am greeted by a new, intricate design. Part of our mission, and others, is to protect this repository of proven designs.

    Lantern Fitting. Photo by Brian Cox
    Lantern Fitting. Photo by Brian Cox

    Obviously, there were aspects of the building that did not stand the test of time. The flashing between the upper lantern and the sweep roof was the most significant failure, and the extreme height limited the steeple’s overall maintenance. Brian was determined to minimize the plethora of tiny penetrations produced by face fastening. With every steeple restoration, we run into this conflict: it is much easier to mill and assemble trim elements in the comfort of our shop, allowing us the luxury of heat, and finely maintained cabinet tools. It is possible to work at the church, but then we have to contend with weather, job-site tools, commuting and staging. Brian decided to assemble the eight faces of the lantern in removeable panels that could be reapplied on-site.

    Rusty fasteners indicate where water has penetrated the finish. Photo by Brian Cox
    Rusty fasteners indicate where water has penetrated the finish. Photo by Brian Cox

    While the lantern was standing in the yard, the crew fit the sides with horizontal nailers, toe-screwing them to the inside of the frame. They sheathed each face with wide tongue and groove pine, blind-nailing through the tongue. Then they backed out the screws and removed each face as a solid panel. The louvers will be hung on top of the panel – they were never functional – and the panels will be craned in as a unit. This will limit the amount of time the crew has to spend working from a hundred foot staging tower as well as water penetration around the fasteners.

    Flute testing. Photo by Brian Cox
    Flute testing. Photo by Brian Cox

    The frame was decimated, but the most iconic trim details will remain in service. All sixteen urns will be reused, a handful will require new bases. All eight turned columns will be repaired and returned to new, well-flashed pedestals. The louvers and fans will be stripped and re-used, as will the weathervane, and both railings. Cornice trim was painstakingly documented. Sixteen distinct profiles were custom milled by Noah Tremblay and his crew from African Mahogany; the fluted panels and guttae were carved in house.

    Lower lantern and belfry railings. Photo by Brian Cox
    Lower lantern and belfry railings. Photo by Brian Cox

    We’d prefer that these buildings not need our help at all. But given their deteriorated circumstances, we’re grateful we get to do the fix. Next up: scarfing the belfry posts, and joining together the floor, in 12″ x 12″ white oak.


  • First Parish Church, East Derry: Repairing the Upper Lantern

    First Parish Church, East Derry: Repairing the Upper Lantern

    Upper Lantern, before. Photo by author

    The East Derry crew has been hard at work completely rebuilding the belfry, lantern and upper lantern. The framing is complicated, and heavy. Each lantern is a separate, eight-sided tier, connected by a sweeping skirt roof. Below the lanterns, the belfry may only have four sides, but the bell itself is supported on a hip-roof floor made out of woven grid of 12″ x 12″ oak. The entire frame needed to be rebuilt. We used white oak, the same species as the original; it clocks in at about 83 pounds per cubic foot.

    Stacked sweep
    Stacked sweep. Photo by author

    PTF specializes in traditional, in-kind repairs, which means we replicate the original design in the original species. While we believe in preservation, we make our decisions based on evidence. It is hard to argue with a design that has lasted 200 years. The sweep roof between the upper and lower lantern is one exception. Originally built out of stacked 2″ thick dimensional lumber, it certainly wasn’t constructed 200 years ago. The flashing failed, resulting in the catastrophic destruction of the framing below (next week on PTF blog – a whole host of hollow posts).

    Dave applies the original torus trim to the sweep
    Dave applies the original torus trim to the sweep. Photo by Brian Cox

    We carefully documented the sweep’s dimensions and radius, and constructed a new roof using radiused rafters. The resulting roof is precisely the same shape, but lighter, stronger and less susceptible to moisture infiltration. Above, Dave returns the original torus molding to the newly framed roof. It is hard enough getting miter joints to close on a four-sided building, and much harder at eight. The torus joints came together like they were going home, evidence that the crew achieved an exact replica.

    Have you ever seen such gorgeous sheathing?
    Have you ever seen such gorgeous sheathing? Photo by Brian Cox

    The upper lantern was completely assembled at our shop in Nottingham. It will be clad in wide Eastern White Pine, sourced locally, and trimmed in African Mahogany, which was a concession to the species’ superior consistency in milling, and comparable weather resistance. The sides were preassembled in panels and then removed so that the siding can be applied over the copper flashing at the connection with the sweeping roof.

    Wedding topper
    Wedding topper. Photo by Brian Cox

    The lantern is roofed with an octagonal wedding cake, which is penetrated by a mast that extends through the center of the frame and lands on the lower lantern’s bed timbers. The mast was originally scarfed together from three timbers. We reproduced that design, which will ease the assembly process and transport to the copper shop. The original lapped scarf is visible in the photo of the stacked roof.

    Soldering the skirt
    Soldering the skirt. Photo by Brian Cox

    In his report, Arron noted, “The sweeping roof is perhaps the most important roof on the entire tower. It is here that poor roofing allowed water to penetrate into the center of the tower and rot both the upper and lower lantern frames.” At the Heritage Company, in Waterboro, ME, Victor Wright and his crew redesigned the flashing details to ensure that they will be impervious to weather.

    Up next week: the consequences of poor flashing, and reproducing the lower lantern frame.

  • Inserting an Apatosaurus

    Inserting an Apatosaurus

    This blog leaves a lot out. We can’t give our projects their full due here while giving them their full due out there. I’ve been especially remiss with regards to East Derry. The First Parish Project has been in progress since 2012 and includes the replacement of the undercarriage, moving the building onto a new foundation and rebuilding a belfry, lantern and spire. In the video above, we are replacing two continuous 60 foot posts in the standing tower. There was a lot of back and forth about dismantling the tower, but ultimately, we left it up because housed inside are the intricate mechanics of a historic pipe organ. Reassembly of the organ rivaled reassembly of the tower for level of complexity and expense. While we’ve been remiss in coverage of this long hard road, Paul Lindemann, a dedicated leader of the building committee, has been documenting the process on his website: Nutfield History. Paul made this sweet time-lapse video of the posts being inserted. The video may condense the day into just over a minute, but the installation of these posts was the culmination of months of documentation, design, demolition and rigging. In order to stabilize the building, the crew essentially built a skeleton tower inside the existing tower. It was big. The entire crew should be commended for their hard work, determination and fortitude, but especially Brian Cox, Dave Ewing, Dan Boyle, Tom Glynn and Seth.

    It just so happens that the crew is delivering the belfry frame to the church today. Each of the full length belfry rafters are 12″x 12″x 14′ and weigh in at around 1200 lbs. We’ll keep you posted.

  • Breaking Eggs

    Breaking Eggs

    The last bell to leave the Revere Foundry leaves its perch. Photo by Scott Lewis
    The last bell to leave the Revere Foundry leaves its perch. Photo by Scott Lewis

    It is never a pleasure to break the news that a steeple should be removed to ground. It usually indicates a catastrophic level of deterioration and a total budget in six figures. We only make the recommendation when it is the best approach and the most economical. We remove a steeple when it is the most assured path to its restoration. These steeples define Maine’s skyline. They are one of the most important characteristics of New England’s shared architectural heritage. Every time, we worry that the steeple won’t be returned to its perch, but frequently, removal is one of the best fundraising motivators. Removing a steeple to the ground makes the job safer, it reduces staging costs. It allows us to preserve more original material. Usually, due to underlying frame damage, it isn’t just the best option, its the only option.

    It’s a sad day when a steeple is removed, but it’s exciting too. The whole crew is on site, along with a big crane. The rigging is a fascinating geometric puzzle and the removal sequence is a high-wire choreographed dance. This summer, we removed two such steeples, at Benton Falls and West Auburn.

    Benton Falls Congregational Church
    Benton Falls Congregational Church

    During my first assessment visit to Benton Falls, I squeezed through a hatch in the tower roof and emerged beneath the bell cradle, banging my helmet on the last bell ever to leave the Revere Bell Foundry. On my second visit, a few months later, no amount of beating would open that hatch. The tower plates were nearly non-existent, and Paul Revere’s last bell was slowly crushing through the roof.

    In the architectural glossary of my mind, Benton Falls illustrates “adorable”. This is from our original existing conditions assessment:

    Built in 1828, the Benton Falls Church is understated and intimate; it is embellished just enough to fit in with its surroundings, but not make a statement of its austerity. An archetypal rural Maine church, the gable-roofed main building is 38’ x 42’, with a 12’ x 12’ tower resting on the front gable wall and first interior bent. The tower is topped by an open, octagonal colonnade, notable for containing the last bell cast by the (Paul) Revere Bell Foundry in Canton, MA. The belfry is topped by a simple lantern and well-proportioned, eight-sided spire.

    Overall, the building is showing its age, alongside a history of committed Yankee maintenance.

    Belfry columns, stacked on ground. Photo by Scott Lewis
    Belfry columns, stacked on ground. Photo by Scott Lewis

    A few of the turned belfry columns were rotting, and would need to be extracted from the building. The turned portion of the column was only about half its length. The bottom half is a timber blank that telescopes deeply into the building and lands on a catty corner crab 8 feet below.

    Rigging stack and crab hashtag.
    Rigging stack and crab hashtag.

    We were not able to access the lantern and spire framing on our assessment visits, but the witch’s hat needed to be removed based on the condition of the belfry posts and tower roof alone. Standing on the tower roof, and tied into the framing, the crew re-enforced the lantern crab with a triple-stacked grid of KD (kiln-dried 2×10). Then they assembled rigging timbers by laminating together four layers of 2×12. The rigging timbers were stacked on edge, and crossed like a hashtag. They extended past the lantern by half its width. Eight rigging straps choked the ends of the rigging timbers, and were hung from a square steeple cage.

    Lantern crab center
    Lantern crab center

    The local CBS station, WABI 5, caught the crew rigging the steeple on crane day. The tv crew interviewed members of the congregation and neighbors about the importance of the church in their community. Congregants expressed their commitment to preserve the building with traditional in-kind repairs alongside the challenges of fundraising. By partnering with local craftspeople, we are able to cut costs, increase efficiency and share our knowledge, but these projects are expensive, especially for a small congregation. There are those who will promise they can do the job more cheaply. Unfortunately, it is cheap repairs, devoid of joinery and overly reliant on steel, that we are most frequently called upon to re-repair, twenty years later. There’s no fiberglass steeple that has lasted as long as a timber one.

    Lantern crab, mast and strap
    Lantern crab, mast and strap

    On the ground, we’ll be able to repair the belfry posts, and document the beautifully crafted spire. It has not one, but two gods-eye shaped crabs, one for the lantern, and another for the steeple, which is supported by a central mast. The crab and mast are secured with a wrought iron stirrup, pinned and wedged. Consistent with its age, the builders used a little bit of iron in the right places: to reinforce joinery at the crab’s center and at the ends of the trusses, preventing the rafter heels from blowing out their mortises.

    Spire crab and mast
    Spire crab and mast

    Benton Falls is currently raising money to restore their steeple, you can reach them on Facebook, where they also have a video of the steeple flying.

    West Auburn’s steeple was also removed this summer, using a similar rigging system. Both churches accessed the Maine Steeples Fund to help with assessment and repair costs. West Auburn got attention from the Sun Journal and NBC’s NewsCenter Maine. You can visit them on Facebook, too, where you can see photos of their steeple flying.

  • Lickety Lantern Brasen Hill Barn

    Lickety Lantern Brasen Hill Barn

    Hey, real quick! We’ve been cutting scarf fixes for enormous post feet, and fitting teleport pads for octagonal lanterns. Updates on Chestnut St Lantern, Brasen Hill Barn, and Jennison Barn, below.

    Teleport Pad

    Teleport Pad, Photo by Jacob Imlay

    Chestnut St Church Lantern, Camden, ME: This cute little lantern was cut and fit at the shop, and is ready for transport to the Lyman-Morse boat shop later this week. There it will be fit with a 50-foot fiberglass spire and four 7-foot half-round hoods. Jake laid out the frame and Tim, Zach and Charlie cut and fit the joinery. Zach’s experience building guitars and Tim’s experience making furniture helped maintain tight tolerances. The entire lantern and spire will be laid down on a low-riding flatbed for final transport to the church, where a crane will tip the entire assembly up vertical. It is important that the joinery is tight in order to withstand the torque and lateral loads. Scott, Tim and Arron worked with Taylor-made builders up in Camden to plumb the tower and repair the belfry post feet at the Chestnut St Church. More about removing the old spire, here.

    Lady Lantern
    Lady Lantern, photo by Jacob Imlay

    Brasen Hill Barn, Barrington, NH: Led by Dave and Dan, the rest of the crew have been busy with an enormous barn restoration at Brazen Hill Farm. The barn is beautifully hewn, with drive posts like tree trunks. The deterioration was extensive and the barn was completely dismantled for repairs. The extent of rot meant that the barn was heavily braced and was disassembled piece by piece by a crew of eight over two days.

    Brasen Barn from above, photo by Josh McNally
    Brasen Barn from above, photo by Josh McNally

    Dave, Dan, Tom, Byam and Michael have been busy making traditional timber frame repairs at our shop in Nottingham, NH. Given the extent of damage, the crew worked hard to preserve any viable original material. That means a lot of dutchman and post feet fixes. Dan Boyle documented the repair and fitting process. A few of his process photos, below.

    Undersquinted face fix, photo by Dan Boyle
    Undersquinted face fix, photo by Dan Boyle

    An under-squinted dutchman repair can be used to repair the cheek of a mortise where a pin has blown out the relish. The rest of the post was in good condition and of a dimension and quality that is difficult (but not impossible) to find today.

    Get (in the) Bent Brian
    Get (in the) Bent Brian, photo by Dan Boyle

    After the rotten timbers are repaired or reproduced, we use come-alongs to pull the joinery tight and the bent square. Then we drill holes for the 1-inch oak pins that will hold the joinery together.

    Eave fitting, photo by Dan Boyle
    Eave fitting, photo by Dan Boyle

    The barn is big, almost 70-feet long and 40-feet wide. It contains seven bents. The finished frame was raised almost a month ago, and Dave and Scott documented the process by helmet-cam. Stay tuned for the movie.

    Jennison Barn
    Jennison Barn, photo by Josh McNally

    Jennison Barn, Lee, NH: New Hampshire Preservation Alliance has featured the Jennison Barn as one of their 52 barns in 52 weeks. The NHPA article captures why preservation is important on a human scale, from families to communities. Read their story, here.

Think we can help? Get in touch.