Preservation in the field can take many forms. Most of the time, preservation is the most practical and reliable answer to a client’s needs, but there are times when pure preservation isn’t feasible, or reasonable (see Demeritt-O’Kane). The New Castle Congregational Church and gazebo offers an alternate model. The congregation has endeavored to preserve the main body of the church, repairing the undercarriage framing, and rebuilding the foundation under the rear additions of the building. When it came time to repair the dome topping the steeple, however, the building committee was faced with a proposal: if they allowed a cell tower to be built on top of the tower box, the cell company would pay for a new dome, in addition to monthly rent during the long-term lease. When the congregation chose to lease the space to the cell company, the dome was replaced with a hollow, fiberglass replicate.
Additionally, the cell company contributed to funds raised by community members for the complete restoration of the original dome. Some of the money from the cell tower helped to pay for a custom gazebo to support the restored dome. Its historical integrity was compromised, but at least the dome would be put to use.
The design process was a challenge. The building committee wanted a gazebo space that was large enough for weddings and other functions, but the original footprint of the belfry wasn’t big enough. From a design perspective, the gazebo needed to echo the original tower trim, but not overpower it. Due to distance and perspective, steeple cornice trim can be comically large when viewed up close; it is one of the most persistent surprises since I’ve started doing this work. Given these restrictions, Ed and Keith designed a gazebo that honored the original craftsmanship of the dome, without distracting from the classic composition of the church.
Frame design, shop drawings
The preservation of the dome was completed first. The huge, curved rafters reproduced using a Prazi beam cutter, which is a chainsaw bar and chain attached to a circular saw in place of the saw blade. The Prazi functions like a jigsaw on steroids. Other elements of the original framing were retained, like the struts that run diagonally from plate to mast.The gazebo’s timber frame design was ingenious. The eight-sided structure consisted of four main bents and four diagonal plates, which overlapped and connected the main bents.
Keith using drawknife to smooth curved brace
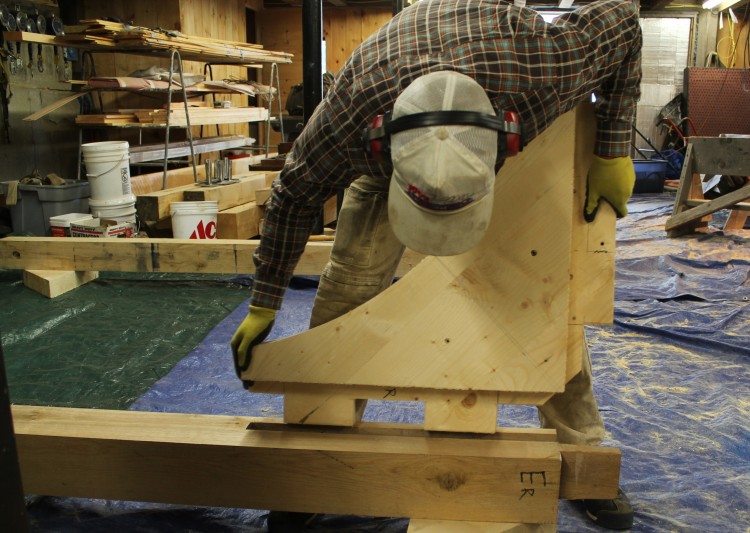
The curved braces were cut from a solid, 3″ thick glue-up. The curve was roughed out by the Prazi, and smoothed with a combination of drawknife, spokeshave, and sander.
Bent Stack
The main bents were assembled in the shop, their joints were pinned, and then stacked neatly. They were loaded onto the trailer and driven to New Castle, where we were met by a crane. The crane unloaded each bent from the trailer and stood the frame onto its feet already located on an octagonal concrete pad.
Placing Bents
As the bents were unloaded, they were braced temporarily, and capped with their respective plates, creating the alternate four faces. Working against the crane operator’s clock, we carefully laid sleepers across the plates and tapped them into their final resting places. Once the sleepers were placed, the crane lifted the cherry-colored dome and placed it on top.
Tarp-tented gaze-bo
The weather in the weeks that followed started with a heat wave and finished with a week-long downpour. When the weather threatened to derail and July 4th deadline, we opted to drape the entire structure in an improvised tarp tent.
Cornice detail
Under the tent, we were able to complete the cedar shingling of the skirt roof, hanging the cornice, casing the posts and braces and hanging beadboard on the ceiling. Our friend Iain Mackenzie turned and installed a custom balustrade. By July fourth, the tarp was removed, and New Castle was able to dedicate the gazebo on Independence Day.
Gazebo, completed (unpainted)
New Castle’s approach may not fit the preservation ideal, but it was a compromise that ultimately led to a new community space and the adaptive re-use of a significant architectural artifact. See more photos in our Flickr set.
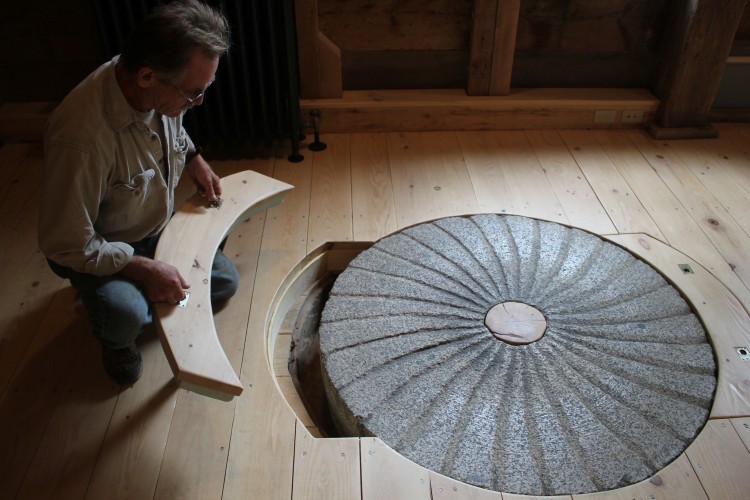
Chuck pulls up the access hatch and examines a millstone
If you grew up in Freedom, ME you’ve probably already toured the Freedom Mill, in high school, under the cover of darkness, at risk to life and limb. At its height during the 19th century, the mill had served as an economic engine for the area, using the water power at Freedom Falls to process grain and manufacture wooden dowels. By the 21st century, the mill was filled with piles of rotting sawdust, and teenagers who had nothing better to do and a misplaced trust in the floor framing. In 2011, Tony and Sally Grassi bought the property, seeing in the detritus an opportunity to preserve an historic landmark while stimulating the local economy.
Jesse Turgeon’s first post fix
The mill’s place in Maine’s history made this restoration especially meaningful for the crew at PTF. Our work places us within the long history of New England building craft, which includes its water-powered mills and early industry. PTF’s Northern Contingent had the pleasure of touring the nearly finished mill last week. A restaurant and an independent school are moving in. What the renovated mill now lacks in mischief and sheer danger, it makes up for by interpreting the industrial history of Maine, and creating a space for people to incorporate that history into their daily lives. We recommend heading up and taking a tour, before classes begin.
Foundations, old and new
Repairing the frame posed a number of unique challenges. The undercarriage needed full replacement, and because the mill was water-powered, it was built more than sixteen feet above a rushing stream. The crew rebuilt the undercarriage exactly as it was originally framed, threading 12″ x 16″ x 22′ joists through the building and over a complicated network of staging.
Scott marvels at the massive floor framing
In addition to the exposed wall framing and the antique mill-works hanging from the ceiling, view hatches throughout the building allow visitors to discover how the building functioned as an industrial space. In the main space, a hatch allows visitors to get a close look at an old mill wheel (see first photo, above). In the main entrance, the dowel drying racks were preserved, and a viewing window shows the series of radiator pipes over which they were built.
Lee points out a detail of the mill works
A small school is moving into one of the upper floors of the mill, the exposed framing surrounding the classroom and steeping students in their heritage. It is on these upper levels where the brace repairs are best observed, right at eye level.
Marriage Marks
The crew also dismantled, repaired and rebuilt an original ell addition. The roof framing is visible as students climb the stairs to their classroom, and in the commercial kitchen.
Preserved framing in rebuilt ell
Over lunch, we saw but a small slice of the work that has been completed at Freedom Mill. The Grassi’s website offers a lot more information on the history, the restoration, and opportunities to visit. It stands out among restoration-project-websites in its simple design and readability.
Middleton, NH is one of those friendly, tightly-knit communities where folks meet weekly for a potluck at the old town hall. The center of town is at a place known as Four Corners, at the intersection of Kings Highway and New Durham/Ridge Road. Our subject, the Old Town Hall, stands at one of the corners; at another is the new town hall, a third holds a small ranch house, and the last of the eponymous corners is an uninhabited, treed lot.
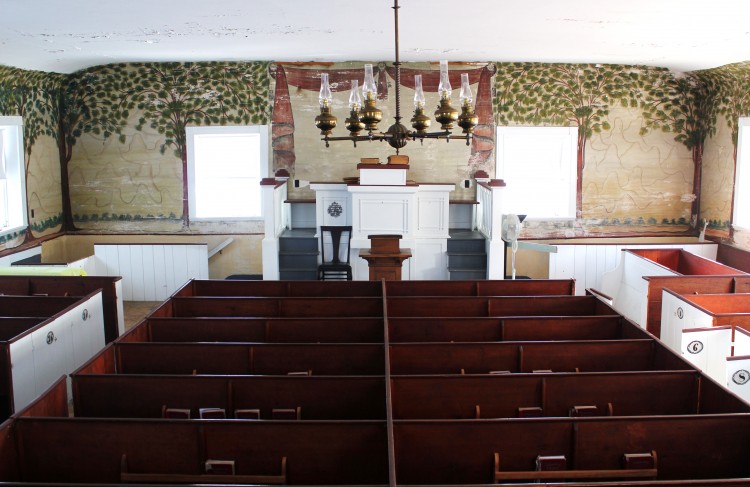
From the outside, the old town hall looks like a lot of other rural New England municipal buildings, with peeling paint, amoebic additions and a neighborly highway maintenance garage. Walk inside, and the impression is confirmed; a church-like basement, with long tables, well-scrubbed kitchen and slightly moldy odor. But the upstairs of this humble building contains on of the most impressive and completely preserved early 19th century meetinghouses I have ever seen. Upon entering the second floor, I felt like Lucy passing through the back of the wardrobe. The walls are decorated with a fanciful landscape mural with feathery trees and stalagmite-shaped mountains. The floor plan is laid out with a complete set of box pews, their stained interiors showing the scalloped marks of the maker’s handplane. The box pew doors were numbered by the same hand that painted the mural, John Avery, in 1841, and although most have been touched up, a handful with the original calligraphy and paint scheme remain.
Last year, Middleton received a matching grant for a conditions assessment of the Old Town Hall and attached Corner School. The grant was provided the New Hampshire Preservation Alliance which receives funding for its grants program from the N.H. Land and Community Heritage Investment Program (LCHIP). Currently, the New Hampshire state Senate is endorsing a budget that includes full funding for LCHIP, which would help more communities to preserve those buildings that define its history, and a sense of place.
Among the many historic buildings that I have had the good-fortune to visit, the Middleton Old Town Hall is one of the most charming and, sadly, most in need of immediate repair.
Read our report to find out what makes it so special. See more photos, here
The historic nature of our work gives Independence Day special meaning for us here at PTF. Two of our recent projects will be holding special celebrations to unveil their restored buildings:
New Castle Gazebo, almost finished
July 4, 2013, New Castle Congregational Church, New Castle, NH – Parade and ribbon cutting at the New Castle Congregational Church, 10a-2p. We have been negotiating with the rain these past two weeks to finish the trim on the gazebo. Since Friday, the gazebo has been covered by an enormous green tarp tent; so in this case, I mean unveiling literally.
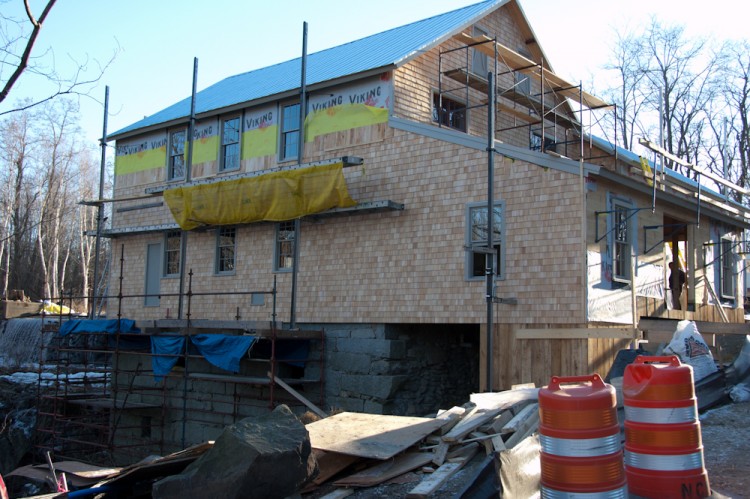
Mill at Freedom Falls, almost finished. Photo from millatfreedomfalls.com
July 6, 2013, Mill at Freedom Falls, Freedom, ME – In honor of Freedom, ME’s Bicentennial, the Mill will be giving tours on July 6, from 8:30 – 3:30. Read more about the tours on their blog, and please stop by.
Abyssinian Meetinghouse, photo by Troy R. Bennet for the Bangor Daily News
Last week, the National Trust for Historic Preservation announced it’s list of America’s 11 Most Endangered Properties. The Abyssinian Meetinghouse had the dubious distinction of making it on the list. Inclusion on the list indicates the importance of the third-oldest standing African-American meetinghouse in our nation’s history, but also sheds light upon the lack of funding to complete its restoration (you can make a donation, here). The announcement was made on June 19, Juneteenth, a holiday commemorating the day in 1965 when slavery was finally abolished in Texas. When I lived in Houston, Juneteenth was really celebrated, it couldn’t pass without one noticing as it does here in Maine. Many people in Maine don’t recognize the holiday, and don’t realize that we have a significant African-American and abolitionist history. Hopefully, this list will bring attention to the one of Maine’s most important artifacts of American history. Preservation Timber Framing is honored to be a part of the restoration process.
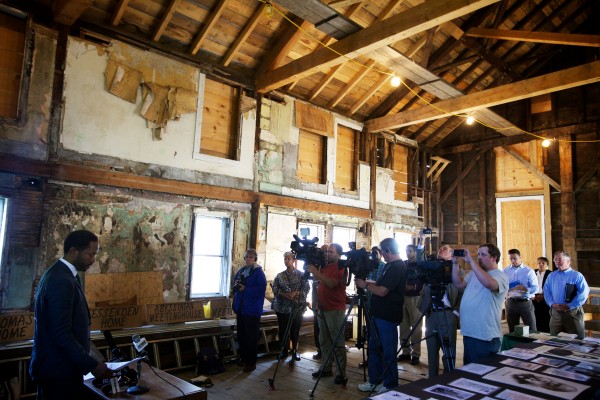
The press conference announcing the Abyssinian’s place on the list was rousing, and much more inspiring than other press conferences I’ve been to (and with a reporter dad, I’ve been to a few). It was covered particularly well by the Bangor Daily News, and also by WMTW and WDSH. The story made the cover of the Portland Daily Sun.
The Portland Press Herald published a particularly well-researched editorial to help generate support for the building. I learned about the 1898 shipwreck that drowned 19 congregants and ultimately led to the dissolution of the church. Read the article here.
And remember, the Committee to Restore the Abyssinian takes donations.
Last week we assembled Marrett House‘s 15 foot frame and panel wall and installed it. The day felt like a mini-crane day, with shoulders instead of cranes, and a mini-rush of adrenaline. When the day was over, and we’d reversed the effects of last April’s drunken car crash, I realized that time machines are not made from plutonium and flux capacitors, but patience and the right epoxy.
Shawn, administering a B-72 injection
The broken panels and stiles were glued together using Araldite, an epoxy filler, over B-72 as a release agent. A single piece required as many as three clamping stages and often requiring a custom clamping jig for each stage. For instance, in the case of a panel split down the middle, we needed to make a jig that protected the beveled, feather edges of the panels, and use cauls to ensure that the panel glued up flat.
Panel 10, epoxied and clamped
That same jig was much too large to be used to repair breaks in the bevel edge itself, and too narrow to repair the broken thumbnail on a stile. Each clamping jig needed to be large enough to distribute pressure evenly, but refined enough to allow us to observe the joint as we applied pressure. Because it was essential that we preserve the paint on either side of the break, if the pieces shifted even 1/32 of an inch during glue up, it would be too much, and the paint lines would not align.
Paint patch test, latex primer, then light filler
The client’s goal was to preserve as much material as possible, and for those repairs to be invisible on the surface. Where paint had flaked as a result of impact, we were asked to use fillers to even the painted surface, erasing ubiquitous paint “craters”. This phase of panel repair was best approximated in Paula Abdul’s song “Opposites Attract” featuring DJ Skat Cat; as we approached the right combination of barrier, epoxy and filler, it required a process of two steps forward and one step back. We completed a series of test swatches with using araldite, Dap filler and oil paint to determine which best produces an even surface. Ultimately, we settled on ready patch, a medium-weight spackling compound that dries almost too quickly.
When it was finally time to install the panel, it was so long that we couldn’t carry it though the building. It was so long that it would have been impossible to assemble in the room itself with the added length of clamps and human bodies. So we went through the front window. Scott, Lee, Shawn and I packed the assembled wall carefully in a cage of 2x lumber, carried it from the barn and passed it though the front wall.
Panel assembly, inside, from behind
Preserving the existing paint surface was important to the curators at the Marrett House, and they requested that we infill paint only. After three attempts of trying to approximate the color, I wish I could say that we found a paint that blended perfectly, but that would require more than just one color. There were more than six different shades of cream along the panels due to fading, dirt accumulation and previous attempts to clean the wall. Fortunately, the curators were pleased with the even surface and invisible seams and weren’t interested in us finding the right shade of dinge with which to wash parts of the wall. For right now, they are happy with the way the primer patches help them to tell the story of this wall’s ordeal.
As self-aggrandizing as it seems (this is a company blog, after all) I can’t recommend a tour of the Marrett House this summer highly enough. As much as I would like you readers to visit the North parlor and exclaim, “I can’t believe a drunk driver drove through that!” It is even more exciting to learn about the Marrett sisters and the history of preserving their family home. One sister taught Helen Keller at the Baxter School for the Deaf on Mackworth Island and you can read Keller’s letters upstairs. There is a likely story about how the locks on doors of the front parlor protected Portland’s gold during the War of 1812. If you are lucky and intrepid visitor, you can puzzle over the attic framing, the whole of which was lifted 2′ during the mid-18th century.
Sill repair, brace repair and stud repair
It’s too bad that Scott, Shawn and Lee’s meticulous frame fixes will be invisible to the visiting public, but more photos are available to the public visiting our Flickr page, and an upcoming blog post focusing on the frame repairs.
Frame repairs, laps and sisters
I know in my head that it is a terrible shame that a careless criminal drunk drove a stolen car through the parlor of a 220-year-old impeccably preserved home, but in my heart I feel fortunate for the opportunity to work closely with such fine craftsmanship.
Castine First Parish Church, photos by Lee Hoagland
On the northeastern side of Penobscot Bay in downeast Maine sits the town of Castine, an elegant town with a rich history. Our crew was called into town because some structural issues had been detected in its First Parish Unitarian Universalist Church. Having never visited before I was struck by the town’s wealth of early American architecture. I feel that a short note on the town’s early turbulent history goes a long way to support much of the building’s history. Castine was originally settled as a trading post in 1613 by the French. However, it spent the next century being taken back and forth between the Colonists, British and French, with even the Dutch having control for a bit. After the French and Indian War the Maine coast was opened up to the Massachusetts colonists, only to have it re-seized by the British in the Revolutionary War, which eventually led to the Penobscot Expedition, one of the greatest losses in American naval history. It then was briefly returned to the colonies, in which time Castine became a town (separating from neighboring Penobscot in 1796). Castine was then again re-seized by the British in the War of 1812, where they controlled it for the length of the war.
In the years that followed Castine was able to prosper thanks to the booming fishing and timber industries that ran through the Penobscot River and Penobscot Bay, making Castine the perfect place for ship captains to build their dream homes
The First Parish church that we are working on had originally started construction in 1790 and became a meeting house in 1796 with a steeple protruding out from the front gable. However, it did not have a minister until 1798. These dates are important because they correspond with the timeline of the town. The people of the town were most inspired during that time when they were rallying to be their own town. The need for a place to meet was essential in becoming a community, and not another military post.
Shawn working in tower box
According to our research the original design had a steeple and tower box out front. The joinery layout supported the research because the bent that makes up the front gable wall is referenced to the inside of the building, in the same direction as the rest of the bents. Typically the reference face on the exterior southern bent is flipped around so that that all exterior walls are referenced to the outside of the building. Thus we can make the conclusion that there was a tower box bent in front of what now is the front gable, making it an interior bent at that time.
Sweet dragon and cross in tower hip roof
The building stayed this way until the prosperous town was at yet another turning point. The First Parish Church represented more liberal Unitarian beliefs, and in 1828, a more conservative religious offshoot was created, calling themselves “The New Trinitarian Society,” and founding the Trinitarian Congregational Parish. By 1831, in an effort to stay with the times, the First Parish church took the steeple off the front, and installed a Greek Revival belfry on top of the front gable. In some readings it is described as a “joyful crown” and is thought to be a Bulfinch design. Inside the tower box, the joinery again supports this history. Each of the hewn posts are joined by scarf joints to sawn timbers that extend the box higher into a hipped roof. The hipped roof was constructed with a truncated dragon and cross joint to carry the hipped rafter. Between the scarfed posts and the roof three new girts were installed. Two girts run perpendicular to the bents and one runs parallel to the front gable, off the second bent. All three girts are supported by ascending and descending 4×5” braces which run by each other to tie that level to the top plate.
The fourth girt that makes up the tower box was once a tie girt in the bent adjacent the original tower box. This tie girt is located approximately two feet below from the additional three girts. Floor joists are cogged over these girts, running perpendicular to the bents. Four bed timbers rest on that floor. The bed timbers support the eight posts that create the belfry. These posts are 10×10” white pine from the level of the bed timbers to the roof frame, then turn into columns with ionic capping at the top. The bed timbers are in a concentric square inside of the girt level, their weight and the weight of the belfry posts supported by the floor joists, rather than directly over the girts. This caused the girts to roll in towards the interior.
Rotten belfry post
In the first half of 2012, Castine contacted PTF about a leaky roof. Since the posts penetrate the hipped roof, it creates eight holes in the roof that need to be flashed with the utmost care, so that water cannot run down the post and sit on the bed timbers, rotting out both the bed timber and the post foot. That is what happened in this church’s case. Thus we find our scope of work: to replace the rotted bed timbers and fix any post bottoms that might need it.
Jack and bracket supporting belfry post while bed timber is replaced
One of the real challenges on this project was to lift all of the posts, and everything above the tower box, to access the old bed timbers while still being able to move our new timbers into position. We threaded 2x8s into the tower box and screwed them to the studs and braces of the tower box creating a laminated beam just outside the ring of belfry tower posts. Then we used other 2×8 beneath the laminated beam as jack studs, transferring the load directly to the tower girts. We lag-screwed an L-shaped steel bracket to each post, and used hydraulic jacks on top of the laminated beam to lift the bracket and the post it was attached to. This gave us the opportunity to lift all the posts while having the entire interior of the tower box to do our work.
Only half of one bed timber looked original, sitting in same orientation as the others which looked like mid-20th century fixes. This led us to believe that flashing must have leaked at least once before. When we removed one of the newer bed timbers, we found a signature and date of 1936. This also matched up with church records.
Tom, post fix, and bed timbers
We decided that since we were replacing so much and needed to lift the entire belfry that we had an opportunity to change the design for the better and used a common historical design in which the bed timbers are run from the middle of connecting eave walls, picking up two of the posts. This transferring of the weight onto the girts spreads the load out onto the walls and off the floor joist. To do this, we needed a fourth girt in which would run coplanar with the three other girts. So we fabricated a girt that joined to the posts with free tenons inserted in the bottom of the girts, allowing it to take horizontal tension and vertical compression.
Rolling bed timber into building
Now that we had a coplanar box we were able to bring up our 9×12” white oak bed timbers. One of the big challenges of this project was getting the timbers up to the tower box while only having interior staircases to move through, but we were able to get them where needed them to go through a series of rigging. Fortunately all of the members were just small enough that they could fit.
Inserting bed timber
We had two chain falls that helped immensely and with that we fabricated slides out of dimensional lumber that saved all around wear and tear. We all really get our jollies off during this kind of rigging and by the time it was over we felt more connected than ever with the timber framers of the past in the ever present quest to lift heavy things up high.
New girt installed in front bent
After the bed timbers were in place we were able to connect them to the belfry posts using free tenons that engaged the bed timbers. Although we were confident in the soundness of the timber elements we installed threaded rod between the girts and the bed timbers and between bed timbers and posts creating a tension connection that would help hold the belfry to the tower box and the rest of the building. This gives the belfry additional stability, which is helpful in cases of extreme weather.
Overall, we enjoyed the dynamic nature of the project and the rich history of Castine. We found the locals to be friendly and knowledgeable and the ocean views to be one of a kind. Although Castine doesn’t have the fame that some other early battleground areas do, it has a staggering significance in its role in the shaping of both the State of Maine and the United States.
-Lee Hoagland
Click on the slideshow below for more photos from the Castine project:
Shawn, showing his pin extraction method. Photos by author
Yesterday we began the dismantling the Marrett House panels in order to repair the broken stiles and rails. Above, Shawn shows his method for extracting the pins. He drills a tiny hole through the center of the pin, then threads a screw into the hole until it just bites, and then uses a hammer claw and a lot of padding to pry the pin out. This method prevents the blowout and denting that might occur from trying to knock the pin all the way through the joint.
Wedging the underside of the joint to avoid denting the wood.
Unbelievably tight joinery made the dismantling process both frustrating and inspiring. We softly tapped a handful of soft-wood wedges into the backside of the joint between stile and rail, and checked again and again to make sure that there were no pins or tiny nails or frass creating the unholy friction that prevented the stile from moving more than 1/32 per tap.
Panel Joinery, with end stile finally removed
Once we got the stile off, we thought we’d find a fox wedge, but there was none, just incredibly tight joinery, and stunning coping. The interior edge of stiles and rails are decorated with a thumbnail profile, and the thumbnails are coped to one another rather than mitered. Coping is the process by which the negative profile of one molding is cut into the backside of another. Good carpenters cope crown and other moldings when they meet at right angles to one another so that when the joint moves with humidity changes, the molding beneath the cope is revealed, rather than a gap. Some carpenters do it better than others, and this guy was among the neatest I have seen.
Coping detail, stile to rail
I took a lot of photos of the process; click on the slideshow below for more.
Marrett House Panels, laid out, from loft above. Photos by author
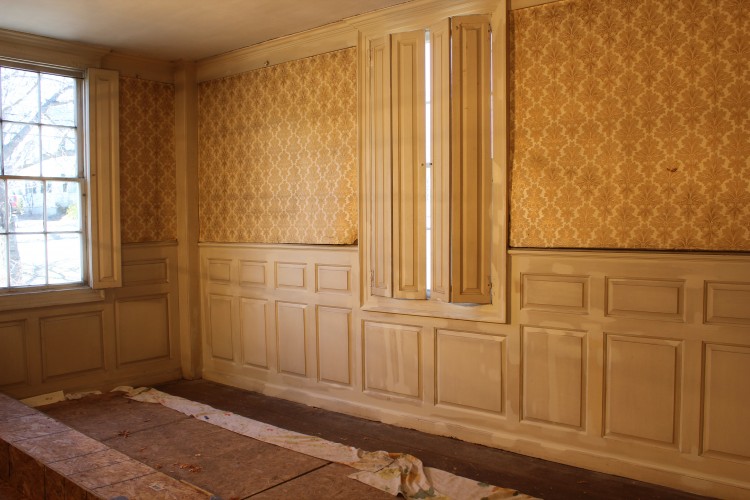
A year ago last April, just after rush hour, a man stole a Suburu in Cape Elizabeth, drunk-drove it to Standish, crossed two lanes of traffic, surfed a lawn and crashed into the Marrett House, coming to rest in its historic parlor. The stout framing members were fractured and the frame and panel wainscot splintered, but the wall’s 12-lite window survived. Not a single pane of original glass was broken. The plaster wall adjacent the window was thrust inwards and the split lath separated from the broken studs, but the 1847 wallpaper pasted to it remains intact. It’s wacky that, out of all the buildings along the way, the driver hit a well-preserved relic of the late 18th century, set well back from the road. And I can’t decide whether that’s good fortune or bad. Route 25 is a well-traveled road, and at least that part of the Marrett House is uninhabited.
Broken stile, just below window. Photo by Shawn Perry
The night of the crash, employees of Historic New England worked late into the night stabilizing and weatherizing the wall. In the following weeks, conservators carefully collected and organized the shards of woodwork and PTF assisted with flashing and estimated the repairs. When PTF came back to site three weeks ago, nearly every piece of splintered woodwork was inventoried and accounted for. Half of the paneled wall was still ajar, in place, and the other half lay in the barn loft, spread out like an exploded schematic.
Broken framing, shoved wall. Photo by Shawn Perry
This is an exciting and challenging project for us. The specifications are detailed and Historic New England requires strict oversight, but the process allows us to learn about other conservation technologies and refine our methodology. Museum clients prioritize conserving material and reversibility more than private clients. Where a private client might want a dutchman repair to a broken stile or rail, well-cemented to the original material, Historic New England wants to preserve the shards of original material, and a barrier layer of Paraloid B-72 between the epoxy and the original wood. While we usually would use West System, a brand of epoxy that has good adhesion, penetration and permanance, here the client requested Araldite, an epoxy that doesn’t penetrate the surface and, with a barrier layer, is ultimately reversible. Ultimately, it is much nicer to work with a client who really cares about their property rather than one who doesn’t really care what we do or how we do it. Fortunately, clients who don’t care about their building don’t choose PTF.
Shawn, the left stile, and mortising chisel marks from a hand-chopped mortise.
For me, the exciting part of this project is fitting together the shards of wood like a jigsaw puzzle. The task allows me to connect with the mind of the original builder, and explore his methods of construction, as well as reminisce about the 1000-piece jigsaw puzzles my aunt, my mother and I used to construct every Christmas. With all the work that Historic New England completed before we got there, I think the Christmas puzzles might have been harder.
Riven lath with the quality of stain-grade trim
The plaster hangs on individual riven lath, which fell out of fashion soon after the Marrett House was built. By 1800, most houses were built with split-board, or accordian lath, in which a single wide board, of low quality, is split and stretched down the studs. The riven lath at Marrett House is perfectly clear with impossibly straight, tight-grain; the kind of wood that many carpenters lament can’t be found today to be used for interior trim and parlor reproductions.
The quality of lath may have contributed to the survival of the plaster and wallpaper that hung on it. In the third photo, above, one can see the degree to which the wall was pushed into the room, and the damage to the studs. It should be noted that the original studs and sill were in unusually sound condition, and showed no signs of rot. The car hit the wall with enough force to completely sever the studs from their joinery.
The Marrett House project is already well on its way to completion. The stud repairs have been fit, the B-72 and epoxy arrived yesterday, and we will begin test-gluing the panels tomorrow. It’s a shame that such an historic artifact suffered from the random recklessness of a drunk driver, but the very qualities that lent this building its longevity allowed it to survive such an injury. Many of our historic buildings have suffered far worse from roof leaks and poor maintenance.
Marriage marks in stud and sill
I hadn’t seen before marriage marks like the ones used to align framing members in the west wall; I wonder whether they might be unique to the builder or to the region. Has anyone out there wandering the interwebs come across this type of marriage mark before?
For more photos of the marriage marks, riven lath and the rest of our process, click on the slideshow, below:
Arron and Jess in front of Seated Bear. Photo by Shawn Patrick Ouellette, Portland Press Herald
On Sunday, the restoration of Bernard Langlais’ wooden sculptures was covered in a full page spread of the Maine Sunday Telegram. It was a pleasure to talk with Bob Keyes, and Shawn Ouellette, of the Portland Press Herald, and to meet the with the folks who raised the money to make this restoration possible. The Ogunquit Museum of American Art is still trying to raise money for the restoration of “Horse in Field.” We’ll start taking the lion apart tomorrow, and I can’t wait. Read the article, here.